How to Implement Failsafe Enforcement with In-App Detection
What is Failsafe Enforcement?
Failsafe Enforcement allows mobile apps to handle detected threats with precision and flexibility. When you enable this feature, it enhances the selected In-App Detection Threat Event by delaying the enforcement action, giving your app control over how and when the user is notified. This approach ensures that the app can provide a smooth user experience while still addressing security threats effectively.
By leveraging the Failsafe Enforcement functionality, mobile app developers unlock enhanced user experience options, offering added layers of notification sophistication through features such as the App Compromise Notification and versatile Short Message Options.
Note: The Short Message Options are available for Android apps only.
How Does In-App Detection with Failsafe Protect Mobile Apps
Failsafe Enforcement consists of three components:
A Failsafe Window: The failsafe window countdown starts the moment the threat event is sent from Appdome to the protected app. The failsafe enforcement window can be set between 1 and 60 seconds.
The enforcement action will occur at the earliest of two scenarios: (1) the protected app has sent the “EnforceThreatEvent” to Appdome, or (2) Appdome did not receive a response from the protected app within the Fail-Safe window.
Notify on Failsafe Enforcement: If Appdome does not receive a response within the failsafe window, the app closes when the window expires.
Notify on App Triggered Enforcement: Your app controls the timing of the enforcement by sending the “EnforceThreatEvent” command to Appdome within the defined window. Once Appdome receives the command, it promptly exits the app. However, if Appdome doesn’t receive the command, the app will close when the failsafe window expires.
Using Threat Events with Failsafe Enforcement
Failsafe Enforcement provides app developers with the ability to control when Appdome enforces a detected threat, allowing the app to perform custom logic before enforcement is triggered.
To utilize this feature:
-
Set the Threat Event of the selected feature to In-App Detection w/FailSafe
-
Enable the Threat-Event Failsafe Enforcement option
-
Handle the Threat Event within your app logic
-
Notify Appdome to enforce the event by sending an EnforceThreatEvent with the original event data
If the app does not send the enforcement signal within the configured failsafe window, Appdome will automatically enforce the action.
Android Example (Broadcast API)
On Android, use a Broadcast to receive the Threat Event, handle it, and then send the enforcement signal:
import android.content.BroadcastReceiver
import android.content.Context
import android.content.Intent
import android.os.Bundle
import android.util.Log
import com.example.threateventlogger.MainActivity.Companion.DEV_EVENTS_PERMISSION
import kotlin.random.Random

class ThreatEventReceiver(): BroadcastReceiver() {

    companion object {
        const val FAIL_SAFE_CALLBACK = "EnforceThreatEvent"
        const val FAIL_SAFE_TRIGGER =
            "ActiveVpnDetected" // Change to use the detection you are interested with
    }

    override fun onReceive(context: Context?, intent: Intent?) {
        if (intent == null) {
            return
        }
        val eventId = intent.action ?: return
        val bundle = intent.extras

        Log.e("TAG", "ThreatEventReceiver: received intent for eventId: $eventId")

        /**
         * Add your own logic here :)
         */

        if (eventId == FAIL_SAFE_TRIGGER && context != null) {
            val outIntent = Intent(FAIL_SAFE_CALLBACK).apply {
                setPackage(context.packageName)
                if (bundle != null) putExtras(bundle)
            }
            context.sendBroadcast(outIntent, DEV_EVENTS_PERMISSION)
        }
    }
}
iOS Example (NSNotificationCenter)
On iOS, use NSNotificationCenter to listen for Threat Events, perform your internal logic, and then trigger enforcement:
// Call startListening()

import Foundation

extension Notification.Name {
    static let FailSafeEnforcementEvent = Notification.Name("EnforceThreatEvent")
    static let AntiVPNDetected = Notification.Name("ActiveVpnDetected")
}

//call startListening() from AppDelegate.swift
func startListening(){
  let mappings: [(Notification.Name, String)] = [
   (.AntiVPNDetected, "ActiveVpnDetected"),
  ]

  // Listen on MAIN to keep UI updates simple
  tokens = mappings.map { (name, friendlyName) in
     NotificationCenter.default.addObserver(
      forName: name,
      object: nil,
      queue: .main
     ) { [weak self] note in
      self?.handle(note, friendlyName: friendlyName)
     }
    }
 }

 private func handle(_ note: Notification, friendlyName: String) {
  let info = (note.userInfo as? [String: Any]) ?? [:]

  // Add your own logic
  // Example: eventId for failsafe = "AntiVPNDetected".

  if note.name == .AntiVPNDetected, let userInfo = note.userInfo {
     NotificationCenter.default.post(name: .FailSafeEnforcementEvent, object: nil, userInfo: userInfo)
  }
 }
Note: Register the observer once (for example, during app initialization) to avoid duplicate handlers.
Prerequisites for using Appdome Failsafe Enforcement
To use Failsafe Enforcement, you need:
- An Appdome account – Appdome DEV or Higher.
- A Threat-Events license
- A license for In-App Detection with Failsafe
- Mobile App (.ipa for iOS, or .apk or .aab for Android)
Step-by-Step Guide to Implement Failsafe Enforcement
Follow these steps to implement Failsafe Enforcement in your iOS or Android app.
Note: While this guide uses Root Detection as an example, you can enable Failsafe Enforcement for any feature that includes Threat Events.
-
-
Upload Your App to Appdome
-
Upload Method: Appdome Console or DEV-API
-
Android Formats: .apk or .aab
-
Root Detection Compatible With Java, JS, C++, C#, Kotlin, Flutter, React Native, Unity, Xamarin, Cordova, and other Android apps
-
-
Build the Root Detection Feature Using Appdome’s DEV-API:
- Create and name the Fusion Set (security template) that will contain the Root Detection feature as shown below:
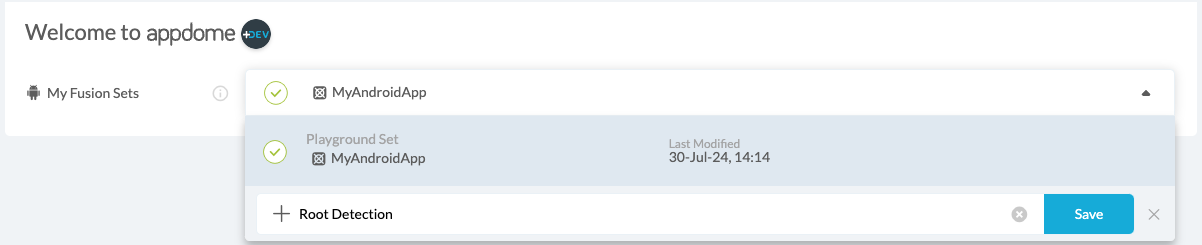
Figure 1: Fusion Set that will contain the Root Detection feature
Note: Naming the Fusion Set to correspond to the protection(s) selected is for illustration purposes only (not required).
- To add the Root Detection feature to this Fusion Set, follow the steps in the section “Building the Root Detection feature via Appdome Console” of this article.
- Open the Fusion Set Detail Summary by clicking the “…” symbol on the far-right corner of the Fusion Set, as shown in Figure 1 above, and get the Fusion Set ID from the Fusion Set Detail Summary (as shown below):
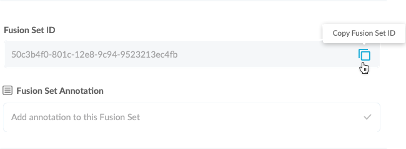
Figure 2: Fusion Set Detail Summary
Note: Annotating the Fusion Set to identify the protection(s) selected is optional only (not mandatory).
- Follow the instructions below to use the Fusion Set ID inside any standard mobile DevOps or CI/CD toolkit like Bitrise, App Center, Jenkins, Travis, Team City, Circle CI, or other systems:
- Build an API for the app – for instructions, see the tasks under Appdome API Reference Guide
- Look for sample APIs in Appdome’s GitHub Repository
- Create and name the Fusion Set (security template) that will contain the Root Detection feature as shown below:
-
Build the Root Detection Feature via Appdome Console
- To build the Root Detection protection using Appdome Console, follow the instructions below.
- Where: Inside the Appdome Console, go to Build > Security Tab > OS Integrity section.
- How: Toggle on Root Detection, as shown below.
- Click on the Threat Events checkbox
- Select In-App Detection w/FailSafe from the drop-down menu
- Optional: Turn on Notify on Failsafe Enforcement
- Optional: Turn on Notify on App Triggered Enforcement
- Threat-Events™ ON > In-App Detection w/Failsafe
Once this setting is enabled, Appdome will begin enforcing specific detections, but only after a fixed timeframe specified by the app developer.
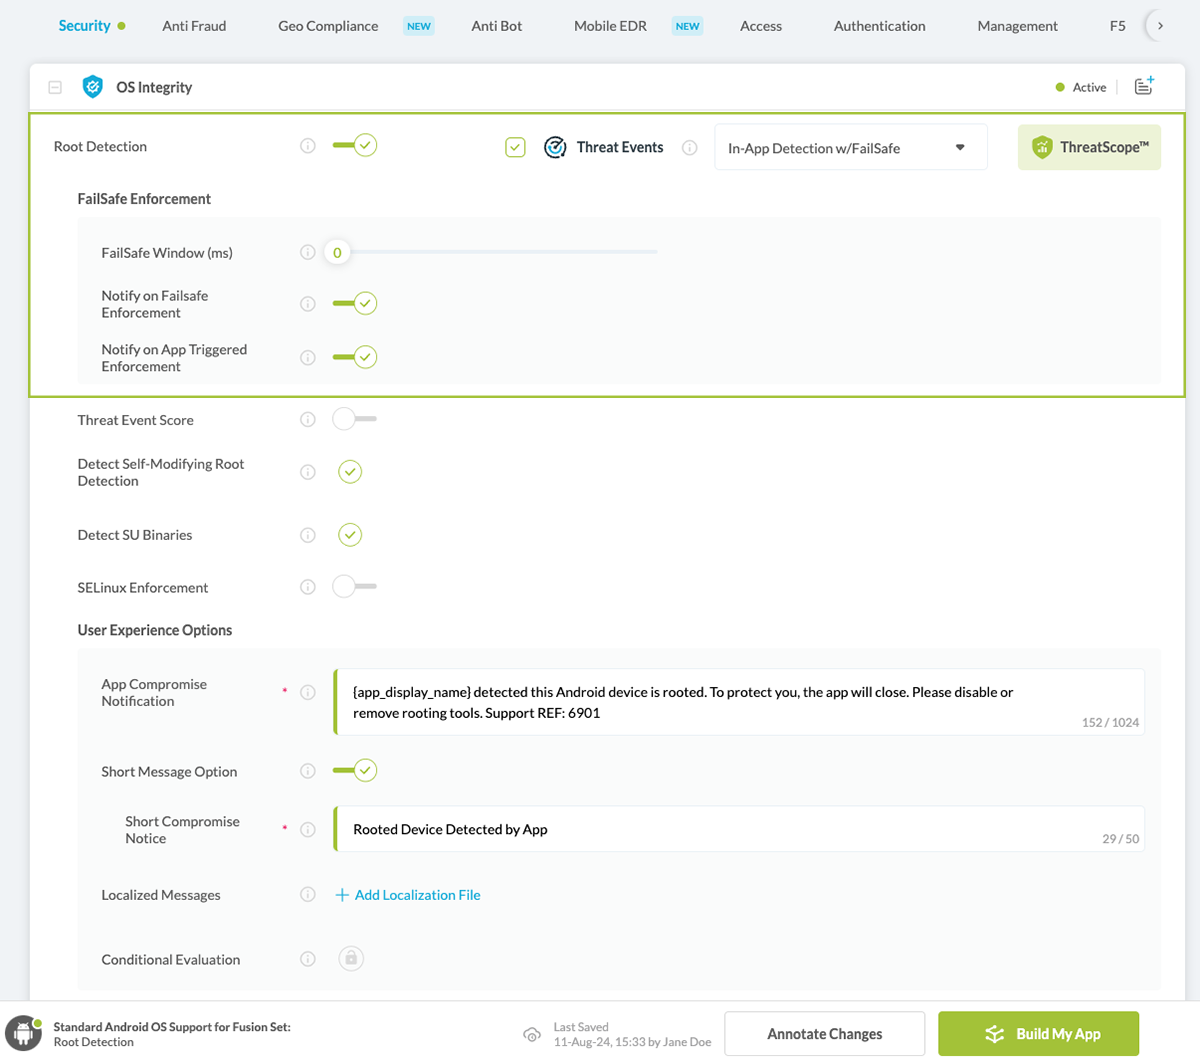
Figure 3: Detect rooting option
Note: The App Compromise Notification contains an easy-to-follow default remediation path for the mobile app end user. You can customize this message as required to achieve brand-specific support, workflow, or other messaging. - After you select Root Detection, you’ll notice that the Fusion Set you created now bears the icon of the protection category that contains Root Detection.

Figure 4: Fusion Set that displays the newly added Root Detection protection - Click Build My App at the bottom of the Build Workflow (shown in Figure 3).
-
Congratulations! The Root Detection is now added to your mobile app
Certify the Root Detection feature in Android Apps.
After you build Root Detection, Appdome generates a Certified Secure™ certificate. This certificate guarantees that the Root Detection protection has been added and is actively protecting the app. To verify the protection, locate it in the Certified Secure™ certificate.
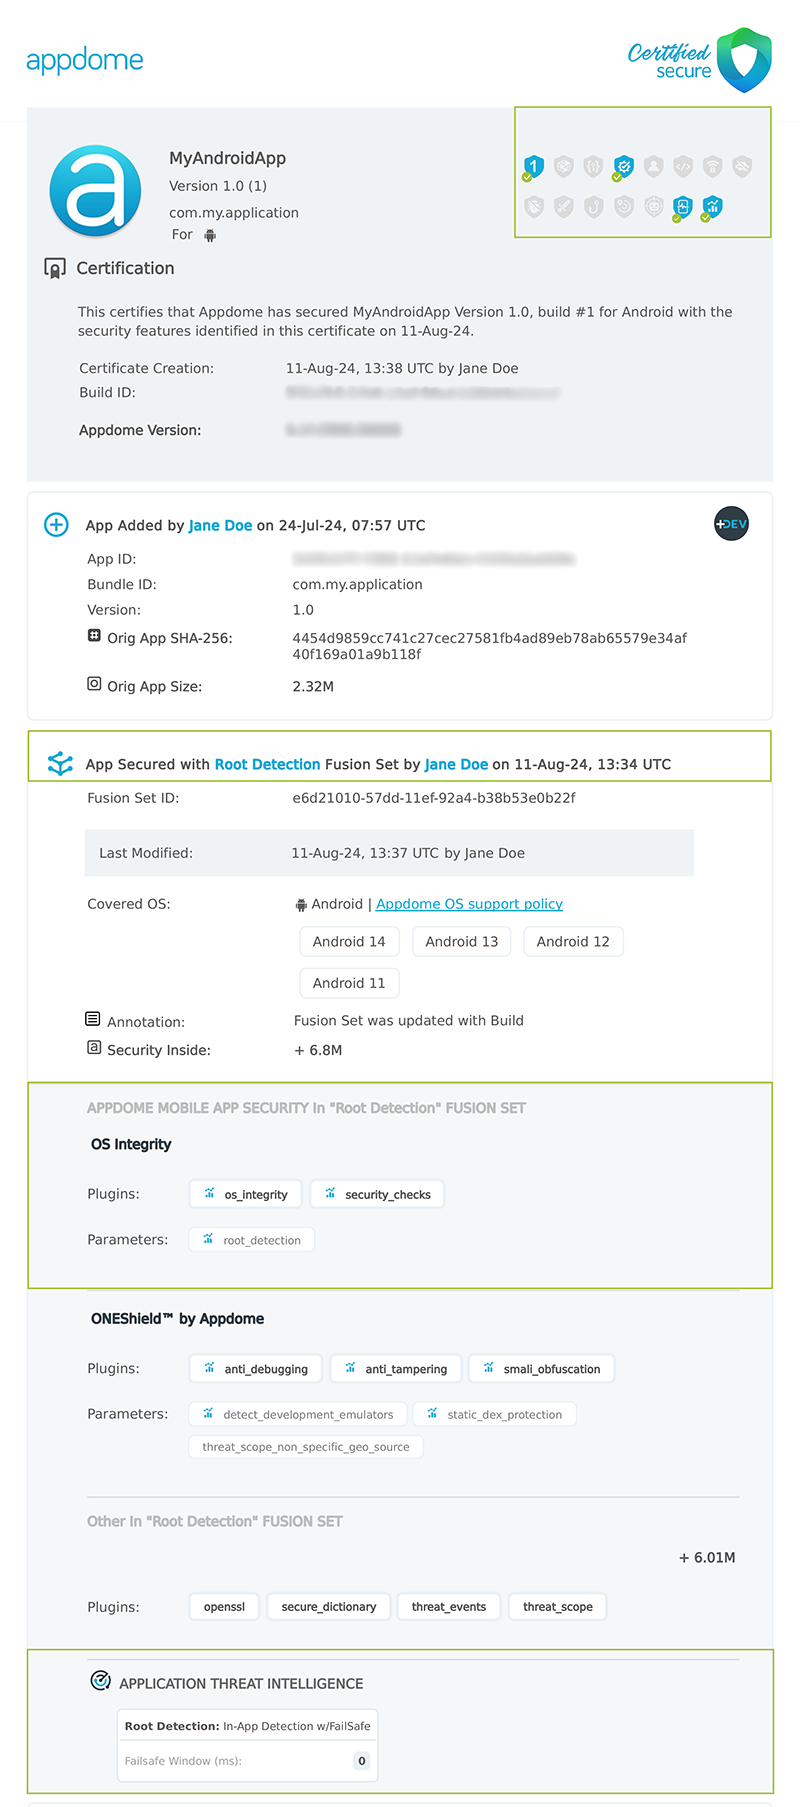
Figure 5: Certified Secure™ certificate
Each Certified Secure™ certificate provides DevOps and DevSecOps organizations with the entire workflow summary, audit trail of each build, and proof of protection that Root Detection has been added to each Android app. Certified Secure provides instant and in-line DevSecOps compliance certification that Root Detection and other mobile app security features are in each build of the mobile app.
Related Articles
- Threat-Events in Android & iOS Apps Explained
- Threat-Events™, In-App Threat Intelligence in Native iOS Apps
- Threat-Events™, In-App Threat Intelligence in Kotlin Apps
- Threat-Events™, In-App Threat Intelligence in React Native Apps
- Threat-Events™, In-App Threat Intelligence in Swift Apps
- Threat-Events™, In-App Threat Intelligence in Native Android Apps
How to Learn More?
If you have any questions, please send them our way at support.appdome.com or via the chat window on the Appdome platform.
Thank you!
Thanks for visiting Appdome! Our mission is to secure every app on the planet by making mobile app security easy. We hope we’re living up to the mission with your project.