How to Secure Android & iOS Apps in CircleCI Pipelines
Appdome’s Build-2Secure Orb for CircleCI is an out-of-the-box CircleCI integration, making it easy for mobile developers to secure Android & iOS apps in CircleCI pipelines. In addition, you can automate the build, signing, and certification of security, anti-fraud, and other protection in Android & iOS apps in CircleCI pipelines. No code and no SDKs are required.
The purpose of Appdome’s Build-2Secure Org for CircleCI is to streamline and accelerate cyber and anti-fraud delivery in CI/CD pipelines. To do this, the Build-2Secure Orb for CircleCI automates three important steps in delivering more secure mobile applications to your users quickly:
(1) Building the selected app-level protections into mobile apps.
(2) Code signing the Appdome-protected mobile app.
(3) Certifying the defenses inside each Appdome-protected mobile app.
The Appdome Build-2Secure Orb for CircleCI delivers Certified Secure™ mobile app security, anti-fraud, anti-malware, mobile anti-bot, and other cyber defense updates in mobile apps on Appdome’s Cyber Defense Automation Platform. Use this Orb for CircleCI as a stand-alone DevSecOps integration or in combination with other DevSecOps integrations in your CI/CD pipeline.
For more general information on this Orb, see Orb Authoring Process on the CircleCI website.
Here are the step-by-step instructions on using the Appdome Build-2Secure Orb for CircleCI.
Prerequisites for using Appdome’s Orb for CircleCI
Before you use Appdome’s Orb for CircleCI, there are a few things you’ll need to have:
- An Appdome SRM account
- Appdome Build-2Secure API token
- Fusion Set ID
- A CircleCI account
- Review Network Requirements for Using Appdome Build-2Secure API
Step 1: Installing the Build-2Secure Orb for CircleCI
Edit your .circleci/config.yml favorite IDE with the CircleCI in-app configuration editor.
- Ensure that the CircleCI version, which is displayed at the top of your .circleci/config.yml, is 2.1.
version: 2.1
- Add the orbs block (stanza) below your version and install Appdome Build-2secure in CircleCI by adding the following to your .circleci/config.yml, where X.Y.Z represents the version number; for example, 2.3.1.
orbs:
  build-2secure: appdome/build-2secure@X.Y.Z
Alternatively, set the version to volatile to get the latest version.
orbs:
  build-2secure: appdome/build-2secure@volatile>
Step 2: Configuring the Build-2Secure Orb for CircleCI
In order to use Appdome’s Build-2Secure Orb, it’s necessary to obtain the Appdome Build-2Secure API Token. For more information on how to copy the API token, please refer to the article Getting and resetting your API Token. Once you have copied the API token, add it as an environment variable in CircleCI.
- Navigate to the Project Settings section on CircleCI’s platform.

- From the menu on the left,
- Click Environment Variables
- Click Add Environment Variable.
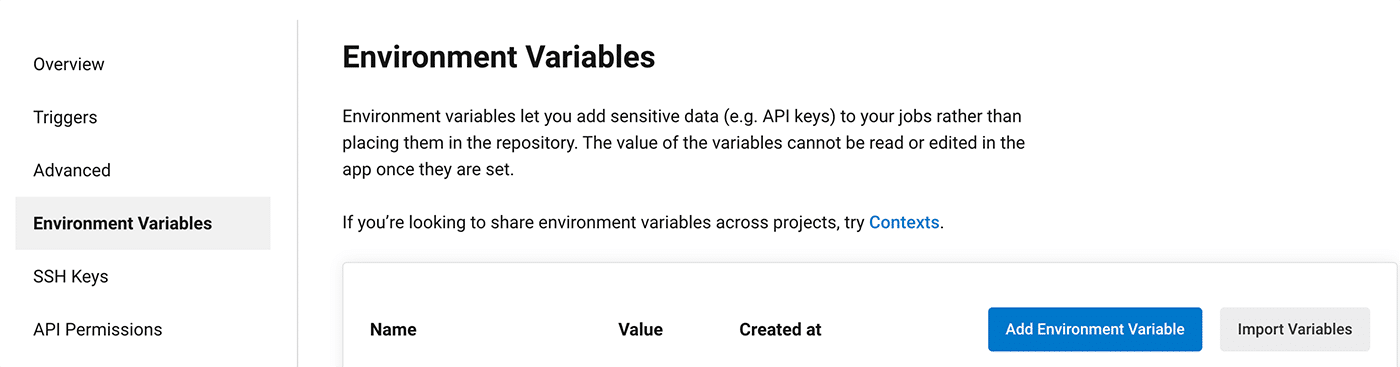
- Use the App Environment Variable dialog box to add the Appdome Build-2Secure API Token variable by entering the following values:
Name: APPDOME_API_TOKEN
Value: <YOUR_APPDOME_TOKEN>

- In addition to your APPDOME_API_TOKEN, make sure to insert your iOS or Android Fusion Set ID to CircleCI’s Environment Variables:
- For iOS apps, add the following variables:
Name: FUSION_SET_ID_IOS
Value: <Appdome_Fusion_Set_ID_For_iOS> - For Android apps, add the following variables:
Name: FUSION_SET_ID_ANDROID
Value: <Appdome_Fusion_Set_ID_For_Android>
- For iOS apps, add the following variables:
- Add Appdome Build-2Secure to your job by calling it from the jobs block of your .circleci/config.yml file, as shown in the base template below.
For additional usage examples, see the Appdome page on CircleCI website.workflows: Appdome fusion: jobs: - build-2secure/appdome_runner: runner: <type_of_run> team-id: <your_team_ID> - remove this line when working on personal workspace. appFile: <remote_app_location_of_the_non-protected_app> output: <secured_app_file_name> sign-overrides: <path_to_remote_JSON_download_file_location> google-play-signing: <true_or_false> - (For Android only!). build-with-logs: <true_or_false> second-output: <true_or_false> build-to-test: <vendor_name_to_testing("BITBAR" or "BROWSERSTACK" or "LAMBDATEST" or "SAUCELABS")> - In the code block below, set the following variables with the parameter values as described below:
6.1 runner
Any of the following options, in accordance with the build platform you need and the sign type:- ANDROID_AUTO_SIGNING
For more information, follow the instructions in the article:
How to Code Sign Secured Android Apps in DevSecOps Build System. - ANDROID_PRIVATE_SIGNING
For more information, follow the instructions in the article:
How To Privately Code Sign Sealed Android Apps using DevSecOps Build System. - ANDROID_AUTO_DEV_SIGNING
For more information, follow the instructions in the article:
How to Automate Secure Android App Code Signing in DevOps CI/CD. - IOS_AUTO_SIGNING
For more information, follow the instructions in the article:
How to Use Code Sign on Mac for Secured iOS Apps. - IOS_PRIVATE_SIGNING
For more information, follow the instructions in the article:
How to Privately Code Sign Sealed iOS Apps using DevSecOps Build System. - IOS_AUTO_DEV_SIGNING
For more information, follow the instructions in the article:
How to Automate Secure iOS App Code Signing in DevOps CI/CD. - 6.2 team-id
Insert your team-id. This line is optional and may be removed when working on a personal workspace. - 6.3 appFile
Please provide the remote address of the non-protected application. For example, “https://[URL_of_your_non_protected_app]”. - 6.4 output
The requested name of the secured application is: appdome_secured_app.apk/.aab/ipa - 6.5 sign-overrides
Include this parameter with the path to a JSON file only if you want to override signing with a custom JSON file. Otherwise, remove this line. - 6.6 google-play-signing
For Android only. Either leave the default value False or change the value to True if you use Google Play App Signing to allow developers to offload the signing of their release APKs onto Google, change the value to True
- ANDROID_AUTO_SIGNING
7. Second Output (.aab apps only): If you’d like to use this option, change the code to ‘true’ and set a path for the second .apk file to be downloaded. Specify a full path for the application. The second output will be saved under the name: “Appdome_Universal_App.apk”.
If you’d like to continue working with the universal apk in the next job, you must use this path to access the universal apk:
$HOME
/appdome_workspace/appdome_outputs/Appdome_Universal_App.apk
Note: this option is relevant only for apps signed with Appdome Auto Sign or Private Sign. Not applicable for Auto-Dev Private Signed apps.
8. Build to test: allows automated testing of Appdome Secured Apps in standard DevOps testing suites.
Do not use this service for individual device testing.
Specify the supported Testing Service: “BITBAR”,”BROWSERSTACK”,”LAMBDATEST” or “SAUCELABS”
Note: for iOS – only Saucelabs is supported.
9. For each type of sign, you must add the following environment variables as explained above.
Note: Certain sign options require files. The file must first be encoded using the base64 method, and the output of this process must be stored within the specified environment variable, as described in the section “Adding Files as Environment Variables Using Base64 Encoding” below.
-
-
-
-
- ANDROID_AUTO_SIGNING
- Name: KEYSTORE_FILE
Value: <Keystore_base64_File> - Name: KEYSTORE_PASSWORD
Value: <Your_Keystore_Password> - Name: KEYSTORE_ALIAS
Value: <Your_Keystore_Alias_Name> - Name: KEYSTORE_KEY_PASSWORD
Value: <Your_Keystore_Key_Password>
- Name: KEYSTORE_FILE
- ANDROID_PRIVATE_SIGNING
- Name: SIGN_FINGERPRINT
Value: <Your_SHA1_Fingerprint>
- Name: SIGN_FINGERPRINT
- ANDROID_AUTO_DEV_SIGNING
- Name: SIGN_FINGERPRINT
Value: <Your_SHA1_Fingerprint>
- Name: SIGN_FINGERPRINT
- IOS_AUTO_SIGNING
- Name: KEYSTORE_P12_FILE
Value: <P12_Keystore_base64_File> - Name: P12_PASSWORD
Value: <Your_P12_Keystore_Password> - Name: MOBILE_PROVISION_PROFILE_FILE
Value: <Mobile_Provision_profile_base64_file> - Name: ENTITLEMENTS_FILE
Value: <Entitlement_base64_file>
- Name: KEYSTORE_P12_FILE
- IOS_PRIVATE_SIGNING
- Name: MOBILE_PROVISION_PROFILE_FILE
Value: <Mobile_Provision_profile_base64_file>
- Name: MOBILE_PROVISION_PROFILE_FILE
- IOS_AUTO_DEV_SIGNING
- Name: MOBILE_PROVISION_PROFILE_FILE
Value: <Mobile_Provision_profile_base64_file> - Name: ENTITLEMENTS_FILE
Value: <Entitlement_base64_file>
- Name: MOBILE_PROVISION_PROFILE_FILE
- ANDROID_AUTO_SIGNING
-
-
-
Continuous Integration with Orb
If Appdome is the first job in your workflow, you have the option to give the Appdome orb as an input URL link for an application to protect with Appdome. In the appFile input:
- build-2secure/appdome_runner:
       runner: <type_of_run>
       team-id: <your_team_ID> - remove this line when working on personal workspace.
appFile: <remote_app_location_of_the_non-protected_app>
       output: <secured_app_file_name>
       sign-overrides: <path_to_remote_JSON_download_file_location>
       google-play-signing: <true_or_false> - (For Android only!).
       build-with-logs: <true_or_false>
       second-output: <true_or_false>
       build-to-test: <vendor_name_to_testing("BITBAR" or "BROWSERSTACK" or "LAMBDATEST" or "SAUCELABS")>
If Appdome orb is after the job that builds the application that Appdome will protect, the workflow is supposed to look like:

workflows:
  main_workflow:
    jobs:
      - build
      - build2secure/appdome_runner:
          team-id:<YOUR_TEAM_ID>
          name: <NAME_FOR_THE_JOB>
          runner: <TYPE_OF_RUN>
          appFile: <FULL_OR_RELATIVE_PATH_TO_THE_APP>
          requires:
            - build
In order to share with Appdome orb your built application from the first (build job) what you have to do is to add to the build job the step “persist_to_workspace”:
# Persist the specified paths (workspace/built-app-location) into the workspace for use in appdome orb job.
- persist_to_workspace:
	# Must be an absolute path, or relative path from working_directory. This is a directory in the execution
	# environment which is taken to be the root directory of the workspace.
 	root: workspace
	# Must be relative path from root
	paths: - <relative_path_from_root_to_the_built_app>
If the built application location (after the build job has built it) is “appdome_android_sample/build/outputs/apk/debug/appdome_android_sample-debug.apk” after the commands that build the app in the first job, add the “persist_to_workspace” step as follows:
  - persist_to_workspace:
          # Must be absolute path or relative path from working_directory
          root: .
          paths: appdome_android_sample/build/outputs/apk/debug/appdome_android_sample-debug.apk
The build job for the app should be set up as follows:
jobs:

  build:
    docker:
      - image: circleci/android:api-25-alpha
    environment:
      JVM_OPTS: -Xmx3200m
    steps:

      - checkout
      - run:
          name: Download Dependencies
          command: ./gradlew androidDependencies
      - save_cache:
          paths:
            - ~/.gradle
          key: jars-{{ checksum "build.gradle" }}-{{ checksum  "appdome_android_sample/build.gradle" }}

      # Generate apk
      - run: ./gradlew assembleDebug

      - persist_to_workspace:
          # Must be absolute path or relative path from working_directory
          root: .
          paths:
            appdome_android_sample/build/outputs/apk/debug/appdome_android_sample-debug.apk
      - store_artifacts:
            path: ./appdome_android_sample/build/outputs/apk/debug
            destination: outputs
Configure the Appdome Orb Configuration as follows:
workflows:
  main_workflow:
    jobs:
      - build
      - build2secure/appdome_runner:
          team-id:<YOUR_TEAM_ID>
          name: "appdome_runner"
          runner: "ANDROID_AUTO_SIGNING"
          appFile: "appdome_android_sample/build/outputs/apk/debug/appdome_android_sample-debug.apk"
          requires:
            - build
If Appdome’s orb is the last job in your configuration, you can find the outputs under the “Artifacts” tab in the CircleCI web app. To download the artifacts, you can use curl by following the instructions provided in the article: Downloading all artifacts for a build on CircleCI or Access uploaded artifact URL in job.
If Appdome is not the last job in your CircleCI configuration, you can continue working with the output of Appdome using the step attach_workspace as follows:

steps:
   - attach_workspace:
       at: your_working_directory/appdome_workspace/
Make sure to use your_working_directory /appdome_workspace/ as the path.
To access the protected application as an input, you must use the path:
Path: “Working_directory /appdome_workspace/appdome_outputs/<output_name>.apk/.aab/.ipa.”
This path will lead you to the protected application.
“working_directory/appdome_workspace/appdome_outputs/<output_name>.apk/.aab/.ipa.”
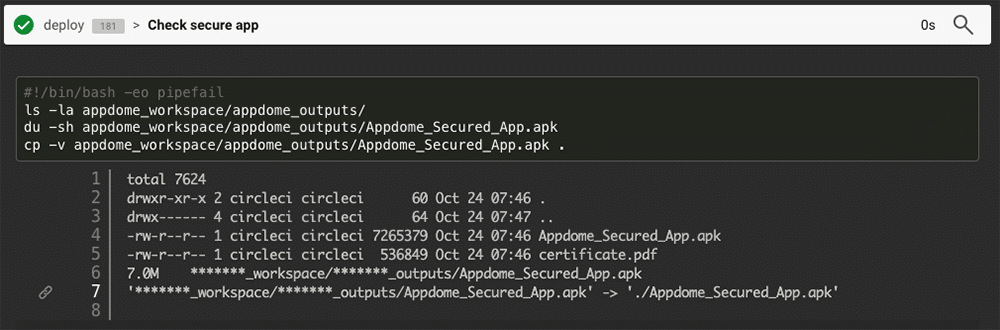
For example, if you want to view the protected app from another job, check its size and copy it to your working directory(root). Create a job that executes these commands.
      docker:
        - image: circleci/android:api-25-alpha
      environment:
        JVM_OPTS: -Xmx3200m
      steps:
        - checkout
        - attach_workspace:
            at: appdome_workspace
        - run:
            name: Check secure app
            command: |
              ls -la appdome_workspace/appdome_outputs/
              du -sh appdome_workspace/appdome_outputs/Appdome_Secured_App.apk
              cp -v appdome_workspace/appdome_outputs/Appdome_Secured_App.apk .
Your workflow should look as follows:
workflows:
  main_workflow:
    jobs:
      - build
      - build2secure/appdome_runner:
          team-id: <YOUR_TEAM_ID>
          name: "appdome_runner"
          runner: "ANDROID_AUTO_SIGNING"
          appFile: "appdome_android_sample/build/outputs/apk/debug/appdome_android_sample-debug.apk"
          requires:
            - build
      - deploy:
          name: deploy
          requires:
            - appdome_runner
The output should be as follows:
If an output name isn’t inserted by the user for the application, then the default name will be Appdome_secured_app.apk/ipa/aab
If you want to work on your next job in CircleCI with the Appdome-protected app, configure your next job with the following parameters:
jobs:
  downstream:
    executor: my-executor
    steps:
      - attach_workspace:
          at: ~/appdome_workspace/
      - run: |
          export APPDOME_SECURED_APP=$(ls $HOME/appdome_workspace/appdome_outputs/*appdome_secured_app*)
Note: If the user does not provide an output name, the default name ‘Appdome_secured_app’ will be used.
Full example for CircleCi config with the Appdome orb:
version: 2.1

orbs:
  	build2secure: appdome/build-2secure@1.1.6
jobs:

  build:
    docker:
      - image: circleci/android:api-25-alpha
    environment:
      JVM_OPTS: -Xmx3200m
    steps:

      - checkout
      - restore_cache:
          key: jars-{{ checksum "build.gradle" }}-{{ checksum  "appdome_android_sample/build.gradle" }}
      - run:
          name: Download Dependencies
          command: ./gradlew androidDependencies
      - save_cache:
          paths:
            - ~/.gradle
          key: jars-{{ checksum "build.gradle" }}-{{ checksum  "appdome_android_sample/build.gradle" }}

      # Generate apk
      - run: ./gradlew assembleDebug

      - persist_to_workspace:
          # Must be absolute path or relative path from working_directory
          root: .
          paths:
            appdome_android_sample/build/outputs/apk/debug/appdome_android_sample-debug.apk
      - store_artifacts:
            path: ./appdome_android_sample/build/outputs/apk/debug
            destination: outputs
  deploy:
      docker:
        - image: circleci/android:api-25-alpha
      environment:
        JVM_OPTS: -Xmx3200m
      steps:
        - checkout
        - attach_workspace:
            at: appdome_workspace
        - run:
            name: Check secure app
            command: |
              ls -la appdome_workspace/appdome_outputs/
              du -sh appdome_workspace/appdome_outputs/Appdome_Secured_App.apk
              cp -v appdome_workspace/appdome_outputs/Appdome_Secured_App.apk .
        - restore_cache:
            key: jars-{{ checksum "build.gradle" }}-{{ checksum  "appdome_android_sample/build.gradle" }}


workflows:
  main_workflow:
    jobs:
      - build
      - build2secure/appdome_runner:
          team-id:<YOUR_TEAM_ID>
          name: "appdome_runner"
          runner: "ANDROID_AUTO_SIGNING"
          appFile: "appdome_android_sample/build/outputs/apk/debug/appdome_android_sample-debug.apk"
          requires:
            - build
      - deploy:
          name: deploy
          requires:
            - appdome_runner
Step 3: Build Android & iOS Security with Build-2Secure
Trigger the pipeline that contains the Appdome Build-2Secure job. This job initiates Appdome Build-2Secure which automatically integrates the requested security features into your app based on the Fusion Set ID.
Step 4: Retrieve DevSecOps Certification with Build-2Secure
- After the build is complete, you can download the secured app from the Artifacts tab in the CircleCI platform.
The following artifacts will be available for download:
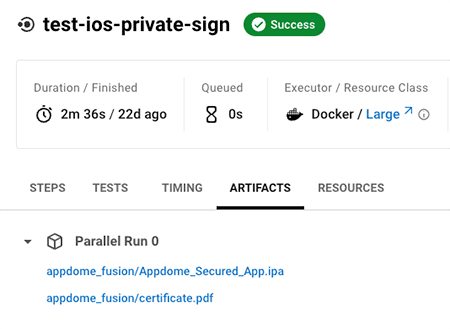
The name of the secured output app will match the name selected in the output parameter.
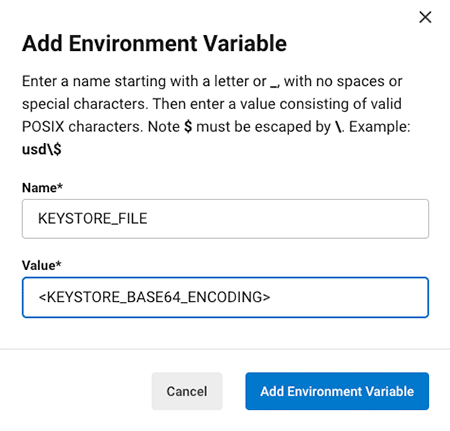
Adding Files as Environment Variables by Using Base64 Encoding
To add files as environment variables:
- Open a terminal.
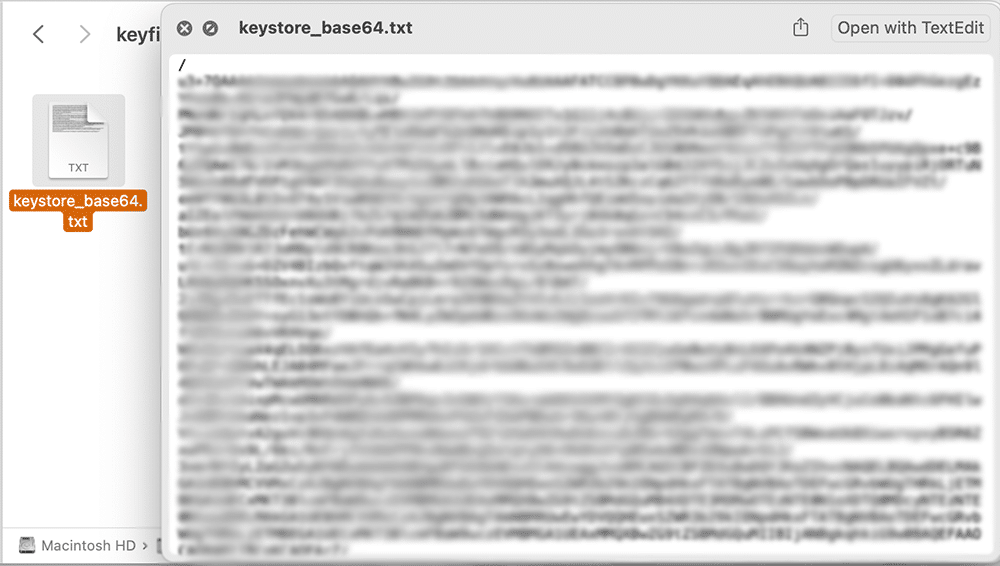
- Encode the requested file with base64, and save (paste) it in a temporary text file:
Usage: base64 [-i in_file] [-o out_file]
For example:
base64 -i appdome.keystore -o keystore_base64.txt
- Copy the contents of the text file into the matching environment variable, as shown in the images below.
Related Articles:
- How to Secure Android & iOS Apps in Bitrise CI/CD Pipelines
- How to Secure Android & iOS Apps in GitHub CI/CD Pipelines
- How to Secure Android & iOS Apps in GitLab CI/CD Pipelines
Conclusion
The description above is designed to help you secure Android and IOS apps in CircleCI CI/CD pipelines. If you have questions about using this Build2Secure step for CircleCI, please send them our way at support.appdome.com or via the chat window on the Appdome platform.
Thank you!
Thanks for visiting Appdome! Our mission is to secure every app on the planet by making mobile app security easy. We hope we’re living up to the mission with your project.