How to use Appdome Build-2Secure in TeamCity
With the Appdome Build-2Secure plugin, you can easily secure Android and iOS apps using JetBrains TeamCity as part of your build and deploy process. No coding or technical expertise is required. Automate the process of adding mobile app security features such as data encryption, code obfuscation, anti-tampering, anti-fraud, anti-malware, and much more to any Android or iOS app with no coding or SDK. Additionally, sign your app with your own enterprise certificate for added flexibility and control.
Prerequisites
- An Appdome SRM account
- Team ID (optional)
- An administrator privileges account on a TeamCity server, with plugin installation permissions
- At least one TeamCity build agent
- A TeamCity project of a mobile application
Step 1: Adding Appdome Build-2Secure Plugin into the TeamCity Platform
The Appdome Build-2Secure step takes the unprotected application file (apk, aab, or ipa), rebuilds it, and signs it using the On-Appdome platform based on the chosen fusion set and signature method. This step can be part of an existing Build process or as a new Build where you must provide the application file as part of the input for this step.
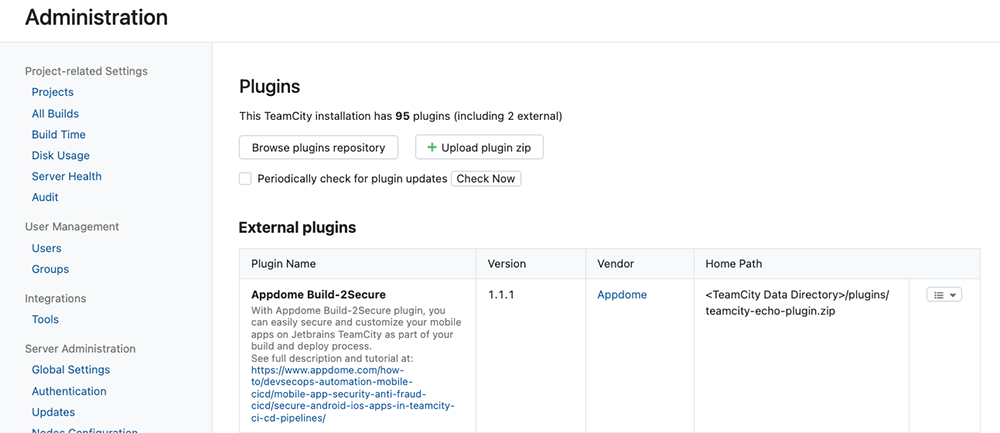
Installing the Appdome Build-2Secure plugin on the TeamCity server:
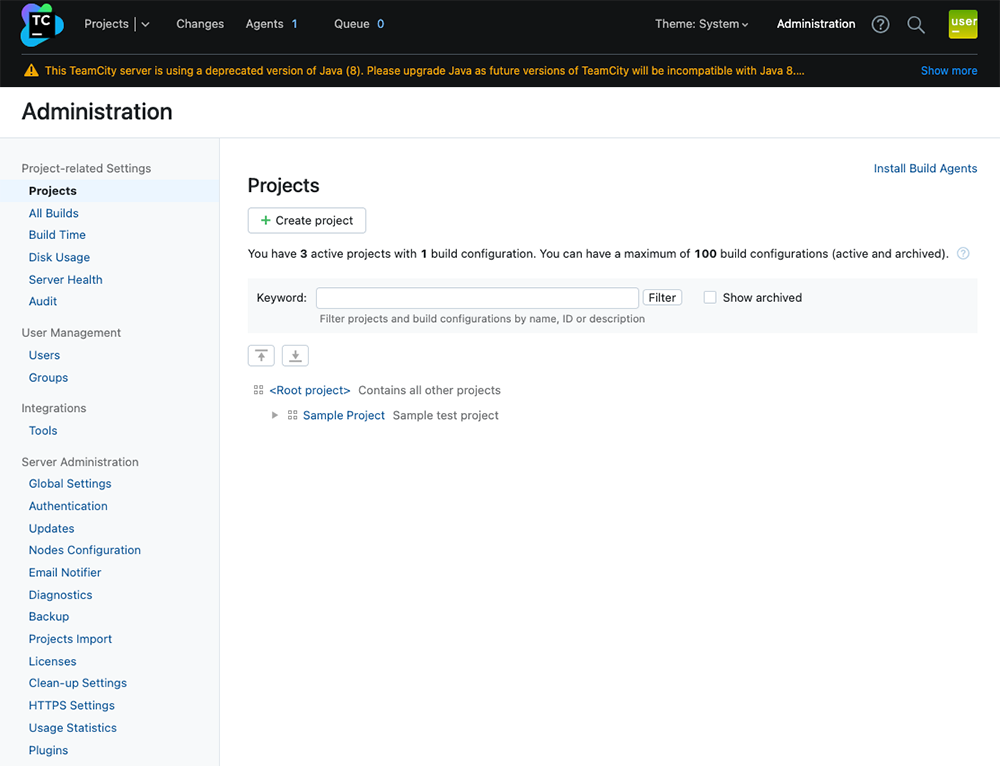
- Go to your TeamCity web interface and log in. Usually it would be: http://<server_address>:8111
- Click Administration on the top right.
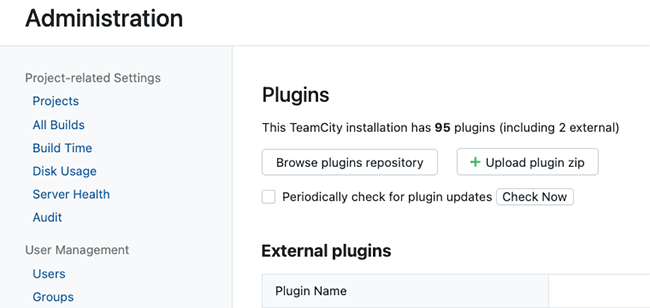
- On the left bar, click Plugins.
- Click Browse plugins repository >> Proceed. A new browser tab will open, displaying the JetBrains Marketplace.
- In the search bar, type “appdome.”
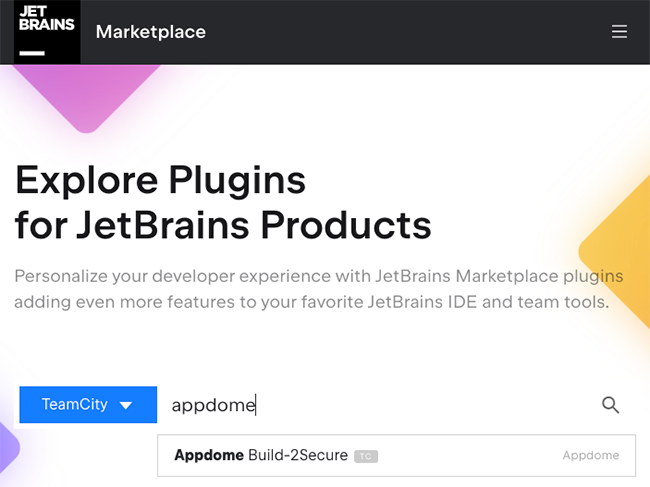
- From the results, select Appdome Build2Secure. The Appdome Build2Secure plugin page will be displayed.
- Click Get.
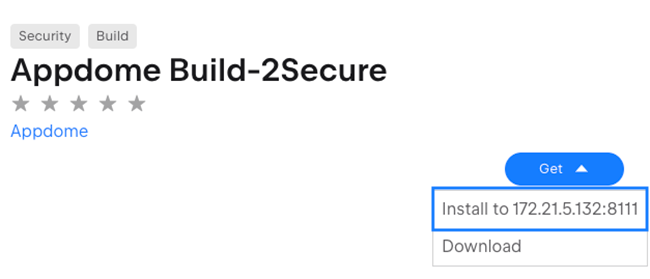
- If the server is running on your host, you can select Install to… to install the plugin directly on your server. Then, Simply click “Install“.
If the server is running on a remote host, you can download the plugin to your computer and install it by going back to your TeamCity server URL, then to the Administrator>>Plugins>>Upload plugin zip process (you will need Administrator privileges). - After a successful installation, the Appdome Build-2Secure plugin will be displayed as part of the External plugins installed on the server.
Step 2: Defining Build Parameters
- Login to the TeamCity server and go to Projects.
- Select your project and then click on Build.
- On the top right corner, click Edit Configuration Settings… The build screen will be displayed.
- Under the General Settings section, configure the following fields:
Name: Build name (mandatory).
Build configuration ID: This ID is used in URLs, REST API, HTTP requests to the server, and configuration settings in the TeamCity Data Directory (mandatory).
Description: Build description.
Publish artifacts: Select Only if the build status is successful.
Artifact paths: Copy the following text into the text box: +:artifacts/*
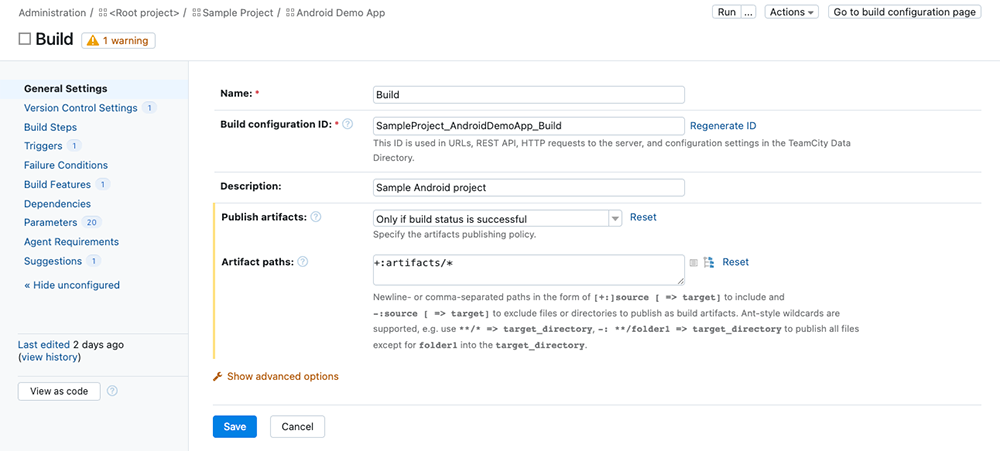
- Click Save.
- Click the Parameters tab on the left side of the screen.
Note: You may need to click on Show more >> to reveal the Parameters tab option.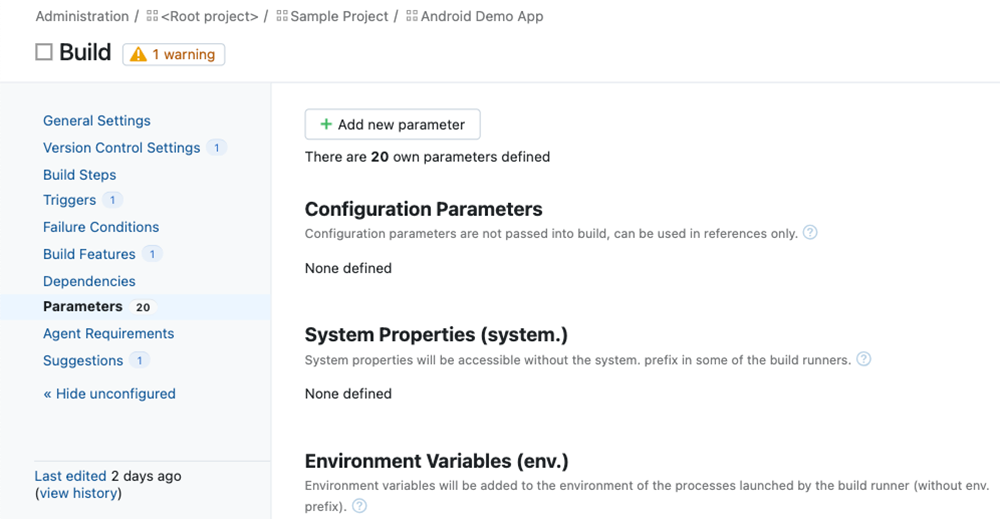
- Define an environment variable representing the Appdome platform API key:Click the + Add new parameter button. A new window with a new parameter prompt will be opened.Add the following parameter:Name: env.api_key
Kind: Environment variable (env.)
Value: Enter the Appdome platform API Key valueNote: The environmental variable holding the Appdome platform API key must be named env.api_key.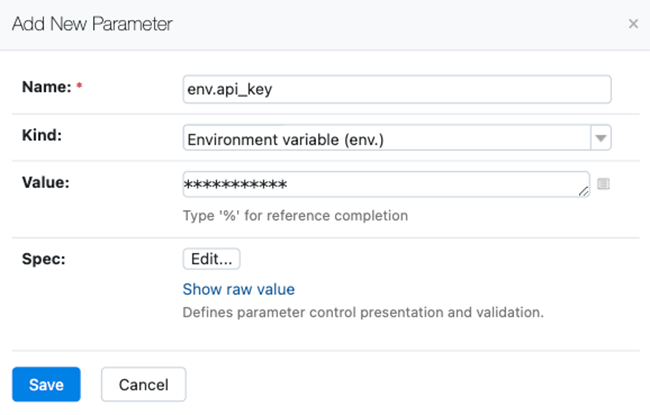
- Under Spec, click Edit…
In the following window, add the following parameters:Description: Appdome platform API KeyDisplay: HiddenRead-only: checkType: Password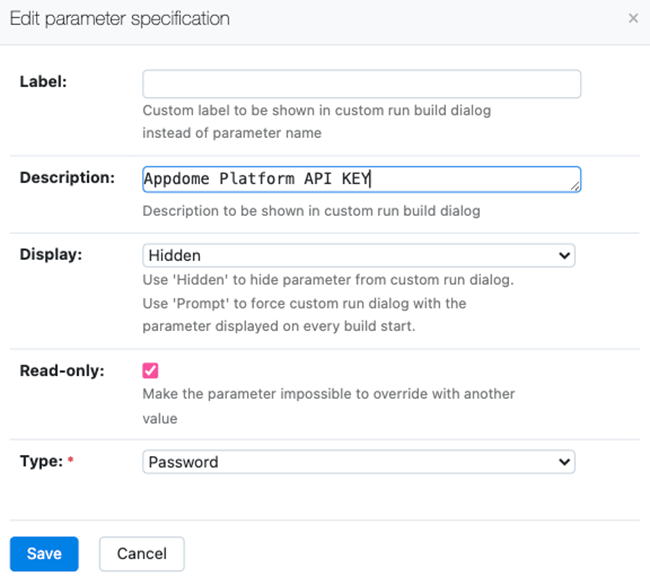
- Click Save.
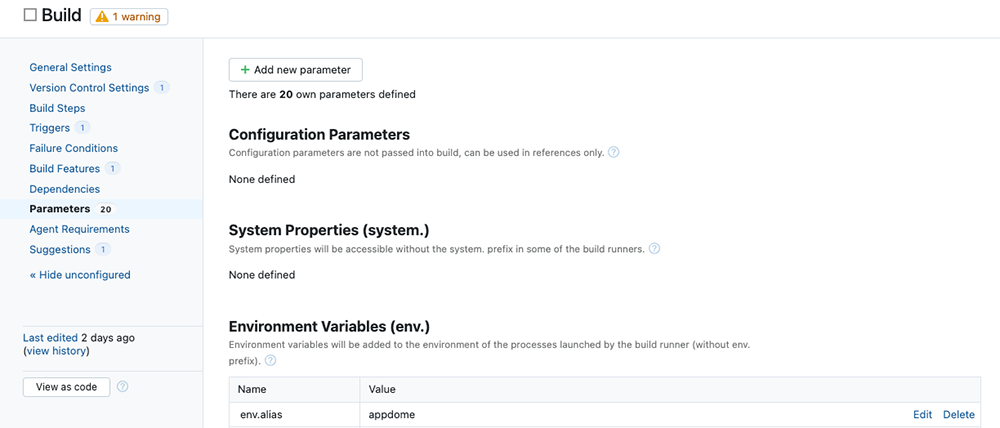
The newly defined env.api_key parameter should now appear under the Environment Variables (env.) section.
- Repeat steps 4-8 above to define the following environmental parameters:
- Keystore passwords (for Android app signing)
- Certificate passwords (for iOS app signing)
- Key passwords
- Keystore aliases (for Android app signing)
- Signing fingerprints
Notes:
- All environmental parameter names must start with the env. Prefix (i.e., env.key_password).
- Secret values (e.g., passwords, keys, etc.) must be defined as “Passwords” and Displayed as “Hidden.” Non-confidential definitions can be left as default.
When correctly defined, you should see them under the Environment Variables (env.) section.
Note: “Password” type values will be hidden with ******, while text values will be displayed as they are.
- Add a new parameter for the mobile application location. This should point to the app apk/aab/ipa file you would like to protect with Appdome.
Click the + Add new parameter button. A new window with a new parameter prompt will be opened. Add the following parameter:Name: env.app_locationKind: Environment variable (env.)Value: a URL to an external server or an environmental variable holding the app file location (could be output from a previous build step).In this example, we will represent the app location with a URL to an external server holding a .apk app.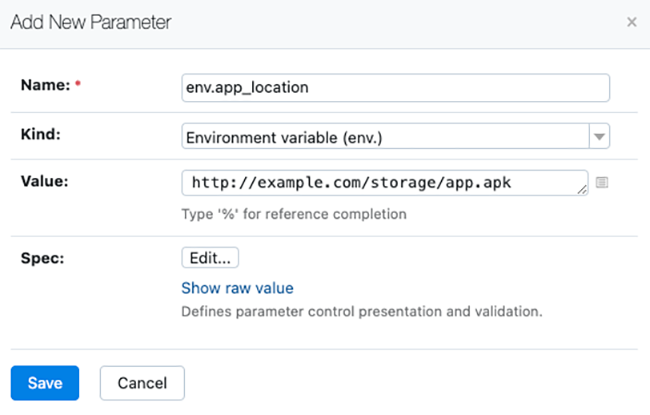
- Click Save.Now, you should see the env.app_location variable under the Environment Variables (env.) section.
- Repeat the step above to add environment variables holding locations of additional files that will be required for signing:
a. For Android apps:
On-Appdome Signing requires the following environment variables:
- Keystore file
- Keystore password
- Keystore Alias
- Key password
- Google sign fingerprint (if Google Play signing is being used)
Private and Auto-Dev Signing requires the following environment variable:
- Signing fingerprint or Google Sign fingerprint (if Google Play signing is being used)
In our Android example, we have defined the following variables:
- ks_location – Keystore file location
- ks_pass – Keystore password
- alias – Keystore alias
- key_pass – Key password
- fp – Signing fingerprint
These variables should be defined as described in sections 8-9 above.
b. For iOS apps:
On Appdome, Signing requires the following environment variables:
- Certificate file (.p12) location
- Certificate password
- Provisioning profile files
- Entitlement files
Private and Auto-Dev Signing requires the following environment variables:
- Provisioning profile files
- Entitlement files
In our iOS example, we have defined the following variables:
- env.p12 – Certificate file location
- env.cert_pass – Certificate password
- pro_1 and env.pro_2 – Two provisioning profile files
- ent_1 and env.ent_2 – Two entitlement files
These variables should be defined as described in sections 8-9 above.
Step 3: Adding Appdome Build-2Secure Step into the Build Process
- Click the Build Step tab on the left side of the screen. Here, we will define the build steps.
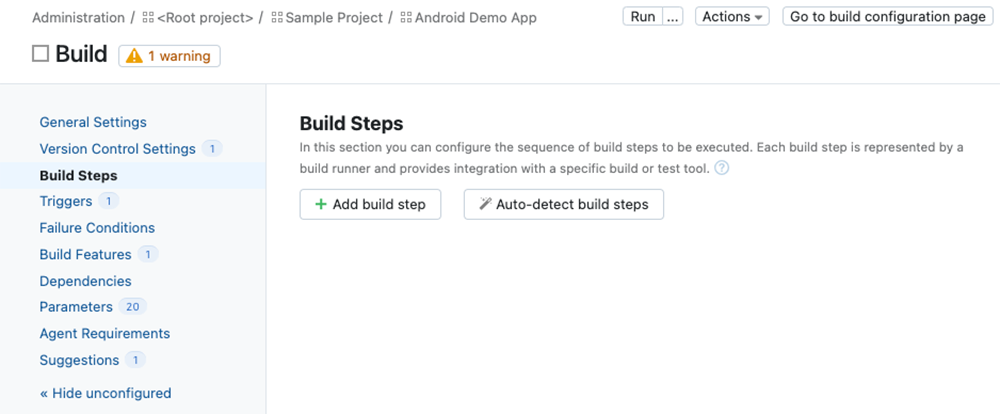
- To add a new Appdome build step, click +Add build step. A list of available step types will be displayed.
Note: In our example, no steps are currently defined. However, you may already have some steps defined. It is important that the Appdome build step is added in the right place. - Select Appdome Build-2Secure.
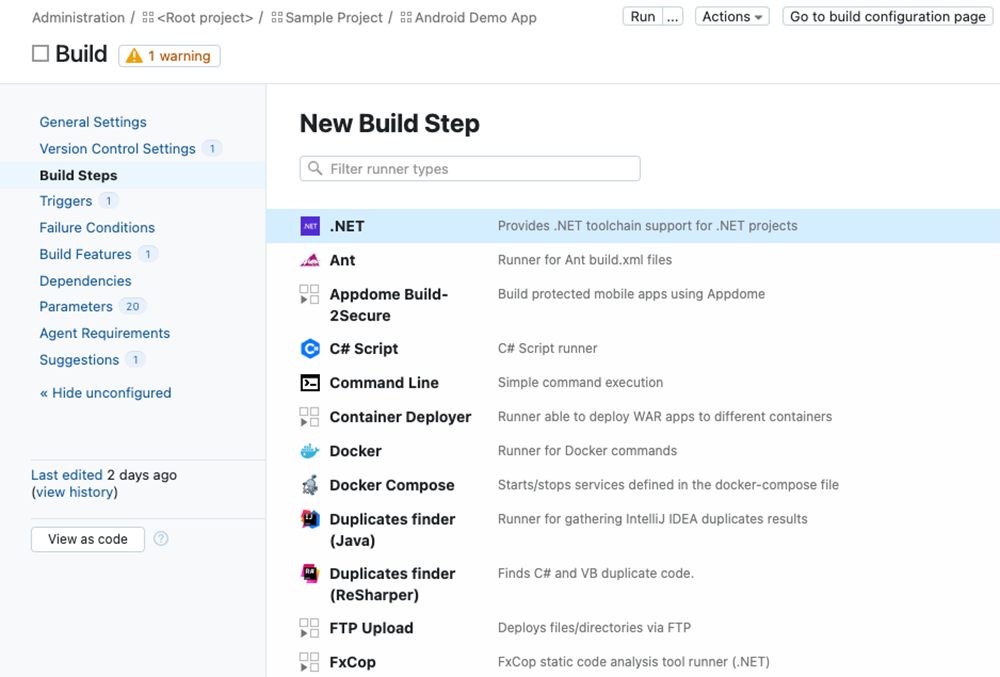
- A new build step definition screen will be displayed.
Note: You may have to refresh the web page to see all the fields.
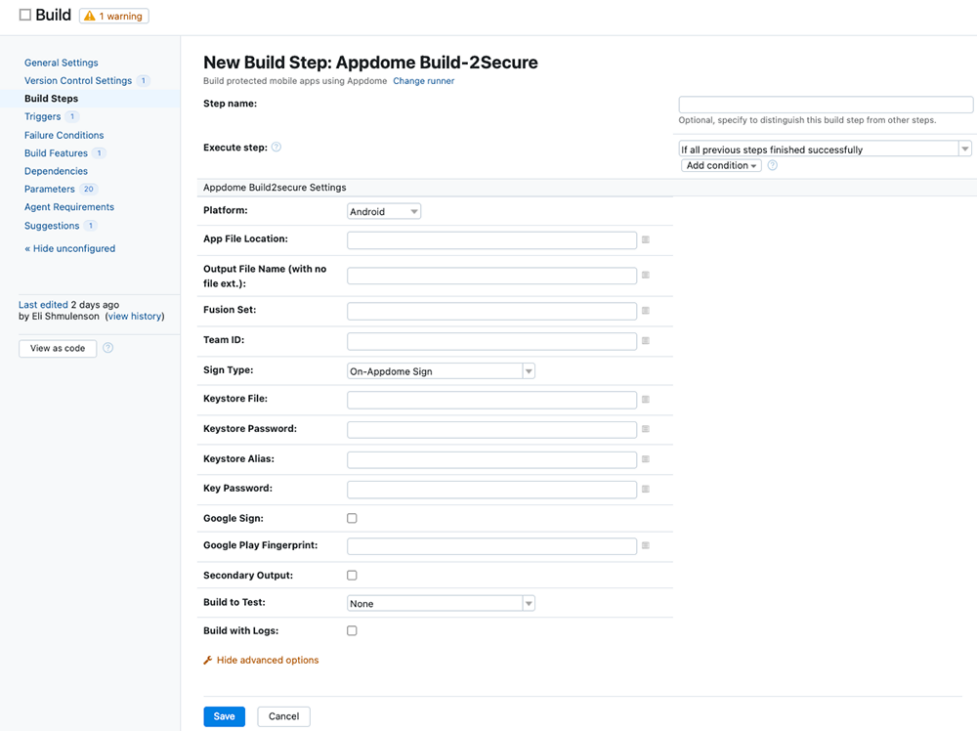
- Select the Platform—Android or iOS. The other input fields will be updated accordingly. We will use Android for our example.
- In the App File Location field, enter the location of the mobile app that will be built. It could be a URL to an external server or an environment variable representing the mobile app location. In our example, we will enter env.app_location.
Note: This field can be populated with up to 2,000 characters. If your file location URL is longer, you should use an environment variable rather than a direct link. If you still prefer using a URL, make sure the link is fully entered and not truncated. - Firebase App ID: The App ID appears in the Firebase project settings for the built app. This field is optional and is used to upload the code de-obfuscation map to the Firebase Crashlytics service.
Note: To utilize Crashlytics service, the following pre-requisites must be met:- Google application credentials must be defined. This can be done by defining an environmental variable named env.GOOGLE_APPLICATION_CREDENTIALS is pointing to your Google service credentials in the JSON file.
- The TeamCity server must have Firebase CLI installed. For details, see Install the Firebase CLI.
- Output File Name is an optional field where you can state the name of the output app file (without file extension). If no Output File Name is provided the default output file name will be the original app name with “Appdome_” prefix.
- In the Fusion Set field, enter the fusion set you want to use for this build. Make sure the fusion set matches the platform you selected.
- Fill the Team ID field with your team ID, as appears in the On-Appdome platform (optional).
- Select Sign Type. Determines the signing type, which will be detailed in the next section.
- Check the Secondary Output checkbox if you are building an Android .aab-type app and wish to get a protected universal .apk file. In such case, alongside the output of the protected .aab build, there will be a universal apk file.
If the Output File Name was provided, then the secondary output file will be the stated file name with “_Universal.apk” suffix.
If no Output File Name was provided, the secondary output file will be the original app name with “_Universal.apk” suffix.
The Secondary Output checkbox applies only for Android .aab type apps with On-Appdome or Private signing methods. - Build to Test allows you to create a build suitable for testing on a mobile device cloud based on the selected cloud vendor. For production builds, select “None.”
- Check the Build with Logs checkbox if you want to include diagnostics logs in your build.
Step 4: Configuring Sign Type in the Appdome Step
The parameters required for app signing depend on the app platform and the sign type.
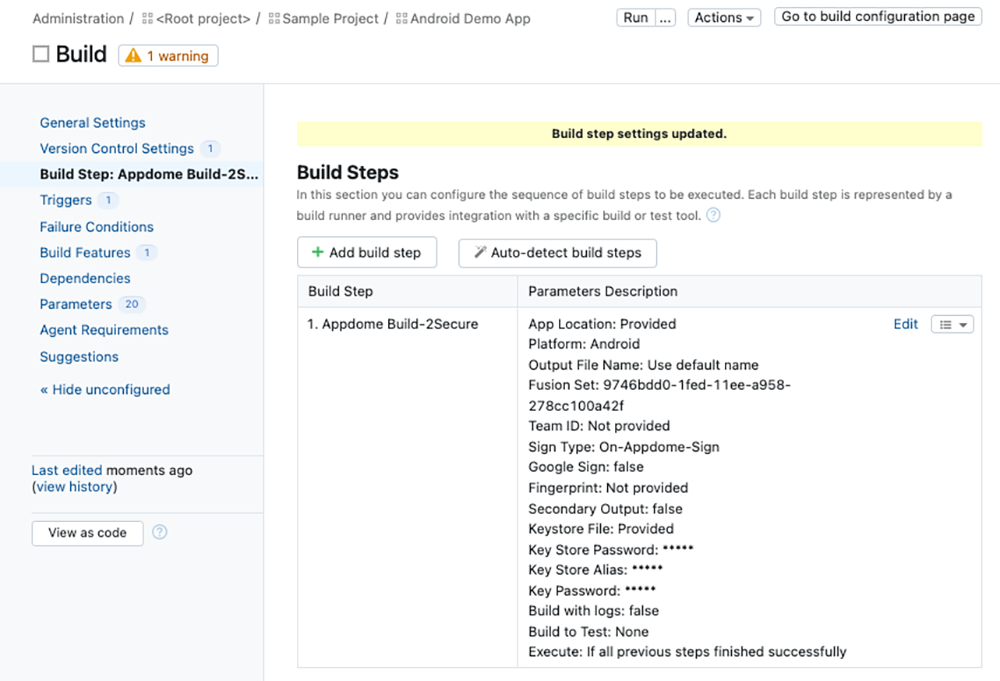
- Android app with On-Appdome-Sign Type:
- Platform: Android
- Sign Type: On-Appdome-Sign
- Keystore File: URL of the keystore file location or the environment variable holding it
- Keystore Password: The Keystore password or the environment variable holding it
- Keystore Alias: keystore alias or the environment variable holding it
- Key Password: The key password or the environment variable holding it
- Google Sign checkbox: if checked, the app is meant to be uploaded to Google Play.
- Google Play Fingerprint: The fingerprint to be used for Google Play signing or the environment variable holding it. If Google Sign is not checked, leave it blank.
Based on the example given in the previous section, the screen will be filled as follows:
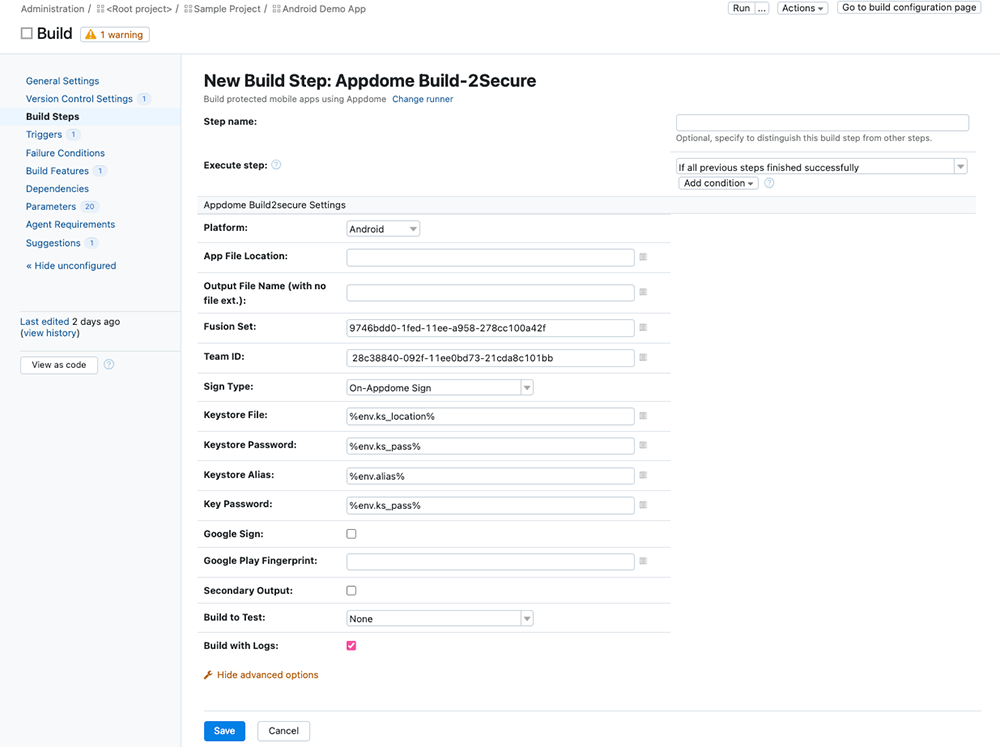
Note: In some cases, the TeamCity platform may wrap the environment parameters with % signs so that they are shown like %env.alias%. You can also do the same manually, and it will be acceptable.
2. Android app with Private-Sign or Audo-Dev-Sign Type:
- Platform: Android
- Sign Type: Private-Sign or Audo-Dev-Sign
- Google Sign checkbox: if checked, the app is meant to be uploaded to Google Play.
- Google Play Fingerprint: The fingerprint to be used for Google Play singing or the environment variable holding it. If Google Sign is not checked, leave it blank.
- Fingerprint: If Google Sign is not selected, you can use a private signature fingerprint. Enter the environment variable holding it here.
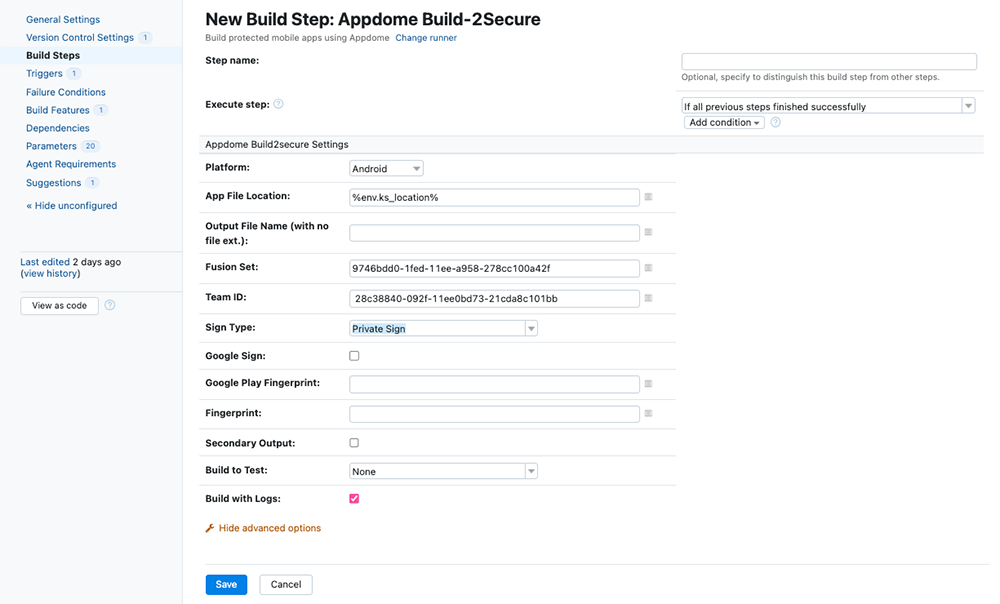
Note: In some cases, the TeamCity platform may wrap the environment parameters with % signs so that they are shown like %env.alias%. You can also do the same manually, and it will be acceptable.
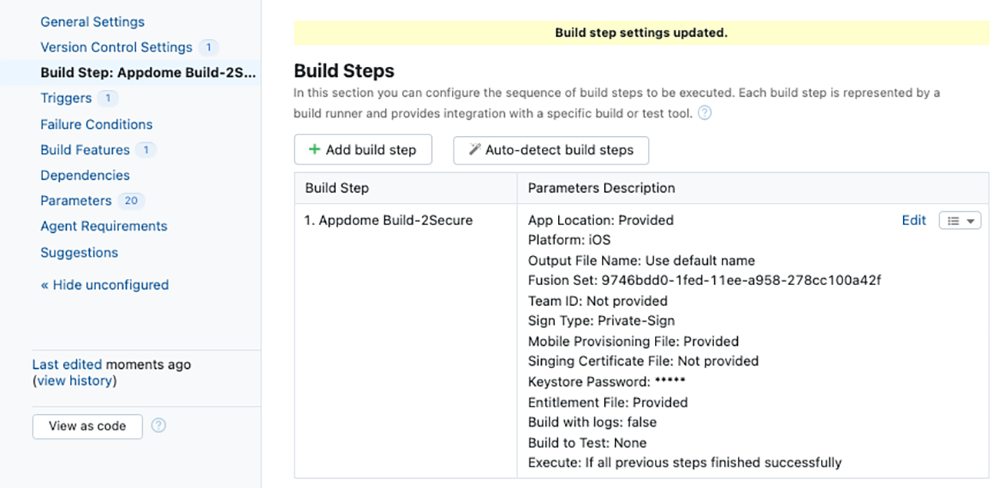
3. iOS app with On-Appdome-Sign Type:
- Platform: iOS
- Sign Type: On-Appdome-Sign
- Provisioning Profile Files: URL of the provisioning profile file location or the environment variable holding it. You can enter multiple environment variables of provisioning files; just separate them with commas (see example in the screenshot below)
- Signing Certificate File: URL of the certificate file location or the environment variable holding it
- Certificate Password: certificate file password or the environment variable holding it
- Entitlements Files: URL of the entitlement file location or the environment variable holding it. You can enter multiple environment variables of entitlement files; just separate them with commas (see example in the screenshot below)
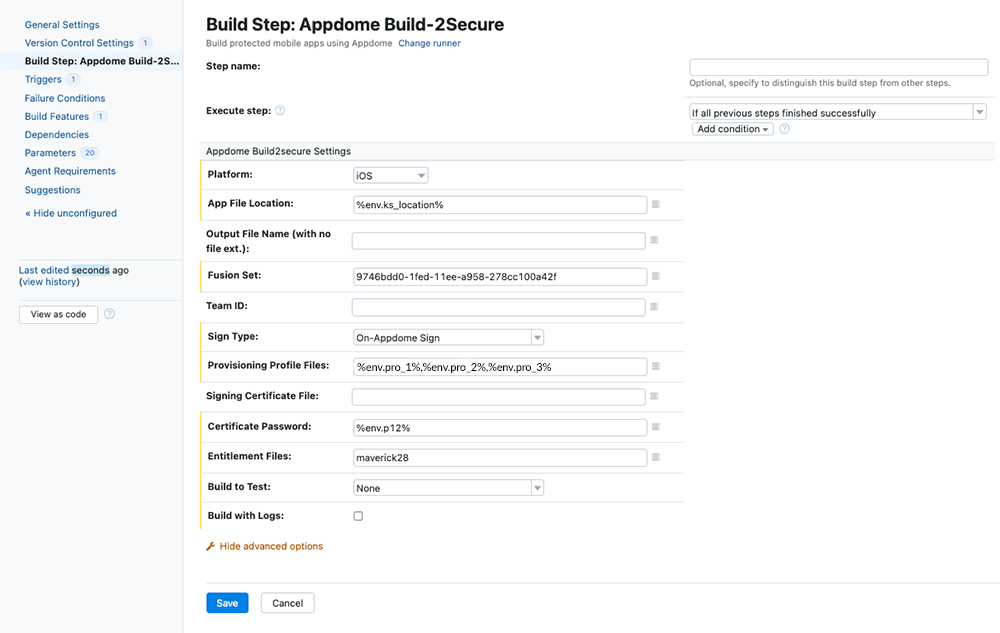
Note: In some cases, the TeamCity platform may wrap the environment parameters with % signs so that they are shown like %env.alias%. You can also do the same manually, and it will be acceptable.
4. iOS app with Private-Sign or Audo-Dev-Sign Type:
- Platform: iOS
- Sign Type: Private-Sign or Audo-Dev-Sign
- Provisioning Profile Files: URL of the provisioning profile file location or the environment variable holding it. You can enter multiple environment variables of provisioning files; just separate them with commas (see example in the screenshot below)
- Entitlements Files: URL of the entitlement file location or the environment variable holding it. You can enter multiple environment variables of entitlement files; just separate them with commas (see example in the screenshot below)
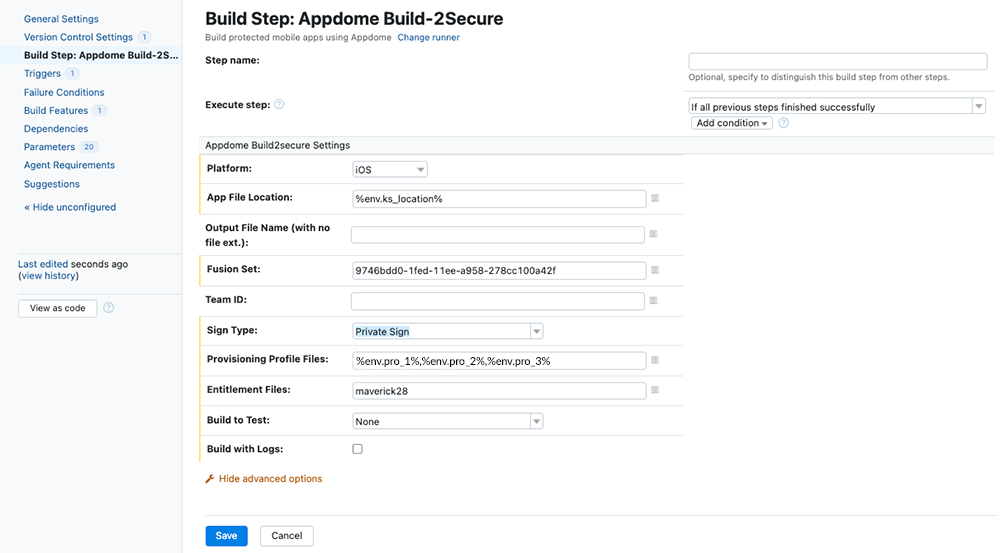
Note: In some cases, the TeamCity platform may wrap the environment parameters with % signs so that they are shown like %env.alias%. You can also do the same manually, and it will be acceptable.
Click Save.
When done, the step will be added to your build process, as shown in the screenshot below.
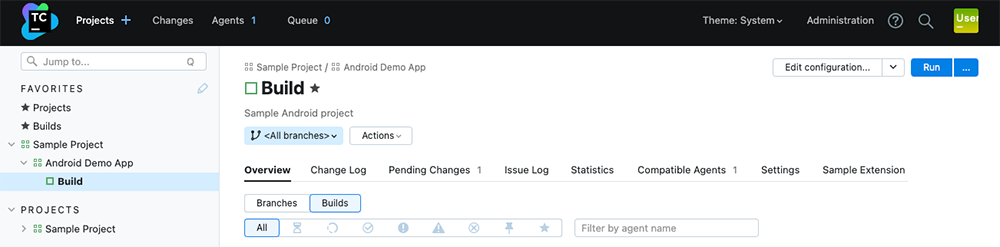
Step 5: Running the Build Process
1. After you have defined all the steps in your build process, you can run the build by clicking the Run… button on the upper right-hand side of the screen. This will initiate the build process.
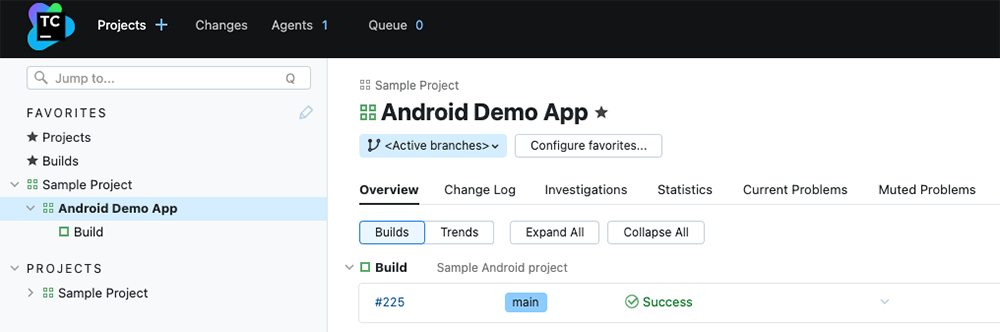
2. To see the build process logs, select Projects from the top menu and then click Build.
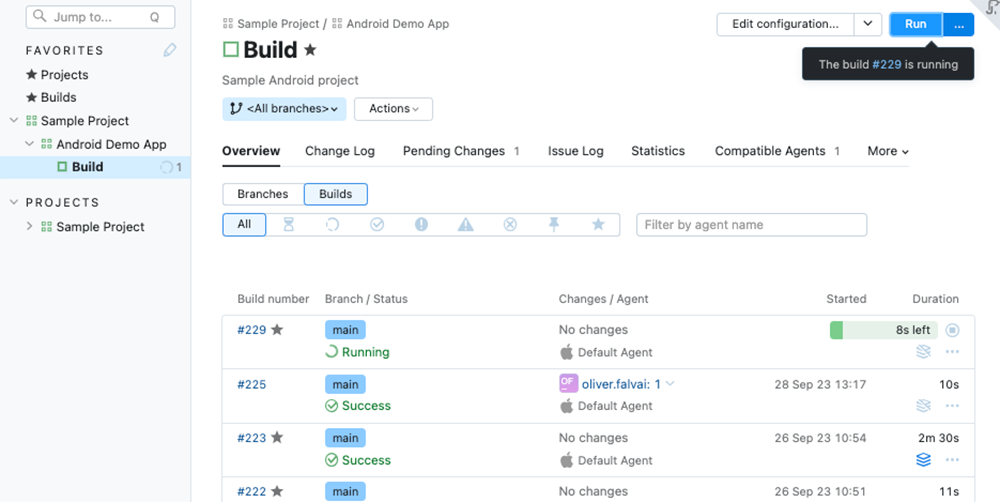
3. You will see that the build status is being updated in real-time. Clicking on the build status will provide additional details and logs.
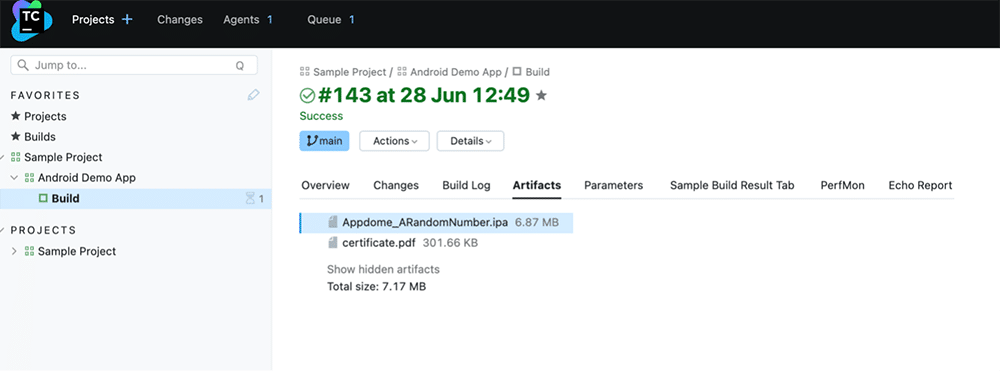
4. When the build is successfully completed, the result files will be stored in the artifacts. The build application will typically bear the prefix “Appdome_” by default (as demonstrated in the example provided below) unless a specific Output File Name configuration has been defined instead. The Artifacts section can be accessed by clicking on the icon on the right side of the screen.
In addition, the build app file will be represented by the environmental variable $APPDOME_BUILD, which can be referred to in the next steps. If Secondary Output was selected for the Android .aab app, then $APPDOME_BUILD_SO will refer to the protected universal apk file.
Related Articles:
- How to use Appdome’s Validate-2Secure Plugin for Jenkins
- How to Secure Android & iOS Apps in Bitrise CI/CD Pipelines
- How to Use Secure Android & iOS Apps in GitHub CI/CD
How Do I Learn More?
If you have any questions, please send them our way at support.appdome.com or via the chat window on the Appdome platform.
Thank you!
Thanks for visiting Appdome! Our mission is to secure every app on the planet by making mobile app security easy. We hope we’re living up to the mission with your project.