Automatically De-obfuscate Firebase Crashlytics Stack Traces
What is Firebase Crashlytics?
Firebase Crashlytics is a lightweight, real-time crash reporter that helps you track, prioritize, and fix stability issues that erode your app quality. Crashlytics saves you troubleshooting time by intelligently grouping crashes and highlighting the circumstances that lead up to them.
Understanding Stack Trace Obfuscation with Appdome’s Obfuscate App Logic
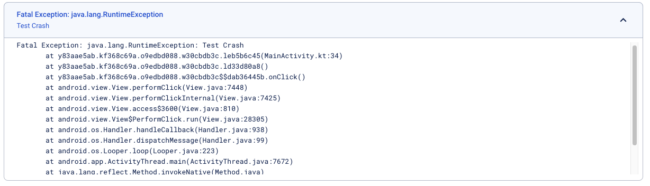
Before diving into the de-obfuscation process, it’s important to understand the impact of integrating Appdome’s Obfuscate App Logic with Android Crashlytics. This integration results in obfuscated stack traces that are difficult to interpret without the appropriate de-obfuscation keys, thus safeguarding your app’s internal logic by making the stack traces difficult to read without proper de-obfuscation keys. The following sections of this article will guide you through the steps to automatically de-obfuscate these stack traces, starting with a glimpse at how an obfuscated stack trace looks prior to de-obfuscation.
Before Crashlytics De-Obfuscation
Preparing Your App
To start with the de-obfuscation process, your app first needs to be obfuscated using Appdome’s Obfuscate App Logic security features.
Prerequisites for Using Appdome’s Obfuscate App Logic Plugins:
To use Appdome’s mobile app security build system to Obfuscate App Logic, you’ll need:
-
Appdome account (create a free Appdome account here)
-
A license for Obfuscate App Logic
-
Mobile App (.apk or .aab for Android)
-
Signing Credentials (see Signing Secure Android apps and Signing Secure iOS apps)
How to Implement Obfuscate App Logic in Android Apps Using Appdome
On Appdome, follow these 3 simple steps to create self-defending Android Apps that Obfuscate App Logic without an SDK or gateway:
-
Designate the mobile app to be protected.
1.1 Upload a mobile app via the Appdome Mobile Defense platform GUI or via Appdome’s DEV–API or CI/CD Plugins.
1.2 Android Formats: .apk or .aab
1.3 Obfuscate App Logic is compatible with Java, JS, C++, C#, Kotlin, Flutter, React Native, Unity, Xamarin, Cordova, and other Android apps. -
Select the defense: Obfuscate App Logic
2.1. Create and name the Fusion Set (security template) that will contain the Obfuscate App Logic feature as shown below: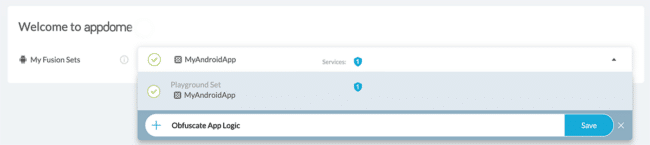
Figure 1: Fusion Set that will contain the Prevent Logging Attacks feature
Note: Naming the Fusion Set to correspond to the protection(s) selected is for illustration purposes only (not required).
2.1.1 When you select the Obfuscate App Logic, you’ll notice that the Fusion Set you created in step 2.1 now bears the icon of the protection category that contains Obfuscate App Logic.
Figure 2: Fusion Set that displays the newly added Obfuscate App Logic protection.
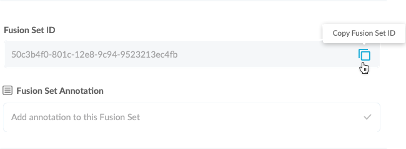
Note: Annotating the Fusion Set to identify the protection(s) selected is optional only (not mandatory).2.1.2 Open the Fusion Set Detail Summary by clicking the “…” symbol on the far-right corner of the Fusion Set. Copy the Fusion Set ID from the Fusion Set Detail Summary (as shown below):
2.1.3 Follow the instructions below to use the Fusion Set ID inside any standard mobile DevOps or CI/CD toolkit like Bitrise, Jenkins, Travis, Team City, Circle CI, or other systems:
2.1.3.1 Refer to the Appdome API Reference Guide for API building instructions.
2.1.3.2 Check Appdome’s GitHub Repository for sample APIs.2.2 Add Obfuscate App Logic
2.2.1 Navigate to Build > Security tab > TOTALCode™ Obfuscation section in the Appdome Console.
2.2.2 Enable Obfuscate App Logic
(a) Toggle On Obfuscate App Logic
Note: The checkmark feature De-Obfuscate Crashlytics Stack Traces is enabled by default, as shown below.
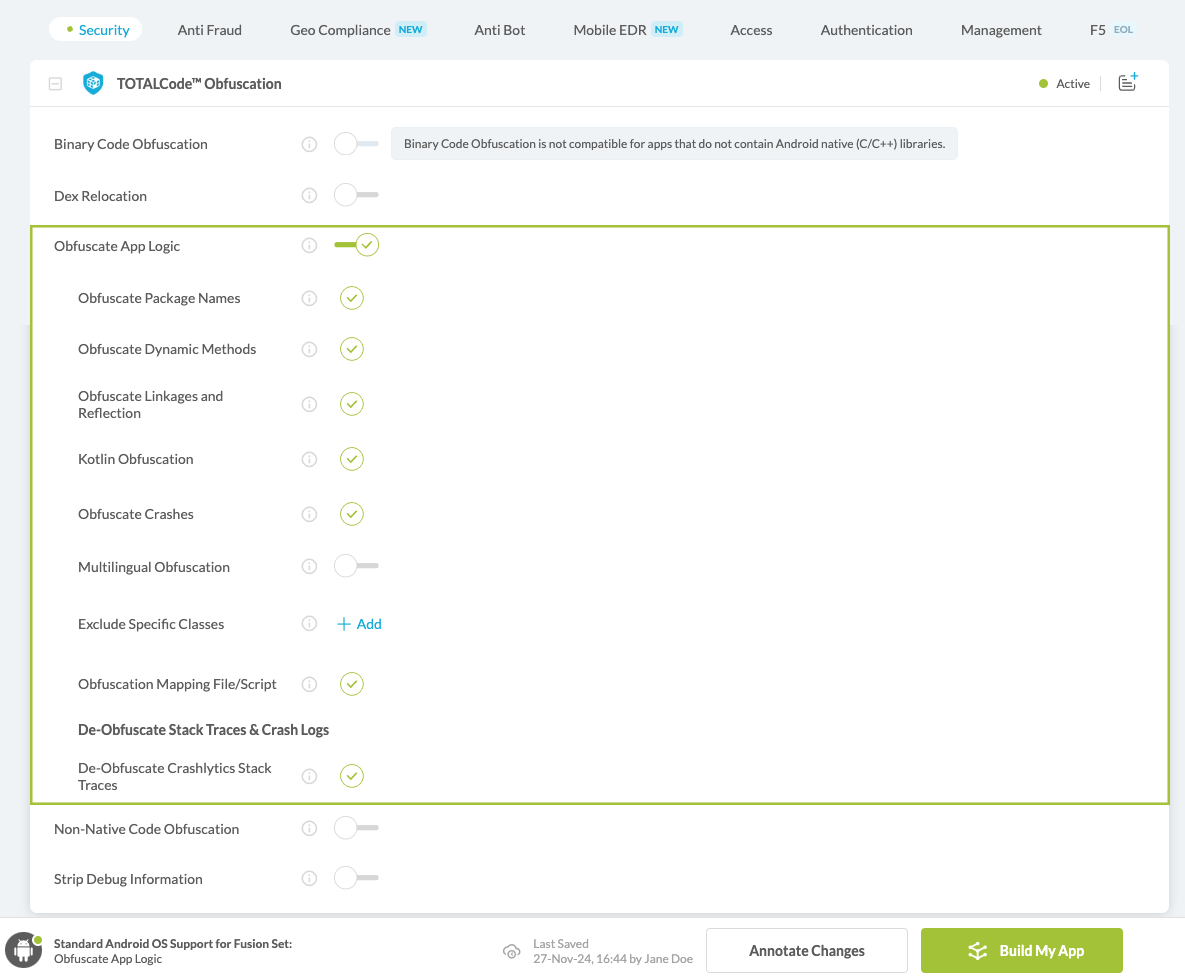
Figure 3: Selecting Obfuscate App Logic
Note: The Appdome platform displays the Mobile Operating System supported by each defense in real-time. For more details, see our OS Support Policy KB.3. Initiate the build command either by clicking Build My App or via your CI/CD.
How to Automatically De-Obfuscate Android Crashlytics Stack Traces
- Click on Workflow Summary

- Click Download Obfuscation Mapping Files
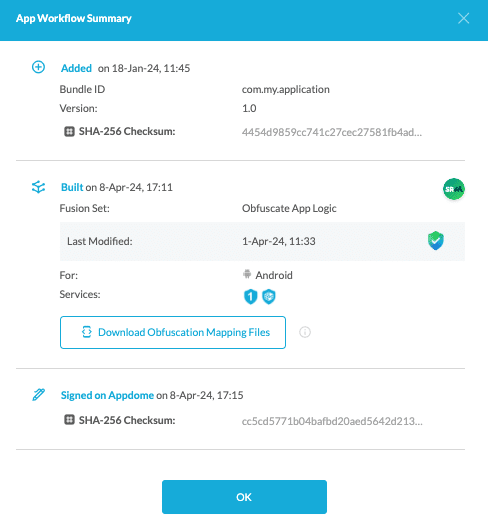
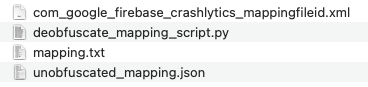
- Locate the required files.
- com_google_firebase_crashlytics_mappingfileid.xml
- mapping.txt
- Install Firebase CLI
Follow the instructions in this Installation Guide - Log in to your Firebase account
Follow the instructions in the Firebase Login Guide. - Save your app-id from Firebase Console
Learn more about: Where can I find the App ID for my Firebase app? - Run the following CLI command
firebase crashlytics:mappingfile:upload --app=<app-id from step 7> --resource-file=<"com_google_firebase_crashlytics_mappingfileid.xml" file location from step 4a> <"mapping.txt" file location from step 4b>
- Use this command to install the APK app file to your device:
adb install <full path to APK>
- Produce a new crash to verify that the de-obfuscation is working.
From this point forward, every stack trace in Crashlytics related to this Appdome build will be automatically de-obfuscated.
Related Articles:
- How to Obfuscate Java Code in Android Apps
- How to Remove Debug Information, Anti-Reversing Android & iOS Apps
- How to Optimize File Size, Code Obfuscation Best Practices in Android & iOS Apps
How Do I Learn More?
If you have any questions, please send them our way at support.appdome.com or via the chat window on the Appdome platform.
Thank you!
Thanks for visiting Appdome! Our mission is to secure every app on the planet by making mobile app security easy. We hope we’re living up to the mission with your project.