How to Secure Android & iOS Apps in Jenkins CI/CD
Prerequisites for Appdome’s Jenkins plugin
Before you use Appdome’s plugin for Jenkins, there are a few things you need to have:
- An Appdome SRM account
- Appdome API token
- Fusion-Set ID
- Jenkins CI/CD server
- CURL installed on your Node.
- Environment Injector plugin (Optional)
Step 1: Installing the Build-2Secure plugin in Jenkins
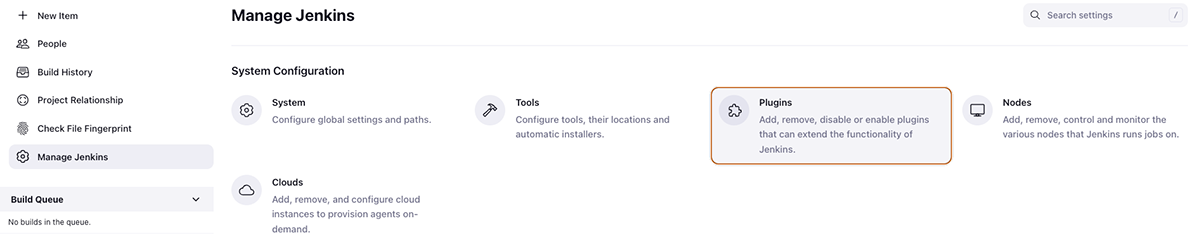
- Go to the Jenkins homepage.
- Select Manage Jenkins on the left menu.
![Jenkins Dashbord 1 [manage Jenkins]](https://www.appdome.com/wp-content/uploads/2023/03/jenkins-dashbord-1-manage-jenkins.png)
- Select the Manage Plugins command.
- To add the Appdome Build-2Secure plugin to Jenkins using the Jenkins Plugin Index, follow these steps:
- Go to the Available Plugins tab in Jenkins.
- Search for Appdome Build-2Secure.
- Select the Appdome build-2Secure plugin, click Download now, and install after restart.
- Restart your Jenkins server to complete the installation.
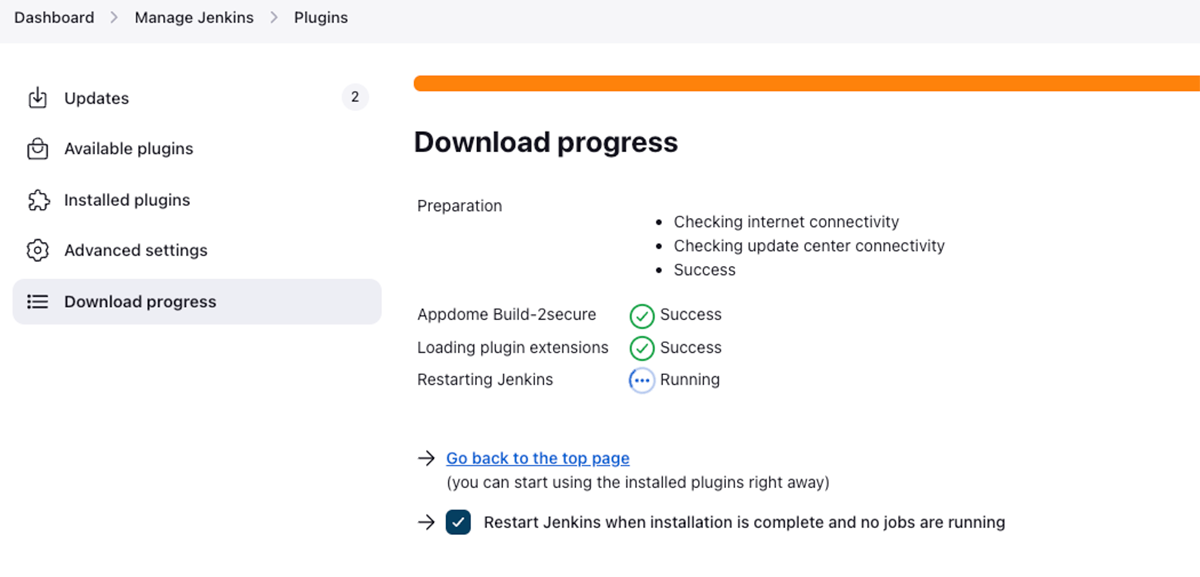
- To confirm the plugin’s successful installation, navigate to Manage Jenkins > Installed plugins and search for Appdome Build-2Secure.

The Appdome Build-2Secure plugin is versatile and can be used in both freestyle projects and pipelines. To utilize the plugin in a freestyle project, it is necessary to add the plugin as a build step, which will be explained in the following section. Alternatively, if you opt to use a pipeline, we have also included instructions on how to incorporate the plugin into the appropriate stage of your pipeline script later in the guide.
Appdome Build-2Secure Plugin in Jenkins (Freestyle Project)
Step 2: Creating the Build-2Secure plugin in Jenkins
This step provides instructions for adding the Appdome Build-2Secure Plugin using either of the following methods:
- Adding the Appdome plugin to a new project
- Adding the Appdome plugin to an existing project
Adding the Appdome Plugin to a New Project
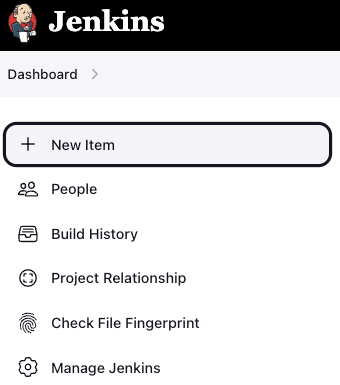
- Navigate to the Jenkins menu and click New Item.
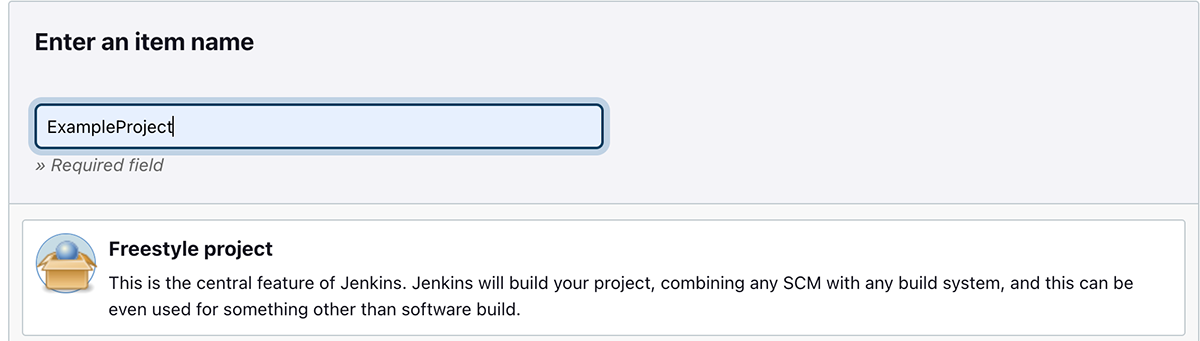
- Assign a name to your project, select the Freestyle Project type, and then click OK.
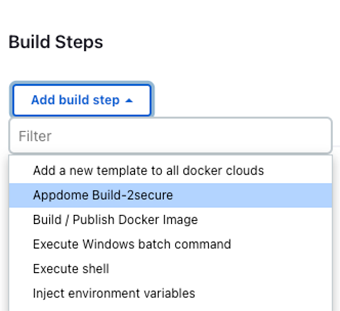
- Select the Build Steps command.
- Expand the list. Add the build step and select Appdome Build-2Secure.
- Proceed to set the Appdome build-2Secure plugin configuration, as described in the next step.
Adding the Appdome Plugin to an Existing Project
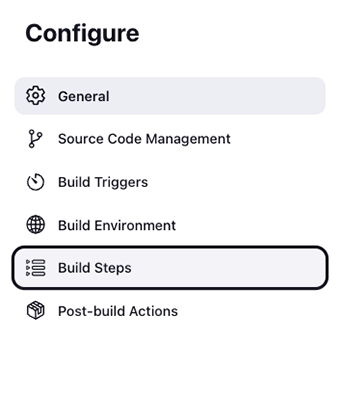
- Select the project to which you want to add the plugin.
- Go to Configure from the Jenkins menu.

- Open the Add build step menu.
- Select the Appdome Build-2Secure plugin.
- Enter your configuration details.
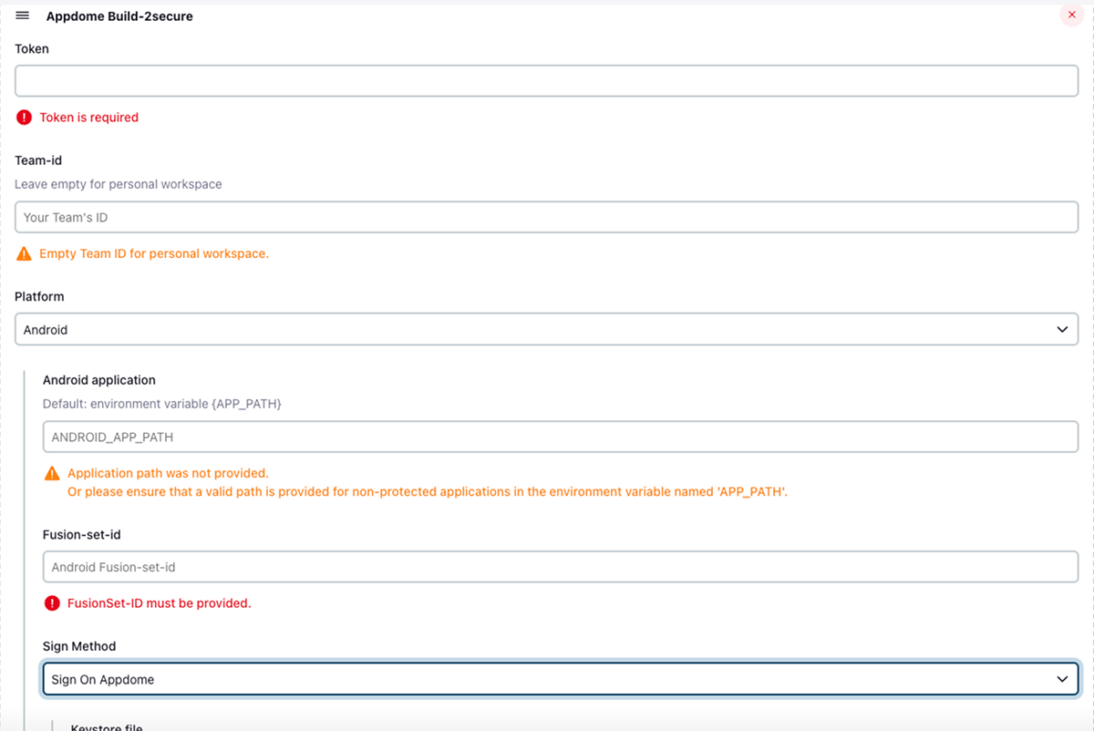
Step 3: Configure Appdome build-2Secure Plugin Configuration
- Enter your Appdome Build2Secure API token in the Token field by following the instructions provided in the section Getting and resetting your API Token on the Appdome website.
- Enter your Team ID API token in the Team ID field by following the instructions provided in the section Getting a Team’s ID on the Appdome website.
- Enter the appropriate Fusion Set ID in the Fusion-set-id field by following the instructions provided in the section Getting a Fusion Set’s ID on the Appdome website.
- Depending on the type of application you are building, use the Platform field to select either iOS or Android.
If you want to learn more about file paths, read the description below; otherwise, proceed to the next step.
File Paths
When working with files, you can set the files in any of the following methods:
- Provide the full path to the file, which should be located on the node machine.
- Use environment variables with the Environment Injector plugin or configure the node machine settings in Jenkins.
- Set a remote URL link to a file either on the configuration page or as an environment variable.
For instructions on how to set environment variables, see Appendix A: How to Set Environment Variables.
Warning
When using the configuration form, any input that has the same field as an environment variable (e.g., the key store’s path) will take precedence, i.e., it will override the environment variable. Therefore, to ensure proper use of the environment variable input, you must verify that these variables are unique and do not also appear in the configuration form.
Use the iOS/Android application field to choose any of the following options:
- Specify the full path to the application file on the node where it is running
- Set the environment variable name as APP_PATH. If an environment variable is defined, leave the <platform> application field (i.e., Android application or iOS application) empty.
- You can set a remote URL link to a file either on the configuration page or as an environment variable named APP_PATH.
Note: The URL link should not contain any commas.
Use the keystore file field to choose any of the following options:
- Specify the full path to the keystore file on the node where it is running
- Set the environment variable name KEYSTORE_PATH. If an environment variable is defined, leave the keystore field empty.
- You can set a remote URL link to a file either on the configuration page or as an environment variable named KEYSTORE_PATH.
Note: The link should not contain any commas.
Use the Provisioning Profile field under iOS signing, and choose any of the following options:
- Specify the full path to the provisioning profile file(s) on the node where it is running. You can add as many files as needed, each file on a new textbox
- You can set a remote URL link to a file either on the configuration page or as an environment variable named MOBILE_PROVISION_PROFILE_PATHS. If an environment variable is defined, leave the Provisioning Profile field empty.
- Set the environment variable name MOBILE_PROVISION_PROFILE_PATHS. To insert multiple files in an environment variable, each file must be separated by ‘,’ without any spaces.
For example: First_file.mobileprovision, second_file.mobileprovision, third_file.mobileprovision… - Use the Entitlements field under iOS signing, and choose any of the following options:
- Specify the full path to the entitlement file(s) on the node where it is running, can add as many files as needed, each file on a new textbox
- Set the environment variable name as ENTITLEMENTS_PATHS
- You can set a remote URL link to a file either on the configuration page or as an environment variable named ENTITLEMENTS_PATHS.
To insert multiple files in an environment variable, each file must be separated by ‘,’ without any spaces.
For example: First_file.plist,second_file.plist,third_file.plist… - Use the Sign Method field to choose the method by which you want to sign your application. The options available will depend on the platform you are using.
The available sign options are:
For Android:
- Sign on Appdome – for further information, follow the instructions specified in the Knowledge Base article
How to Code Sign Secured Android Apps in DevSecOps Build System. - Private Signing – for further information, follow the instructions specified in the Knowledge Base article
How To Privately Code Sign Sealed Android Apps using DevSecOps Build System. - Auto-DEV Signing – for further information, follow the instructions specified in the Knowledge Base article
How to Automate Secure Android App Code Signing in DevOps CI/CD.
For iOS:
- Sign on Appdome – for further information, follow the instructions specified in the Knowledge Base article
How to Use Code Sign on Mac for Secured iOS Apps. - Private Signing – for further information, follow the instructions specified in the Knowledge Base article
How to Privately Code Sign Sealed iOS Apps using DevSecOps Build System. - Auto-DEV Signing – for further information, follow the instructions specified in the Knowledge Base article
How to Automate Secure iOS App Code Signing in DevOps CI/CD.
Android Only: Firebase Crashlytics Integration
In addition to securing and signing Android apps, Appdome provides a convenient integration with Firebase Crashlytics to automate the deobfuscation process. With this integration, Appdome can upload deobfuscated mapping files directly to your Crashlytics account.
To use it, check the checkbox and add your “FIREBASE_APP_ID” to the Firebase App ID textbox.
Android Only: Datadog Integration
In addition to securing and signing Android apps, Appdome provides a convenient integration with Datadog to automate the de-obfuscation process. With this integration, Appdome can upload de-obfuscated mapping files directly to your Datadog account. To use it, check the checkbox and add your “DATADOG_KEY” to the Firebase App ID textbox.
Use the Output Location field to enter a new value or leave the default value:
WORKSPACE/output/appdome_orig_app_name.aab/.apk/.ipa
If you would like to save the output of the built and secured application in a different location, specify a full path of the application example: <your_path/name_of_original_app’.aab/.apk/.ipa>.
The certified secure document PDF and the certified secure JSON will also be saved to this location under the names “Certified_Secure.pdf” and “Certified_Secure.json.”
Build with logs: Mark the checkbox if you’d like to build your app with diagnostic logs.
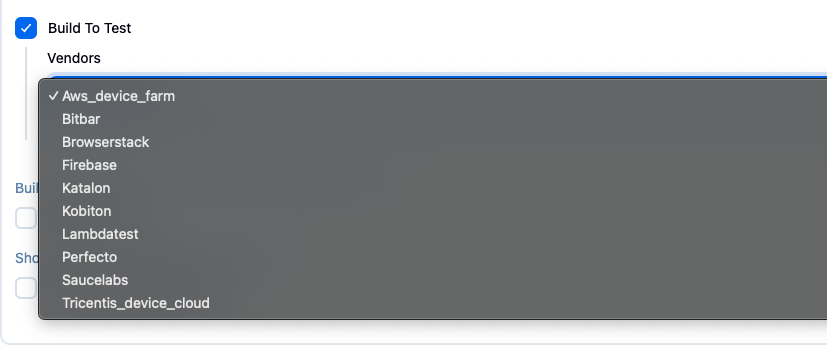
Build to Test: Allows automated testing of Appdome Secured Apps in standard DevOps testing suites.
Do not use this service for individual device testing.
Specify the supported Testing Service.
Second Output (.aab apps only): Mark the checkbox if you’d like to sign the second output. Set a path for the second .apk file to be downloaded.
Specify a full path for the application, for example, <your_path/second_output>.apk
Note: This option is only relevant for apps signed with Appdome Auto Sign or Private Sign. It is not applicable for Auto-Dev Private Signed apps.
Show workflow output logs: Mark the checkbox if you’d like to see any logs that are specifically generated by the Appdome integration at the “Console Output” as explained in “Step 6: Confirming Cyber Build and Sign on Appdome”. In addition, those logs will always be saved into a file named “workflow_output_logs.log” at your output location, as you defined it in the “Output Location” field.
Dynamic Certificate
Certificate pinning is a security technique that is used to ensure that only a specific, trusted server certificate is accepted when establishing HTTPS connections. This prevents attackers from using forged certificates to intercept data and perform man-in-the-middle (MITM) attacks.
The dynamic certificate input is a .zip archive file that contains:
- The certificate files (e.g., cer, .crt, .zip, .pem, .der)
- A certs.json file that maps hostnames to certificate filenames, using the format: { “<host>”: “<cert_file_name>” }
To enable the feature, follow these steps;
- Tick the Dynamic Certificate checkbox.
- Enter the absolute path to the zip file (containing the certificates and the JSON mapping file). For Example: /var/lib/jenkins/certs/dynamic_certificates.zip

After filling in all the required parameters, you can save the configuration and begin building and securing your application with the Appdome Build-2Secure for Jenkins. To do that, skip to Step 5.
Appdome Build-2Secure Plugin in Jenkins (Pipeline Project)
Step 1: Creating the Build-2Secure plugin in Jenkins
This step provides instructions for adding the Appdome Build-2Secure Plugin in both of the following methods:
- Adding the Appdome plugin to a new project
- Adding the Appdome plugin to an existing project
Adding the Appdome Plugin to a New Project
To add the Appdome plugin to a new project:
- From the Jenkins menu, click New Item.

- Assign a name to your project, select the pipeline type, and then click OK.
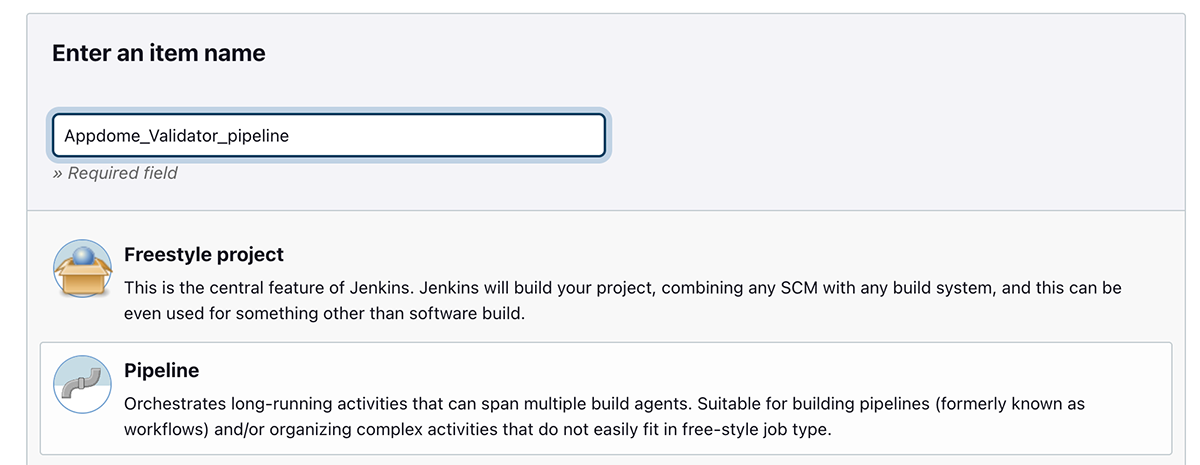
- Use the next page to select the Pipeline command.

- Write your pipeline steps as required.

- Proceed to set the Appdome build-2Secure plugin configuration, as described in the next step.
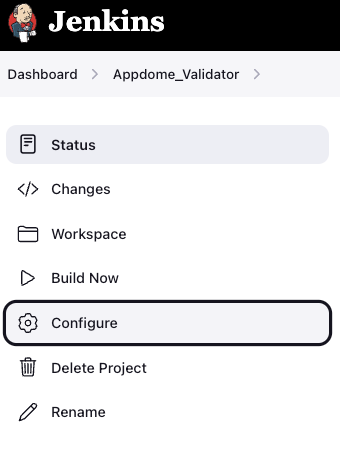
Adding the Appdome Plugin to an Existing Project
To add the Appdome plugin to an existing project:
-
- Select the project to which you want to add the plugin.
- Go to Configure from the Jenkins menu:
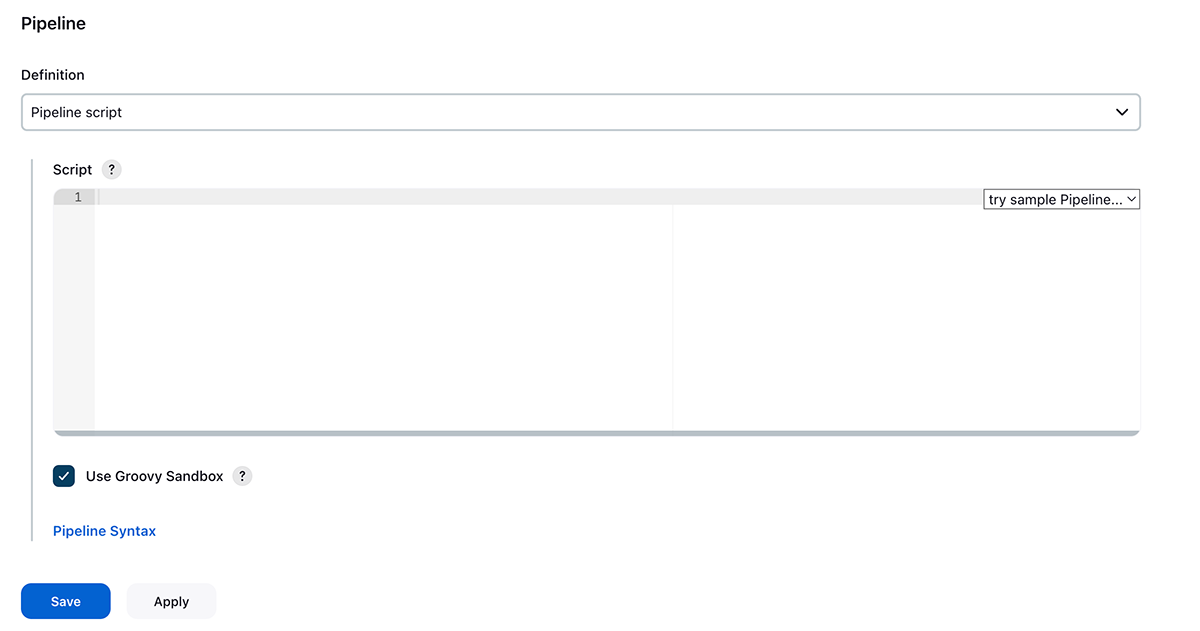
- Use the next page to select the Pipeline:

- Write your pipeline steps as required.
- Proceed to set the Appdome build-2Secure plugin configuration, as described in the next step.
Step 2: Configuring Build-2Secure Plugin on Appdome
To use the Appdome build-2Secure plugin, add one of the next pipeline templates:
Inputs explanation:
Replace all placeholders, which are located within brackets (for example, ‘<YOUR_TOKEN>‘) with the right value in accordance with the relevant template:
- To use the token field, replace ‘<YOUR_TOKEN>‘ with your Appdome Build2Secure API token. You can obtain this token by following the instructions provided in the API guide.
- To use the teamId field (optional), replace ‘<YOUR_TEAMID_OR_LEAVE_EMPTY_FOR_PERSONAL>‘ with your team ID or leave it empty for personal workspace. You can obtain this key by following the instructions provided in the API guide.
- To use the fusionSetId field, replace ‘<YOUR_FUSIONSET_ID>‘ with the appropriate fusion-set-id for your iOS or Android application. For details, see the section Getting a Fusion Set’s ID in the API guide. If you want to learn more about file paths, read the description below; otherwise, proceed to the next step.
- To use the Datadog field, replace ‘<YOUR_DATADOG_ID>‘ with your Datadog ID. This integration with Datadog automates the de-obfuscation process, allowing Appdome to upload de-obfuscated mapping files directly to your Datadog account.
- Additionally, include the following in each example of the Android templates:
datadog: <YOUR_DATADOG_KEY>
- To use the Crashlytics field, replace
<YOUR_FIREBASE_APP_ID>with your Firebase App ID. This integration with Firebase Crashlytics automates the deobfuscation process, allowing Appdome to upload de-obfuscated mapping files directly to your Crashlytics account.
Additionally, include the following in each example of the Android templates:crashlytics: <YOUR_FIREBASE_APP_ID
Dynamic Certificate
Certificate pinning is a security technique that is used to ensure that only a specific, trusted server certificate is accepted when establishing HTTPS connections. This prevents attackers from using forged certificates to intercept data and perform man-in-the-middle (MITM) attacks.
The dynamic certificate input is a .zip archive file that contains:
- The certificate files (e.g., cer, .crt, .zip, .pem, .der)
- A certs.json file that maps hostnames to certificate filenames, using the format: { “<host>”: “<cert_file_name>” }
To enable dynamic certificate pinning, follow these steps:
- Prepare the zip file according to the guidelines above.
- Include the zip file in your pipeline configuration by adding the dynamicCertificate parameter at the same level as the teamId and token. See the example below.
- Ensure the path is absolute and accessible from the Jenkins environment.
appdomeBuild2Secure(
teamId: StringWarp("YOUR_TEAM_ID"),
token: StringWarp("YOUR_AUTH_TOKEN"),
dynamicCertificate: StringWarp("PATH_TO_YOUR_DYNAMIC_CERTIFICATE_ZIP")
// other parameters... )
File Paths
When working with files, you can set the files in any of the following methods:
- Provide the full path to the file, which should be located on the node machine.
- Use environment variables with the Environment Injector plugin or Configure the node machine settings in Jenkins.
- Set a remote URL link to a file either on the configuration page or as an environment variable.
For instructions on how to set environment variables, see Appendix A: How to Set Environment Variables.
To use the appPath field
- Replace ‘<FULL_PATH_OR_URL_TO_APP_FILE>‘ with the full path on the node machine.
- Specify a full path to the file as an environment variable named APP_PATH. If using the environment variable, leave appPath empty.
- Replace ‘<FULL_PATH_OR_URL_TO_APP_FILE>’ with a remote URL link to a file either on the pipeline page or as an environment variable named APP_PATH. If using the environment variable, leave appPath empty.
Note: The URL link must not contain any commas.
To use the provisioningProfiles field under iOS signing. If you insert multiple files, each path to a file must be wrapped with “StringWarp,” as shown in the template.
You can select any of the following options:
- Replace ‘<FULL_PATH _OR_URL_TO_MobileProvision_FILE>‘ with the full path to provisioning profile file(s) on the node where it is running. You can add as many files as needed, and each path to a file must be wrapped with “StringWarp,” as shown in the template.
- Replace ‘<FULL_PATH _OR_URL_TO_MobileProvision_FILE>‘ with a remote URL link to a file either on the pipeline page or as an environment variable named MOBILE_PROVISION_PROFILE_PATHS. If using the environment variable, leave provisioningProfiles empty.
Note: The URL link should not contain any commas.
Specify the full path to the file using the environment variable MOBILE_PROVISION_PROFILE_PATHS. If you choose to use the environment variable, leave the provisioningProfiles field empty.
To insert multiple files as an environment variable, each file must be separated by ‘,’ without any spaces.
For example:
First_file.mobileprovision, second_file.mobileprovision, third_file.mobileprovision
Or:
- https://url_to_download/first_file.mobileprovision
- https://url_to_download/second_file.mobileprovision
- https://url_to_download/third_file.mobileprovision
Note: You can combine URL links with the complete path to local files stored on the node machine.
To use the entitlements field under iOS signing
If you insert multiple files, each path to a file must be wrapped with “StringWarp,” as shown in the template.
You can select any of the following options:
Replace ‘<FULL_PATH _OR_URL_TO_entitlements_FILE#i>‘ with the full path to entitlement file(s) on the node where it is running, you can add as many files as needed, each path to a file must be wrapped with “StringWarp” as shown in the template.
Replace ‘<FULL_PATH _OR_URL_TO_entitlements_FILE#i>‘ with a remote URL link to a file either on the pipeline page or as an environment variable named ENTITLEMENT_PATHS. If using the environment variable, leave entitlements empty.
Note: The URL link should not contain any commas
Specify the full path to the file using the environment variable ENTITLEMENT_PATHS. If you choose to use the environment variable, leave the entitlements field empty.
To insert multiple files as an environment variable, each file must be separated by ‘,’ without any spaces.
For example:
First_file.plist,second_file.plist,third_file.plist
Or
- https://url_to_download/first_file.plist
- https://url_to_download/second_file.plist
- https://url_to_download/third_file.plist
Note: You can combine URL links with the complete path to local files stored on the node machine.
To use the outputLocation field
If you leave outputLocation empty, the default value is set to:
‘WORKSPACE/output/appdome_name_of_original_app.aab/.apk/.ipa’
If you would like to save the output of the build and secured application in a different location, replace ‘<FULL_PATH_TO_OUTPUT_APP_OR_EMPTY_FOR_DEFAULT>‘ with the full path of the application example: <your_path/name_of_original_app’.aab/.apk/.ipa>.
The certified secure document PDF and the certified secure JSON will also be saved to this location under the names “Certified_Secure.pdf“ and “Certified_Secure.json. “
If the ‘Obfuscate App Logic’ option was selected for the Android Fusion, set, the ‘Deobfuscation_Mapping_Files.zip’ will be automatically downloaded to the same location as the protected application and named ‘Deobfuscation_Mapping_Files.zip.’
Build with logs: Build your app with diagnostic logs. To enable the build to test, go to the pipeline inside the AppdomeBuilder section and choose:
buildWithLogs: true
If you don’t want to use ‘buildWithLogs,’ you can either omit this parameter or set its value to ‘false.’
buildWithLogs: false
Build to Test: Allows automated testing of Appdome Secured Apps within standard DevOps testing suites. To utilize it, specify the supported Testing Service and use this syntax:
Note: It is not designed for individual device testing.
buildToTest: [selectedVendor: '<VENDOR_NAME>' ]
Insert the relevant <VENDOR_NAME> from the list:
SAUCELABS
BITBAR
LAMBDATEST
BROWSERSTACK
Second Output (.aab apps only): To sign the second output, specify a set path where the subsequent .apk file will be downloaded. Make sure to specify a full path for the application. To utilize it, enter the following syntax:
secondOutput: StringWarp('<PATH_TO_SECOND_OUTPUT>.apk')
The <PATH_TO_SECOND_OUTPUT> represents the full path for the application.
For example: <your_path/second_output>.apk
Note: This option is relevant only for apps signed either with Appdome Auto Sign or Private Sign. It is not applicable to Auto-Dev Private Signed apps.
Show workflow output logs: see any logs that are specifically generated by the Appdome integration at the “Console Output” as explained in “Step 6: Confirming Cyber Build and Sign on Appdome”.
To enable workflow output logs, go to the pipeline inside the AppdomeBuilder section and choose:
workflowOutputLogs: true
If you don’t want to use ‘workflowOutputLogs’, you can either omit this parameter or set its value to ‘false’.
workflowOutputLogs: false
In addition, those logs will always be saved into a file named “workflow_output_logs.log” at your output location as you defined it in the “Output Location” field.
All parameters within the pipeline template must be situated within the AppdomeBuilder section. Below is a comprehensive example that includes all the parameters:
This example, Android_AutoDevSign, includes a second output parameter and is for illustrative purposes only.
pipeline {
agent any
stages {
stage('Appdome Builder') {
steps {
script {
AppdomeBuilder(
outputLocation: '<FULL_PATH_TO_OUTPUT_APP_OR_EMPTY_FOR_DEFAULT>',
platform: AndroidPlatform(
appPath: '<FULL_PATH_OR_ENV_VAR_OR_URL_TO_APP_FILE>',
certificateMethod: Android_AutoDevSign
fingerprint: '<Your_SHA1_Fingerprint>'
googleSigning: true/false
),
fusionSetId: '<YOUR_FUSIONSET_ID>,
crashlytics: '<YOUR_FIREBASE_APP_ID>',
datadog: "<YOUR_DATADOG_KEY>"
),
teamId: 'YOUR_TEAMID_OR_LEAVE_EMPTY_FOR_PERSONAL',
buildToTest: [selectedVendor: 'VENDOR_NAME'],
secondOutput: StringWarp('<PATH_TO_SECOND_OUTPUT>.apk'),
buildWithLogs: true/false,
token:hudson.util.Secret.fromString('<YOUR_TOKEN>')
workflowOutputLogs: true
)
}
}
}
}
Step 3: Select the signing method for your iOS or Android application.
Android
Auto Signing: For additional information, follow the instructions in the Knowledge Base article How to Code Sign Secured Android Apps in DevSecOps Build System.
Private Signing: For additional information, follow the instructions in the Knowledge Base article How To Privately Code Sign Sealed Android Apps using DevSecOps Build System.
stage('Appdome Builder') {
  steps {
    AppdomeBuilder(
 	outputLocation: '<FULL_PATH_TO_OUTPUT_APP_OR_EMPTY_FOR_DEFAULT>',
 	platform: AndroidPlatform(
  		appPath: '<FULL_PATH_OR_ENV_VAR_OR_URL_TO_APP_FILE>',
  		certificateMethod: Android_PrivateSign(
    			fingerprint: '<Your_SHA1_Fingerprint>',
                        googleSigning: true/false
  			),
  			fusionSetId: '<YOUR_FUSIONSET_ID>'
  		),
 		teamId: '<YOUR_TEAMID_OR_LEAVE_EMPTY_FOR_PERSONAL>',
 		token: hudson.util.Secret.fromString('<YOUR_TOKEN>'))
                workflowOutputLogs: true/false
Auto-DEV Signing – for additional information, follow the instructions specified in the Knowledge Base article How to Automate Secure Android App Code Signing in DevOps CI/CD.
stage('Appdome Builder') {
    steps {
      AppdomeBuilder (
 	outputLocation: '<FULL_PATH_TO_OUTPUT_APP_OR_EMPTY_FOR_DEFAULT>',
 	platform: AndroidPlatform(
  		appPath: '<FULL_PATH_OR_ENV_VAR_OR_URL_TO_APP_FILE>',
  		certificateMethod: Android_AutoDevSign(
    			fingerprint: '<Your_SHA1_Fingerprint>',
    			googleSigning: true/false
  			),
  			fusionSetId: '<YOUR_FUSIONSET_ID>'
  		),
 		teamId: '<YOUR_TEAMID_OR_LEAVE_EMPTY_FOR_PERSONAL>',
 		token: hudson.util.Secret.fromString('<YOUR_TOKEN>'))
                workflowOutputLogs: true/false

 	}
iOS
Auto Signing: For additional information, follow the instructions specified in the Knowledge Base article How to Use Code Sign on Mac for Secured iOS Apps.
stage('Appdome Builder') {
    steps {
 	AppdomeBuilder(
 		outputLocation: '<FULL_PATH_TO_OUTPUT_APP_OR_EMPTY_FOR_DEFAULT>',
 		platform: IosPlatform(
  		appPath: '<FULL_PATH_OR_ENV_VAR_OR_URL_TO_APP_FILE>',
  		certificateMethod: iOS_SignOnAppdome( #Note: Previously was "iOS_AutoSign",has backward compatibility entitlements: [
         StringWarp('<FULL_PATH_OR_ENV_VAR_OR_URL_TO_entitlements_FILE#1>'),
         StringWarp('<FULL_PATH_OR_ENV_VAR_OR_URL_TO_entitlements_FILE#2>'),
         StringWarp('<FULL_PATH_OR_ENV_VAR_OR_URL_TO_entitlements_FILE#N>')
    ],
    		keystorePassword: hudson.util.Secret.fromString('<YOUR_KEYSTORE_PASSWORD>'),
    		keystorePath: '<FULL_PATH_OR_ENV_VAR_OR_URL_TO_KEYSTORE_FILE>',
    		provisioningProfiles: [
         StringWarp('<FULL_PATH_OR_ENV_VAR_OR_URL_TO_MobileProvision_FILE#1>'),
         StringWarp('<FULL_PATH_OR_ENV_VAR_OR_URL_TO_MobileProvision_FILE#2>'),
         StringWarp('<FULL_PATH_OR_ENV_VAR_OR_URL_TO_MobileProvision_FILE#N>')
    ]
  			),
  			fusionSetId: '<YOUR_FUSIONSET_ID>'
  		),
 		teamId: '<YOUR_TEAMID_OR_LEAVE_EMPTY_FOR_PERSONAL>',
 		token: hudson.util.Secret.fromString('<YOUR_TOKEN>'))
                workflowOutputLogs: true/false
    }
}
Private Signing: For additional information, follow the instructions specified in the Knowledge Base article How to Privately Code Sign Sealed iOS Apps using DevSecOps Build System.
stage('Appdome Builder') {
  steps {
  	AppdomeBuilder (
  		outputLocation: '<FULL_PATH_TO_OUTPUT_APP_OR_EMPTY_FOR_DEFAULT>',
 		platform: IosPlatform (
  		appPath: '<FULL_PATH_OR_ENV_VAR_OR_URL_TO_APP_FILE>',
  		certificateMethod: iOS_PrivateSign ([
        StringWarp('<FULL_PATH_OR_ENV_VAR_OR_URL_TO_MobileProvision_FILE#1>'),
        StringWarp('<FULL_PATH_OR_ENV_VAR_OR_URL_TO_MobileProvision_FILE#2>'),
        StringWarp('<FULL_PATH_OR_ENV_VAR_OR_URL_TO_MobileProvision_FILE#N>')
                 ]),
  		fusionSetId: '<YOUR_FUSIONSET_ID>'
  		),
  	teamId: '<YOUR_TEAMID_OR_LEAVE_EMPTY_FOR_PERSONAL>',
 	token: hudson.util.Secret.fromString('<YOUR_TOKEN>'))
        workflowOutputLogs: true/false

 	}
}
Auto-DEV Signing: For additional information, follow the instructions in the Knowledge Base article How to Automate Secure iOS App Code Signing in DevOps CI/CD.
stage('Appdome Builder') {
  	steps {
  		AppdomeBuilder (
 			outputLocation: '<FULL_PATH_TO_OUTPUT_APP_OR_EMPTY_FOR_DEFAULT>',
 			platform: IosPlatform(
  			appPath: '<FULL_PATH_OR_ENV_VAR_OR_URL_TO_APP_FILE>',
  				certificateMethod: iOS_AutoDevSign(
    				entitlements: [
       StringWarp('<FULL_PATH_OR_ENV_VAR_OR_URL_TO_entitlements_FILE#1>'),
       StringWarp('<FULL_PATH_OR_ENV_VAR_OR_URL_TO_entitlements_FILE#2>'),
       StringWarp('<FULL_PATH_OR_ENV_VAR_OR_URL_TO_entitlements_FILE#N>'),
   			 ],
    				provisioningProfiles: [
       StringWarp('<FULL_PATH_OR_ENV_VAR_OR_URL_TO_MobileProvision_FILE#1>'),
       StringWarp('<FULL_PATH_OR_ENV_VAR_OR_URL_TO_MobileProvision_FILE#2>'),
       StringWarp('<FULL_PATH_OR_ENV_VAR_OR_URL_TO_MobileProvision_FILE#N>')
    			]
  				),
  				fusionSetId: '<YOUR_FUSIONSET_ID>'
  			),
                       teamId: '<YOUR_TEAMID_OR_LEAVE_EMPTY_FOR_PERSONAL>',
                       token: hudson.util.Secret.fromString('<YOUR_TOKEN>'))
How Do I Learn More?
If you have any questions, please send them our way at support.appdome.com or via the chat window on the Appdome platform.
Thank you!
Thanks for visiting Appdome! Our mission is to secure every app on the planet by making mobile app security easy. We hope we’re living up to the mission with your project. If you don’t already have an account, you can sign up for free.