How to Sign your Android App Using Appdome's Auto-Dev Private Signing Script
Auto-DEV Private Signing allows you to sign Android apps securely and automatically within your own environment while keeping sensitive signing credentials—such as private keys and keystore passwords—fully under your control.
During the process, you provide at least one SHA-1 or SHA-256 certificate fingerprint to seal the app. Once sealed, Appdome generates a local signing script (sign.sh) that includes the protected app artifact. You can download and run this script locally, supplying your keystore file, passwords, and key alias to produce a fully signed Android app.
Auto-DEV Private Signing is designed for automation and integrates easily into CI/CD pipelines. Build systems such as Jenkins, GitLab CI, and Bitrise can incorporate Auto-DEV signing to enable secure, consistent, and repeatable Android app delivery.
Trusted Signing Certificates
Auto-DEV Private Signing uses Appdome’s Trusted Signing model to validate signing integrity based on authorized certificate fingerprints, rather than distribution-specific signing behavior. Customers explicitly define which signing certificates are trusted, and any app signed with one of these certificates is considered valid and will not trigger anti-tampering protections.
This unified model replaces previous toggle-based signing behavior and enables consistent signing across production, testing, and enterprise distribution workflows.
Before You Begin
Ensure the following prerequisites are met:
-
You have an Appdome IDEAL or higher account with Appdome-DEV access
-
Your app is built with Appdome’s features and is ready to be signed
-
Your Android SDK Build Tools version is 35.0.0 or later
This version includes required updates toapksigner(16KB alignment and ZIP alignment metadata) -
The Java version in your local environment is equal to or newer than the version used to generate your keystore
To verify, run:java -version -
You have access to your Android signing keystore
-
At least one SHA-1 or SHA-256 certificate fingerprint is available (required for Auto-DEV Private Signing)
Environment Requirements
macOS / Linux
-
Python 3.6 or later
-
keytool(JDK 1.8 or later) -
zipalign(Android SDK Build Tools 35.0.0 or later) -
apksigner(Android SDK Build Tools)
Windows
-
Windows Subsystem for Linux (WSL)
-
A Linux distribution supporting OpenJDK 8 (for example, Ubuntu)
-
Python 3.6 or later
1. Generate a Certificate Fingerprint
The fingerprint is a one-way hash of the certificate stored in the Android signing Keystore.
Local signing may fail if the certificate fingerprint you provide doesn’t match the keystore, due to Appdome’s Anti-Tampering protections.
To get the fingerprint, follow these steps:
Step by Step:
- On your workstation, run:
keytool -list -v -keystore <path_to_keystore> -storepass <store pass> -alias <alias>
Alternatively, use this command:
keytool -printcert -jarfile <apk/aab_file>
The SHA1 or the SHA256 of the signature will be marked inside the output. This is a public identifier that can also be extracted from the signed .apk. The output should look like this:
test-alias, Nov 20, 2017, PrivateKeyEntry,
Certificate fingerprint (SHA1):BE:D2:E3:17:9F:20:9A:F9:CF:55:E8:31:21:8C:7E:C7:7F:87:62:26
- Copy the fingerprint.
2. Seal The App in Appdome
Step by step:
- Generate the SHA-1 or SHA-256 certificate fingerprint from your signing keystore.
- Select the APK or AAB you want to sign (the app must complete the Build process).
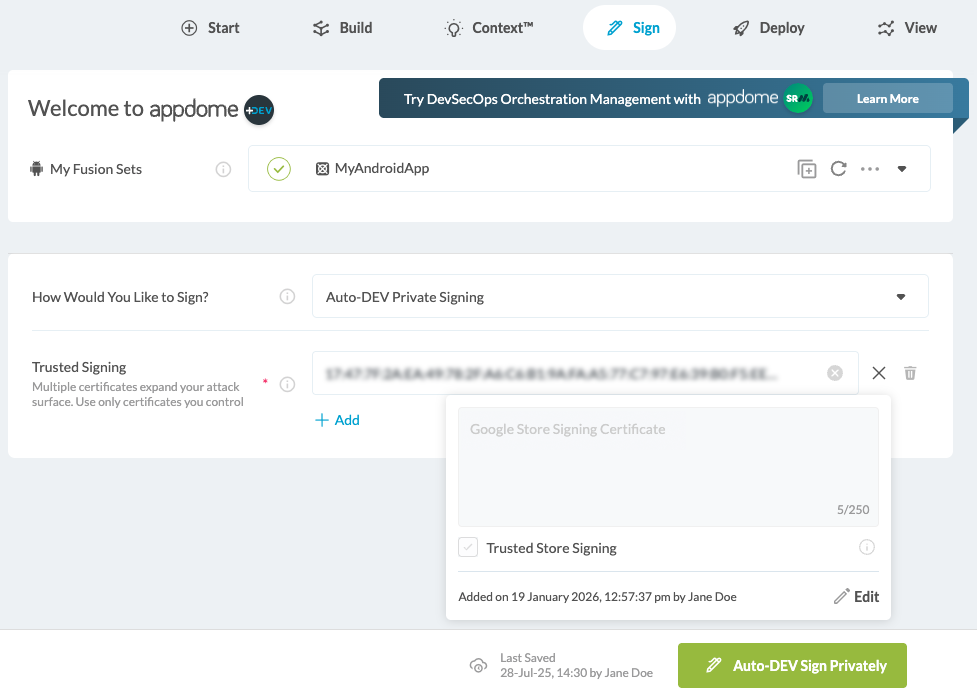
- In the upper navigation bar, select Sign.
- Next to How Would You Like to Sign?, select Auto-DEV Private Signing.
- Under Trusted Signing Certificates, click + to add a SHA-1 or SHA-256 certificate fingerprint
- (Optional) Add an Annotation to document certificate usage.
- (Optional) Select the Trusted Store Signing checkbox
- Select Auto-DEV Sign Privately.
- In the pop-up message, select Continue with Private Signing.
- (Optional) Select the checkbox to save your signing credentials.
- Once sealing is complete, download the app and the generated signing script.
…
3. Configure Your Environment
For Mac OS or Linux:
Step by Step:
- Locate your zipalign and apksigner executables on your computer.
- Add their full location (SDK Built tools) to your environment $PATH variable, for example:
export PATH=$PATH:$ANDROID_HOME/build-tools/29.0.0
For Windows-Subsystem-Linux
Step by Step:
After you have installed the Linux distribution on your Windows computer, open the WSL console and run the following commands:
sudo apt update sudo dist-upgrade -y && sudo apt update
sudo dist-upgrade -y && sudo apt install -y unzip zipalign lib32z1 openjdk-8-jdk gradle
curl https://dl.google.com/android/repository/sdk-tools-linux-4333796.zip --output/tmp/sdk-tools-linux-4333796.zip
unzip/tmp/sdk-tools-linux-4333796.zip -d ~/Android
export JAVA_HOME=/usr/lib/jvm/java-8-openjdk-amd64
cd Android/tools/bin
./sdkmanager "platform-tools" "platforms;android-29" "build-tools;29.0.0"
export ANDROID_HOME=~/Android
export PATH=$PATH:$JAVA_HOME/bin:$ANDROID_HOME/tools:$ANDROID_HOME/platform-tools:$ANDROID_HOME/build-tools/29.0.0
cd ~
android update sdk --no-ui
gradle -v
adb start-server
4. Run the Auto-DEV Private Script
In some environments, you may be required to grant executable permissions to the signing script (using chmod +x command).
Step by Step:
To run the automatic private signing script, use the following command:
sign.sh --output <path_to_outputfile.apk or path_to_outputfile.aab> --keystore <path_to_keystore> --keystore_pass <keystore password> --key_pass <key password> --keystore_alias <key alias>
Congratulations! You now have a signed app with Appdome’s Auto-DEV private signing script.
Related Articles
- How to Sign Secured iOS Apps Using a local Appdome supplied script
- How to Sign Secured Android Apps Using apksigner
- How to Code Sign Secured iOS Apps in DevSecOps Build System
- How to Sign Secured iOS Apps Using codesign
How Do I Learn More?
If you have any questions, please send them our way at support.appdome.com or via the chat window on the Appdome platform.
Thank you!
Thanks for visiting Appdome! Our mission is to secure every app on the planet by making mobile app security easy. We hope we’re living up to the mission with your project.