How to Use Radware's WAF with Appdome MobileBOT™ Defense
Introduction
Web Application Firewalls (WAFs), like the one offered by Radware, play a crucial role in protecting web applications from a wide range of cyber threats. Using Radware’s WAF with Appdome’s MobileBOT™ Defense solution offers app developers a streamlined approach to protect backend APIs against malicious bots and botnets, credential stuffing attacks, DDoS, invalid traffic and other automated attacks. In this guide, you’ll learn how to integrate Appdome’s Docker Image with Radware’s WAF.
Before delving into the steps, let’s understand some of the terms used:
MTLS (Mutual Transport Layer Security): Mutual TLS (mTLS) is a method for mutual authentication in which both parties in a network connection validate the SSL certificates presented by each other against a trusted root Certificate Authority (CA) certificate.
Client Certificate: In cryptography, a client certificate is a type of digital certificate that is used by client systems to make authenticated requests to a remote server.
Safe Session: Represents sessions that are determined to be safe or not at risk of any threat.
At Risk Session: Represents sessions that are potentially under threat or have detected anomalies.
Header Payload: The data transferred in the header of HTTP requests or responses. Protecting this data ensures that it cannot be tampered with during transit.
Prerequisites for Using Radware & Appdome Docker Image
For utilizing Appdome MobileBOT™ Defense with Radware, you’ll need the following:
- A Radware account with admin permissions
- An AWS, GCP, or Azure server with admin permissions
- An Android or iOS app secured by Appdome MobileBOT™ Defense
- An Appdome MobileBOT™ Defense License
Note: When signing your iOS apps, please make sure that your p12 certificate file includes this root CA any intermediate CAs.
You can validate the certificate contains the CA by using the following command:
openssl pkcs12 -info -in Radware.p12 -nodes -legacy
Getting Started with Radware WAF Setup and Configuration
- Upload SSL Certificates
- In the Radware portal, navigate to Assets > Certificates.
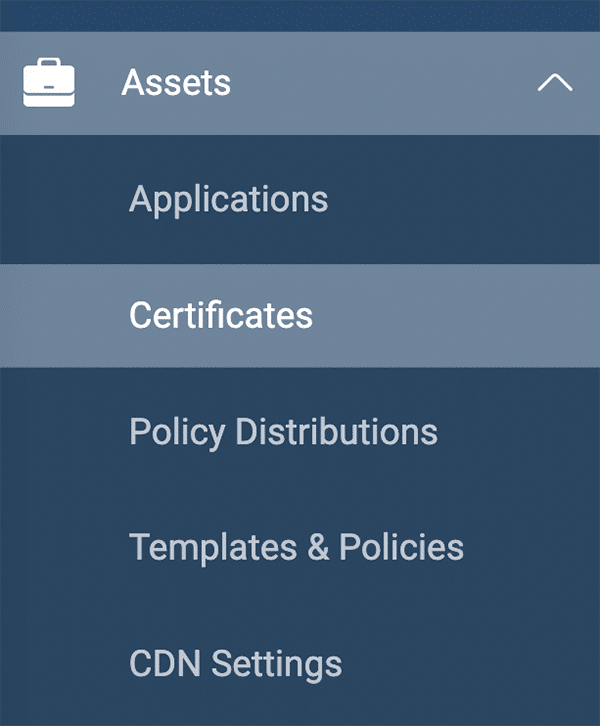
- In the Radware portal, navigate to Assets > Certificates.
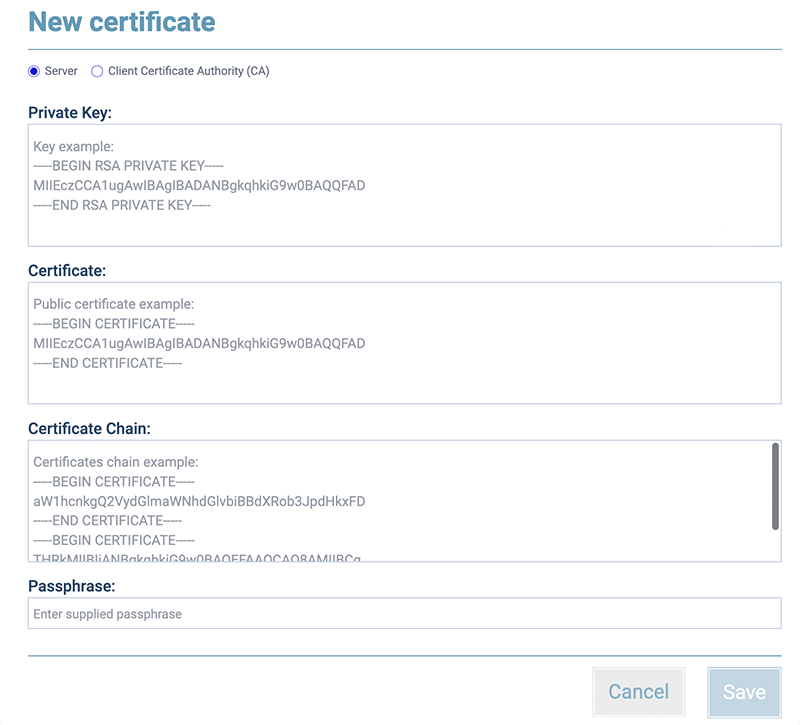
2. Add a new certificate
-
- Click the + sign to add a new certificate.

- Click the + sign to add a new certificate.
-
- Add your private key
- Click Save
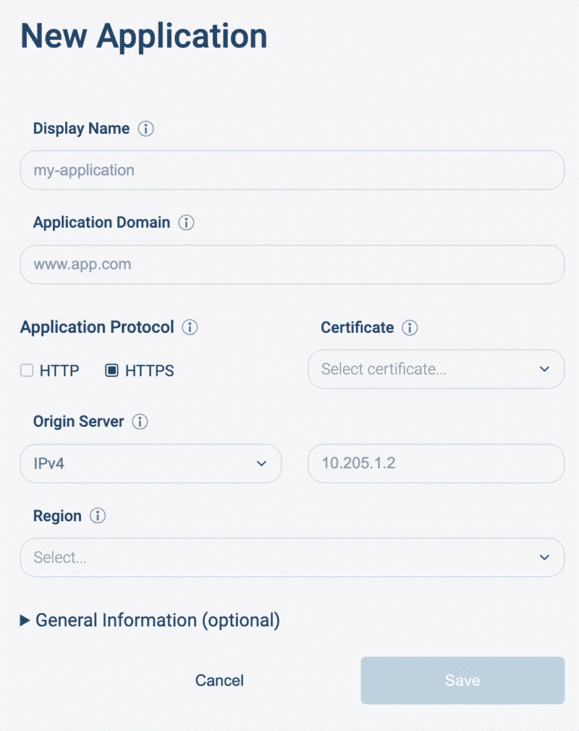
3. Create a new application
-
- Enter your Display Name
- Click Save
- Configure your VM instance, including selecting the Linux distribution you prefer (e.g., Ubuntu, CentOS).
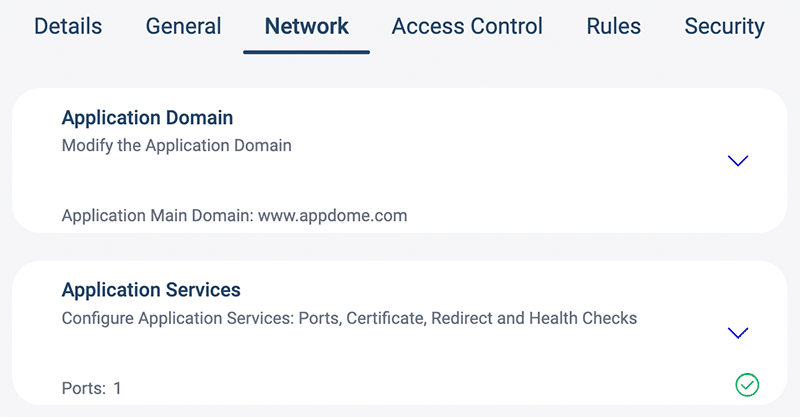
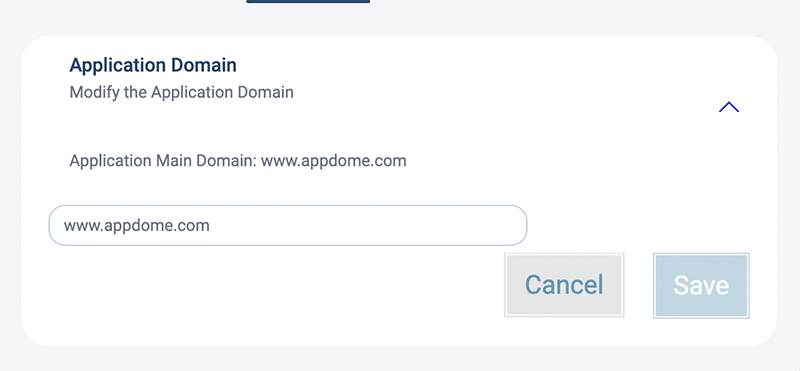
4. Add an Application Domain
-
- In the Radware portal, Navigate to the Network tab
- Enter your Application Domain Name
- Click Save
4. Add Application Services
-
- Add a new service
- Configure the Front-End port 443
- Configure the Back-End port 443
- Add your SSL certificate
- Click Save

5. Add an Origin Server
-
- Add a FQDN ipv4 server address and your server domain name
Note: This is where the Appdome Docker Image instance will run
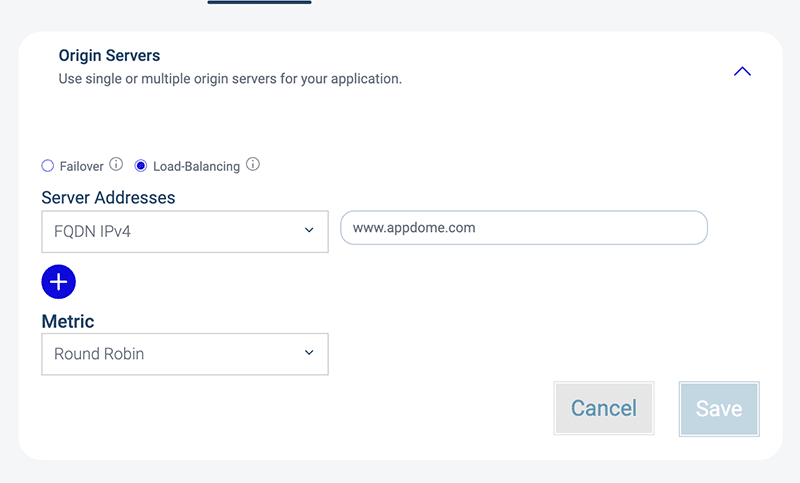
- Add a FQDN ipv4 server address and your server domain name
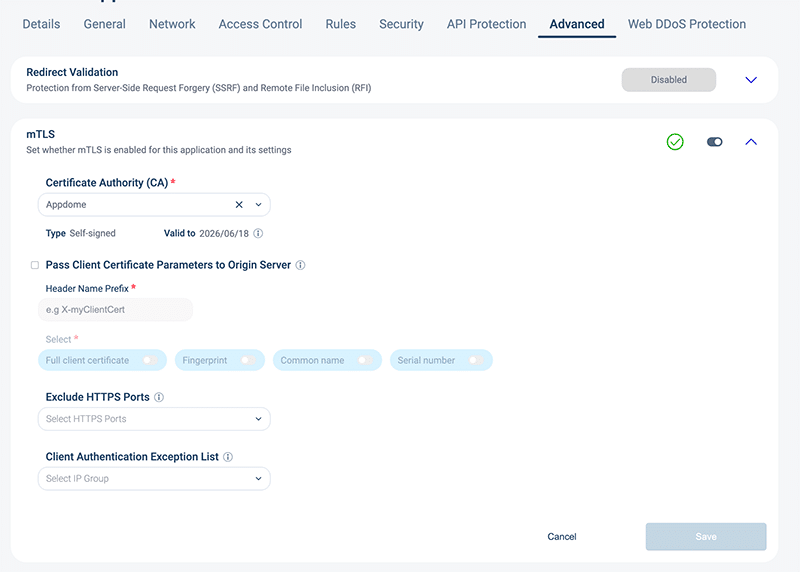
IMPORTANT: It is only necessary to configure the mTLS if you have enabled mTLS in the Appdome build process. Otherwise, skip ahead to the section “Configure Appdome’s Docker Image.”
Configure mTLS
-
- Click on Advanced
- Select the root CA certificate
- Important note: when uploading the P12 certificate to the MobileBOT profile of your protected domain on the Appdome platform, the P12 file must contain this root CA and any intermediates CAs
- Click Save
- Turn on the mTLS toggle
At this point, everything on the Radware side is ready; you can now set up your GCP, Azure or AWS server, or any cloud provider of your choice.
Links to Dedicated KBs:
- GCP: To set up a server on the Google Cloud Platform and configure it with Appdome’s Docker Image, follow this guide.
- Azure: To set up a server on Microsoft Azure and configure it with Appdome’s Docker Image, follow this guide.
- AWS: To set up a server on Amazon Web Services and configure it with Appdome’s Docker Image, follow this guide.
Note: If you are using Radware and GCP, make sure to populate the <server name> field with the domain name that is registered for this service. It needs to be the same server name that was configured in your Radware Origin server setup.
Configure Appdome’s Docker Image
Appdome’s Docker Image is a custom solution to secure apps built on the Appdome platform with the Anti-Bot service enabled. This service functions within a Docker container based on Nginx. To facilitate its operation, users must supply an SSL certificate, config files and keys, and designated environment variables.
Prerequisites: Familiarity with Docker and UNIX-based machines is beneficial.
How Does It Work?
Based on Nginx and Lua, the service employs the Lua module to decrypt the payload and validate the signature; then it proxies the request to the target route as specified in the config file.
The module can be used with either the built-in LRU cache or with Redis, but it is recommended to use the built-in LRU to reduce the overhead of making the calls to Redis and ease the setup. If working in a cluster, it is necessary to use Redis to share storage across multiple instances.
Setup
The following environment variables are required to set up the service.
| Environment Variable Name | Required | Description |
| REDIS | Optional | Only provide AD_REDIS_HOST if you intend to use it. |
| LOG_LEVEL | Optional | The default setting is warn. Available options include: debug, info, notice, warn, error, crit, alert, emerg. All logs are output to the stdout. |
| RESOLVER | Mandatory | Provide the resolver DNS server to use for discovering upstream servers. |
| PASSTHROUGH | Optional | A key that logs only headers but does not validate them. |
| USE_DEFAULT | False | If the default.json config file is passed in the configs folder and this variable is passed as true, only the default configuration will be used. This is meant for testing purposes without constantly updating the config file. |
1. Receive the JSON config file
- Obtain the JSON config file from our Appdome support team. The files will be named after the
taskIDof that build. There may be multiple files, each corresponding to different tasks.
2. Modify the JSON config file
- Add the following fields:
- key: The filename of the key that is relative to the /home folder in your docker container used for validation.
- target: The endpoint to which requests are forwarded. Make sure your DNS resolver resolves this address.
- heartbeat_validity (optional): Time in seconds for how long the heartbeat remains valid.
Example
[{
"key": "keys/your_key_file.key",
"target": "http://target_address",
"heartbeat_validity": 60
...
}]
3. Prepare the Docker Container:
– Ensure your Docker container has the necessary directories (`/home/configs` and `/home/keys`).
- Configs Directory: This directory will store JSON files containing mobile anti-bot configurations provided by Appdome.
- Keys Directory: This directory will store private keys used to validate the headers sent by Appdome.
Note: Ensure Key Matches. Verify that the key specified in the JSON config file correctly points to a key file located in the `/home/keys` directory within the Docker container.
Note: If you want to use only one config file for multiple task_ids for testing, rename the config file to default.json file and set the environment variable USE_DEFAULT=true. This setup is useful for initial testing but is not recommended for production if you regularly change the Anti-bot configuration.
4. Mount the JSON config file to the Docker Container
- Use the `docker run` command with the `-v` option to bind mount the host directories to the container directories.
By following these steps, you’ll be able to correctly set up and mount the JSON config file to your Appdome Docker container.
Optional: How to Configure SSL & mTLS
| Environment Variable Name | Description |
| SSL_ON | In order to enable the reverse proxy to handle SSL connections, you need to mark the SSL_ON=true. Make sure to mount SSL certificates to the container under /etc/nginx/certs/{ssl.crt, key.key}. |
| MTLS_ON | In order to enable the reverse proxy to handle mTLS, you need to set both SSL_ON and MTLS_ON=true. Make sure to mount the CA certificate that will be used for the mTLS under /etc/nginx/certs/ca.crt. |
| FINGERPRINTS | If MTLS_ON=true the certificate fingerprints can be passed to allow only specific certificates identified by a SHA1 fingerprint. The value format should include a string of comma-separated values with a space following each comma as follows: asd, zxc, qwe |
How to run Appdome Docker Image
Connect to your VM, and run the following commands:
-
- Pull the docker image from our public repository:
docker pull public.ecr.aws/n2i7f1e2/appdome-waf:1.0.6
- Pull the docker image from our public repository:
-
- Run the docker image with the following command:
docker run -p 443:443 -p 80:80 -d \
-v "$(pwd)"/certs:/etc/nginx/certs \
-v "$(pwd)"/keys:/home/keys \
-v "$(pwd)"/configs:/home/configs \
-e REDIS=<redis address> \
-e PASSTHROUGH=false \
-e RESOLVER=<resolver address> \
-e SSL_ON=true \
-e MTLS_ON=true \
-e FINGERPRINTS=asd, zxc, qwe \
-e LOG_LEVEL=debug \
--restart unless-stopped \
public.ecr.aws/n2i7f1e2/appdome-waf:1.0.6
- Run the docker image with the following command:
At this point, you have a machine that will run the Appdome Docker Image. Make sure that your application traffic is routing correctly to the Appdome Docker Image and that the Appdome Docker Image is passing the traffic correctly to the target.
Monitoring Docker Health
To ensure your Docker container is operational, it is important to configure a health check endpoint within your system’s monitoring tools. Set up an endpoint in your health monitoring system to regularly check the /_health endpoint of the Docker container. This setup helps confirm that the Docker container is running correctly and is responsive. You can use any system that supports health checks, ensuring it aligns with your deployment environment and monitoring needs.
Note: The health check only verifies that the docker is up and running, but it does not verify that the target is accessible. If you want to make sure that the connectivity between the reverse proxy and the target is working as expected, configure an additional health check that monitors the target connectivity.
Conclusion
By integrating Radware with your preferred Virtual Server and using Appdome’s MobileBOT™ Defense, you can protect your backend APIs against malicious bots and enhance the security of mobile apps. By mastering and implementing the aforementioned configurations, businesses can safeguard and optimize their mobile app traffic.
Related Articles:
How Do I Learn More?
If you have any questions, please send them our way at support.appdome.com or via the chat window on the Appdome platform.
Thank you!
Thanks for visiting Appdome! Our mission is to secure every app on the planet by making mobile app defense easy. We hope we’re living up to the mission with your project. If you don’t already have an account, you can sign up for free.