How to Sign Secured iOS Apps Using P12 Distribution Certificate
An app developer must sign iOS mobile apps before they can be installed on a mobile device. The process of acquiring a valid signing may be troublesome and requires intimate knowledge of the app’s operation modes, such as which entitlements are needed to tap into the full range of the app’s functionality, creating an iOS distribution certificate, etc. This may come with some difficulties, as apps provided by 3rd party vendors rarely come with a detailed manual. Luckily, signing iOS apps on Appdome is easy, effortless, and doesn’t require any prior knowledge. This Knowledge Base article will guide you through all the steps in order to create the necessary credentials for signing iOS apps so that you can sign secure iOS apps with a P12 Distribution Certificate.
This article will guide you through signing iOS apps on Appdome, including the signing credentials required to sign the app on Appdome. Signing iOS apps can be done using Appdome’s built-in signing capabilities or using your own mechanism outside of Appdome. It’s your choice. However, when signing iOS apps on Appdome, the process is quick and easy for any mobile app, including Native iOS/Android, hybrid apps, and non-native apps built-in Maui, Xamarin, Cordova, React Native, Ionic, and more. Signing apps on Appdome will leverage unique capabilities such as the automatic deployment of Fused apps into the Apple App Store and Leading EMM Stores.
Prerequisites
- A Mac computer
- Apple Developer or Enterprise Account
- App ID
- Production Distribution Certificate – P12 File
- Provisioning Profile
Overview
You need an Apple Developer Program or Apple Enterprise Developer Program account to create a signing certificate (P12 file), app ID, registered device list, and provisioning profile. This article explains the key differences and uses of these accounts and the concepts of App IDs, Distribution Certificates, and Provisioning Profiles.
Apple Developer or Enterprise Account
An Apple Developer Program or Apple Enterprise Developer Program account is needed to create a Signing Certificate (P12 file), App ID, Registered Device List, and Provisioning Profile.
Apple Developer Program Account
You can create an Apple Developer Program Individual account within a few minutes.
With this plan, there are two distribution methods:
-
- App Store – The app can be distributed to any number of devices through the Apple App Store. Devices do not need to be registered.
Note: You cannot use App Store distribution if you distribute apps through an Enterprise Mobility Management (EMM) solution or any other method other than the Apple App Store. - Ad Hoc Distribution – Apps can be loaded to 100 iPhones, 100 iPads, and 100 iPod Touches that must be registered by their UDIDs (Unique Device Identifier) within a provisioning profile before signing iOS apps.
- App Store – The app can be distributed to any number of devices through the Apple App Store. Devices do not need to be registered.
Note: Ad Hoc Distribution works to distribute apps through an Enterprise Mobility Management (EMM) solution or any method other than the Apple App Store.
Apple Developer Enterprise Program Account
For companies and educational institutions that intend to distribute apps they develop to employees within their organization, the Apple Developer Enterprise Program does not provide a method to distribute apps through the Apple App Store. Creating an Apple Developer Enterprise account requires you to have a D-U-N-S Number so that Apple can verify your organization’s identity and legal entity status.
In-House Distribution
- The app can be distributed to any number of devices through an Enterprise Mobility Management solution or any other distribution method other than the Apple App Store. Devices do not need to be registered.
- Apps can be loaded onto 100 iPhones, 100 iPads, and 100 iPod Touches, which must be registered by their UDIDs (Unique Device Identifiers) within a provisioning profile before signing iOS apps.
Note: Ad Hoc Distribution works for distribution apps using an Enterprise Mobility Management (EMM) solution or any other distribution method that is not through the Apple App Store.
App ID
An App ID is a unique identifier used to associate one or more apps with a specific development team. It is a two-part string composed of:
- Team ID: A unique identifier provided by Apple for your specific development team.
- Bundle ID Search String: A value you supply to match either the bundle ID of a single app (explicit App ID) or a group of apps (wildcard App ID). The term “Search String” refers specifically to the Bundle ID, which is the unique identifier for your app within the Apple ecosystem. It typically follows a reverse domain format, such as com.companyname.appname.
There are two types of App IDs:
- Explicit App ID: Designed for a single app, this is the most common choice for modern app development.
- Wildcard App ID: Allows multiple apps to share a single App ID. This option was available to enterprise accounts created before iOS 8 but is no longer supported for new enterprise accounts. A new enterprise account can use only an explicit app ID.
Distribution Certificate – P12 File
A P12 certificate file contains a certificate and a private key of the application’s vendor. The certificate must be installed on the machine that will sign the vendor’s applications. A distribution certificate identifies your team/organization within a distribution provisioning profile and allows you to submit your app to the Apple App Store. A P12 file contains the certificates Apple needs in order to build and publish apps. The certificate created in this example will work for an app that will be available on the App Store or for an Ad Hoc deployment that will also work with an EMM (Enterprise Mobility Management) solution.
Provisioning Profile
When distributing different iOS apps, they are usually signed with the same distribution certificate. The entity that changes when signing a different iOS app is the provisioning profile. A provisioning profile is a collection of digital entities that uniquely ties developers and devices to an authorized iPhone Development Team and enables a device to be used for testing.
There are four types of provisioning profiles you can create for iOS devices.
- Development: This type of provisioning profile requires a development certificate installed on each device on which you wish to run your application. It is used in the development cycle and allows developers to debug the application. It can only be installed on a set of pre-registered development devices and is not meant for any distribution scenario.
- App Store: This type of provisioning profile is attached to a specific distribution certificate. It is used to sign before submitting the application to the official iOS app store. After signing, the app will not install on any device and can only be used to upload to the app store.
- Ad Hoc: This type of provisioning profile is attached to a specific distribution certificate. It is used to distribute apps to a limited number of pre-registered devices. You can use this provisioning profile to distribute apps in a small organization where all devices are registered on the Apple site and assigned to this provisioning profile or for testing as part of the development cycle.
- In-House: This type of provisioning profile is only available for members of the Apple Developer Enterprise Program. You can use it to sign iOS apps for in-house distribution. Apps can be installed on any iOS device. In-house provisioning profiles are matched to specific distribution certificates.
Note: In-house provisioning profiles are typically used for distributing apps through an Enterprise Mobility Management (EMM) or Mobile Device Management (MDM) system. If you choose not to use an EMM or MDM system, users can still install your app using the iOS app file. However, they will need to trust your organization before they can launch the app manually. For more details, refer to the guide on Manually Trusting an Enterprise Developer.
Step by Step Instructions for Creating iOS Signing Credentials
1. Create an Apple Developer or Enterprise Account
- Create an Apple Developer Program or Enterprise account.
For more details, see Apple Developer documentation: Choosing a Membership. - Open the Apple Developer page: https://developer.apple.com
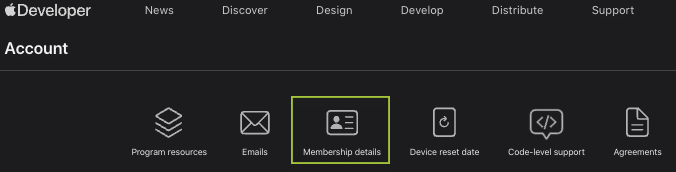
- Click on the Account button
- Click on the Membership details button.
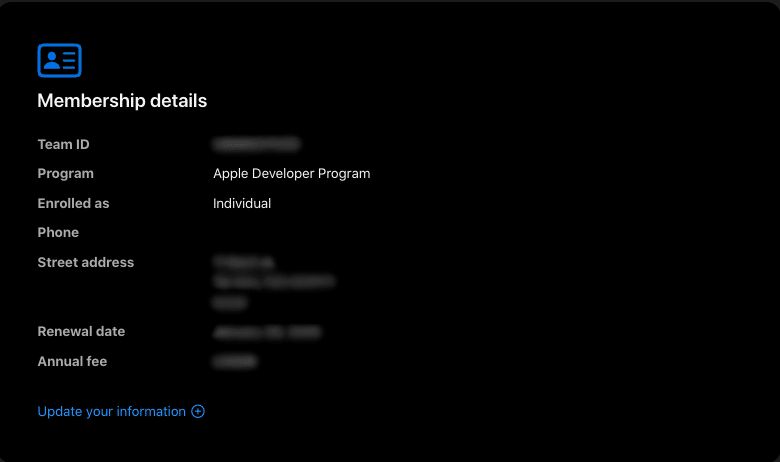
- Verify your account Entity Type from the Membership Details, as shown in the following screenshot. This example uses an Individual account.
2. Register an App ID
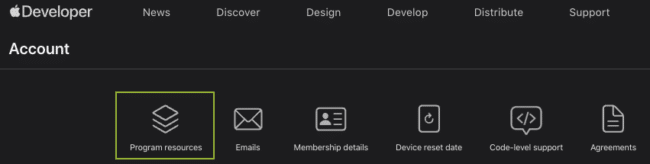
- Click on Program Resources
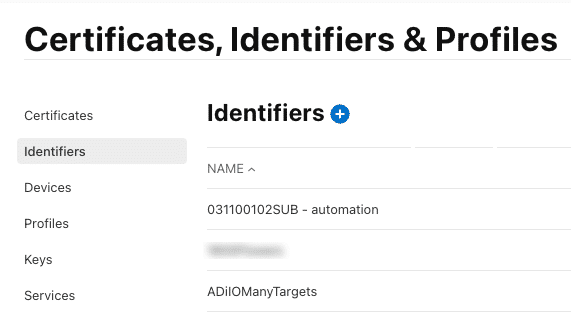
- Select Profiles

- Click on the tab labeled Identifiers.
- Click on the blue + sign button.
- Register a new App ID.
- Click Continue
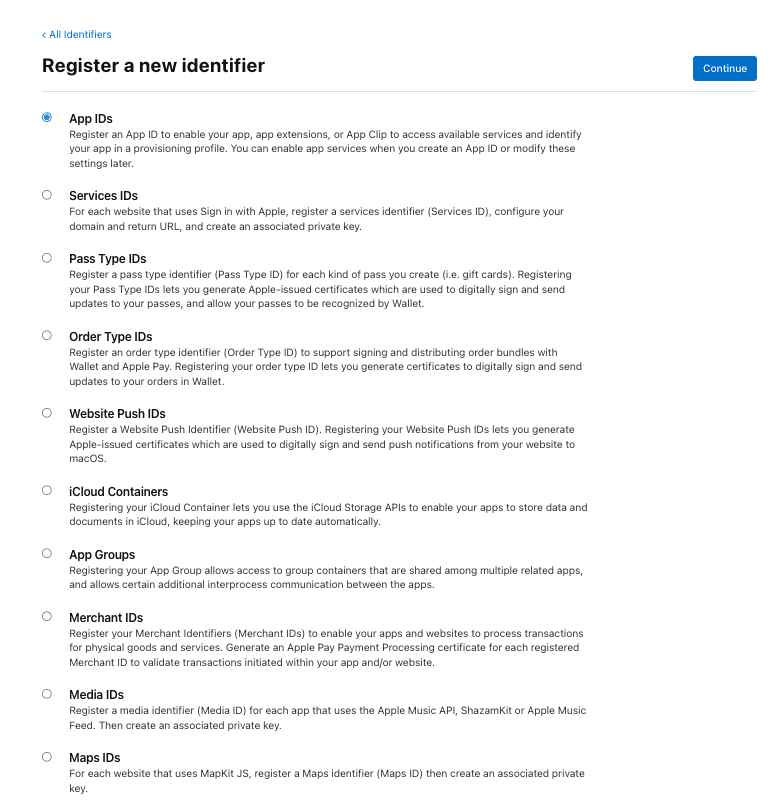
- Select a type: App
- Click Continue

- Enter your company name and text that will uniquely identify the app.
- Under the App ID Suffix, select Explicit. For the Bundle ID, enter the app’s unique bundle identifier, typically formatted in reverse domain notation, such as com.company.appname. While you may choose a Wildcard App ID, note that it has limitations on the App Services available to the app.
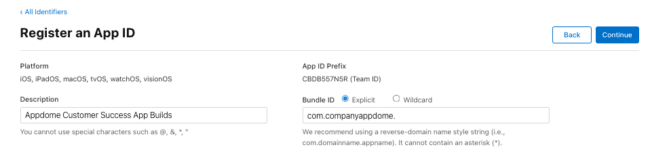
- Click Continue
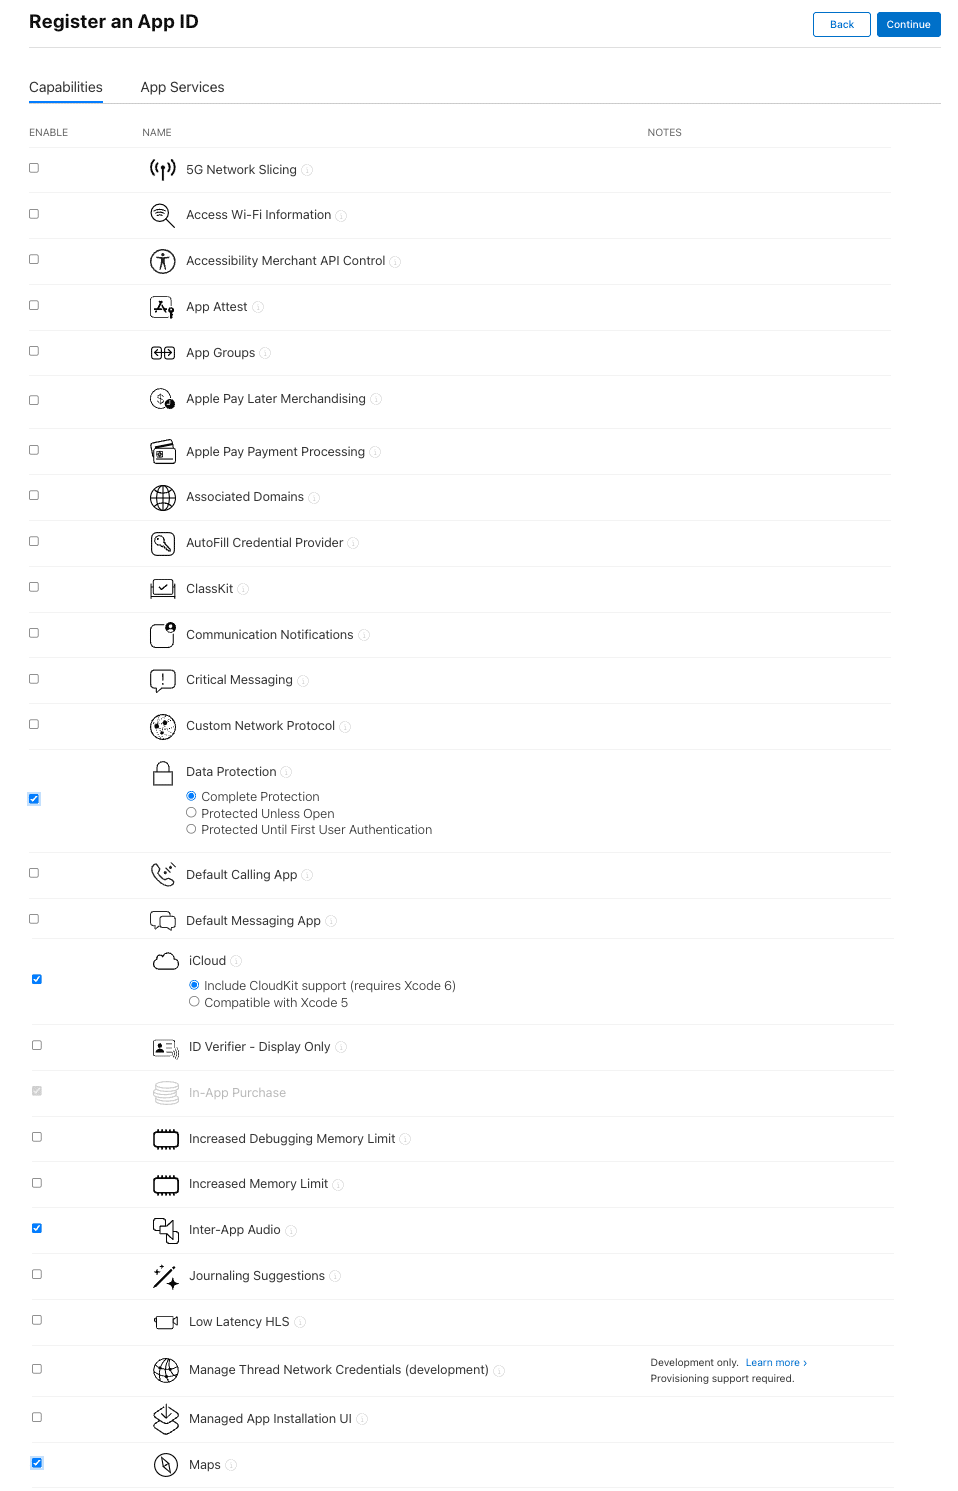
- Under Capabilities, check the boxes next to the services the app uses.
- Click Continue
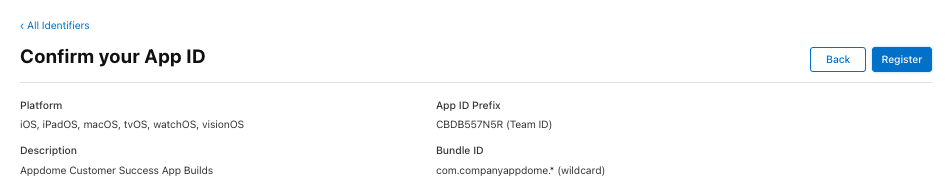
- Confirm your APP ID details.
- Click Register
Note: If you are using a third-party app or an app provided to you by a developer, you may not know which App Services (entitlements) to select. If you are not publishing on the Apple App Store, and you do not see the App services used, it is OK to select more options than what is actually being used by the app.
When signing iOS apps on the Appdome platform, the signing process will remove entitlements from the app if the provisioning profile does not include them. If the provisioning profile has entitlements that the app does not need, the signing process will continue without making any changes to the app. iOS will disregard entitlements in the provisioning profile that the app does not need.
Congratulations! You now have an App ID. Next, we will configure it to support push notifications, create a production distribution certificate, and create a provisioning profile.
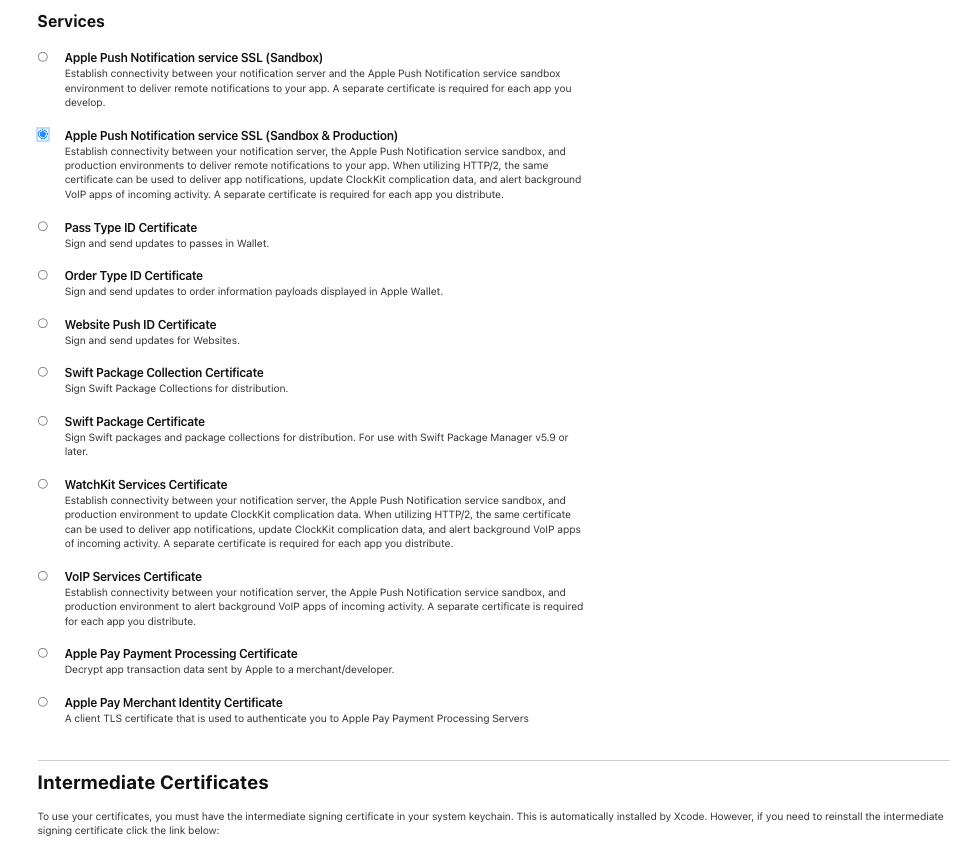
3. Setup Push Notifications
If your app uses push notifications, you must edit the Certificate that your App ID uses to enable them. This will also require creating Push Notification SSL certificates, as shown in the picture below.
- Click on the Certificates tab.
- Click on the blue + sign.
- Scroll down to Services.
- Select Apple Push Notification service SSL (Sandbox & Production)
4. Create a P12 Certificate File
Follow the steps outlined on the About Creating a Certificate Signing Request (CSR) page, as shown below.
- Open Keychain Access on your Mac.
- Click Keychain Access –> Certificate Assistant –> Request a Certificate from a Certificate Authority.
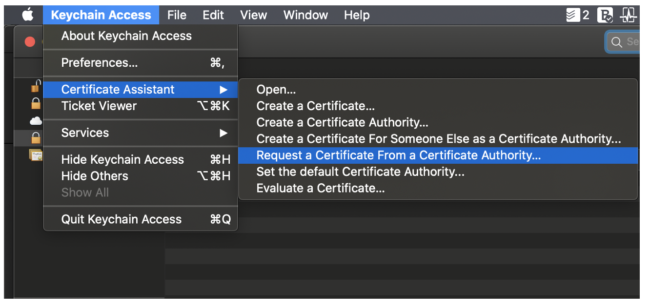
- Enter your information: Email Address and Certificate Common Name.
- Select the Saved to Disk option
- Click Continue.
Note: The CA Email is not needed if you are saving the CSR to disk.

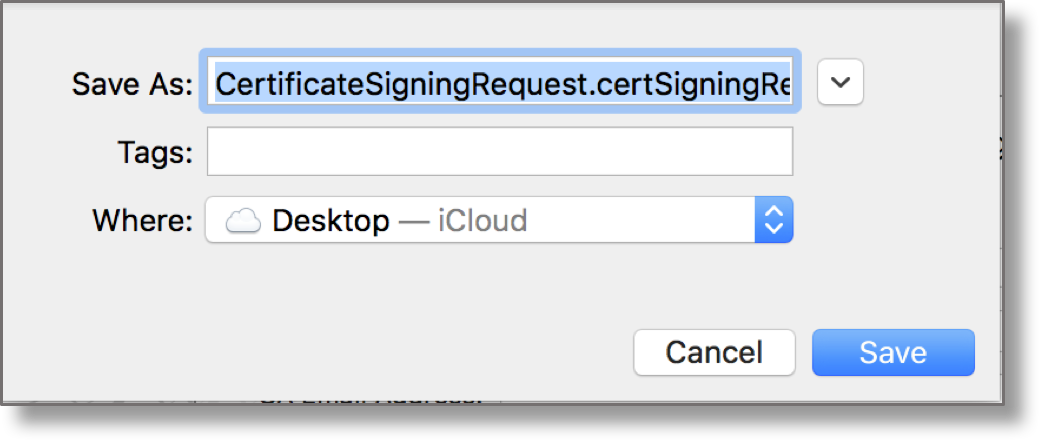
- Save the Certificate Signing Request File to a directory of your choice on your Mac.
- Go back to the Apple Developer webpage.
- To generate your certificate, you will need to import the certificate signing request.
- Click Continue

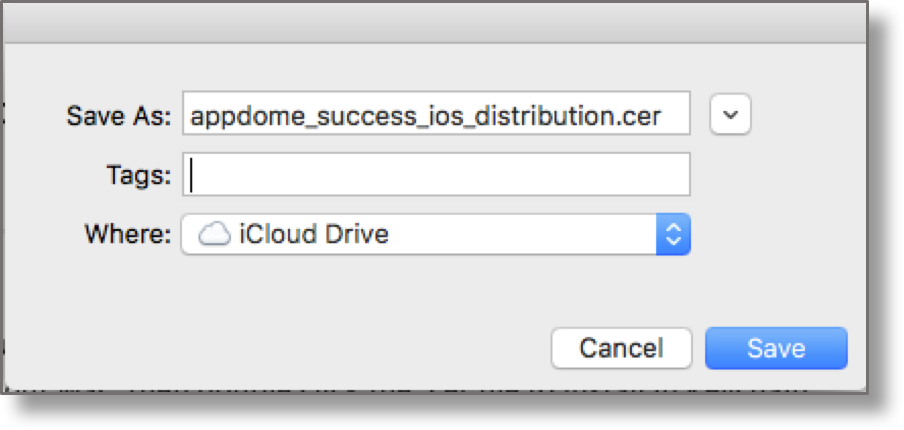
- Once your certificate is ready, click Download to download the certificate to your Mac.
- Give the certificate a name with a .cer extension and Save it to a location of your choice on your Mac.
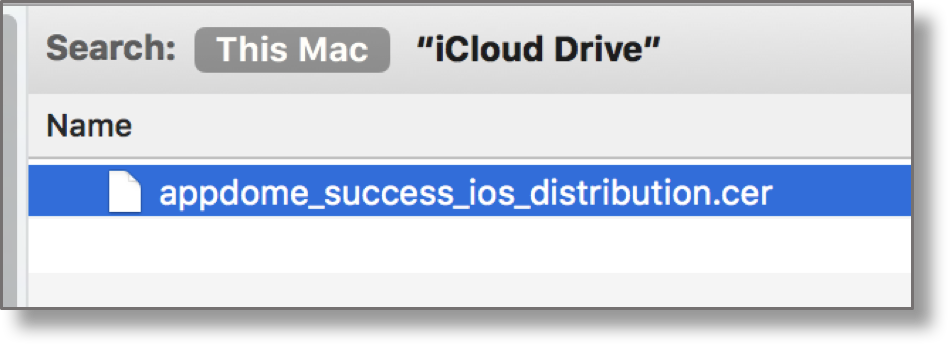
- Locate the certificate in Finder and double-click the certificate file name to add it to Keychain Access on your Mac. This needs to be done so you can create a P12 file from Keychain Access.
- Open Keychain Access on your Mac
- From the left navigation panel, under Category, select Certificates
- In the search bar, type: distribution
- Locate your new certificate and expand it by clicking the triangle icon to the left of the certificate name. After expanding, you should see a private key under the distribution certificate.
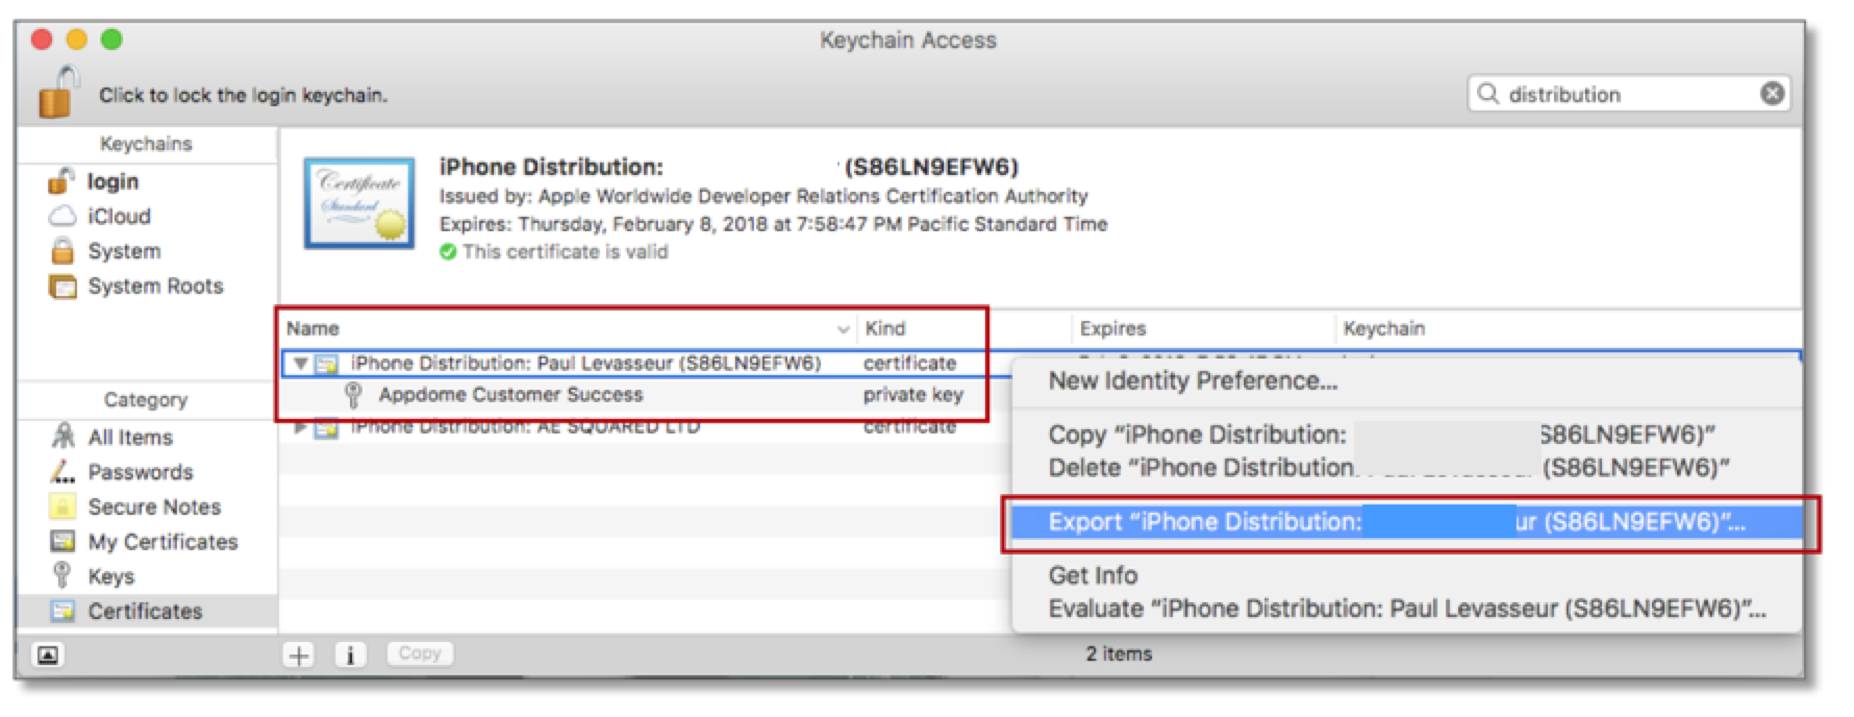
- Right-click the distribution certificate and click Export “iPhone Distribution:” to create a P12 certificate file containing the distribution certificate and the private key.
- Give the P12 certificate file a name, specify a location for where to save the file, then click Save. This P12 certificate will be used to sign apps on the Appdome platform.
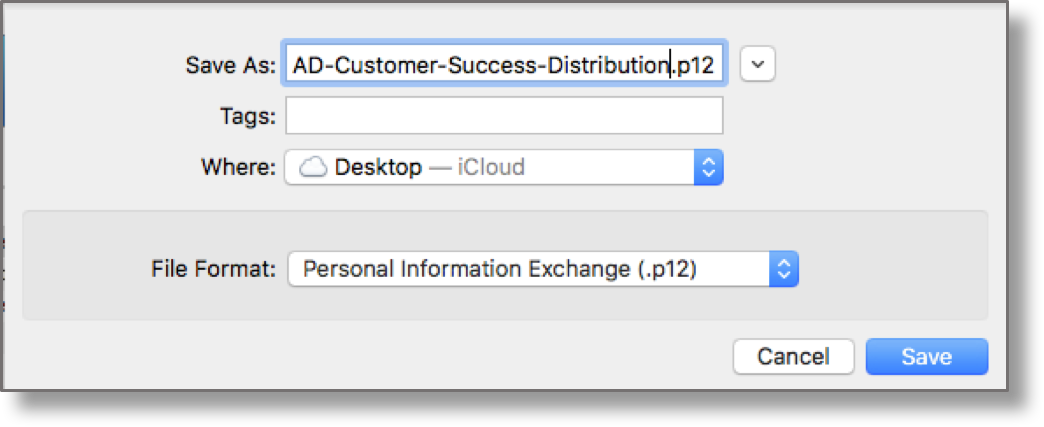
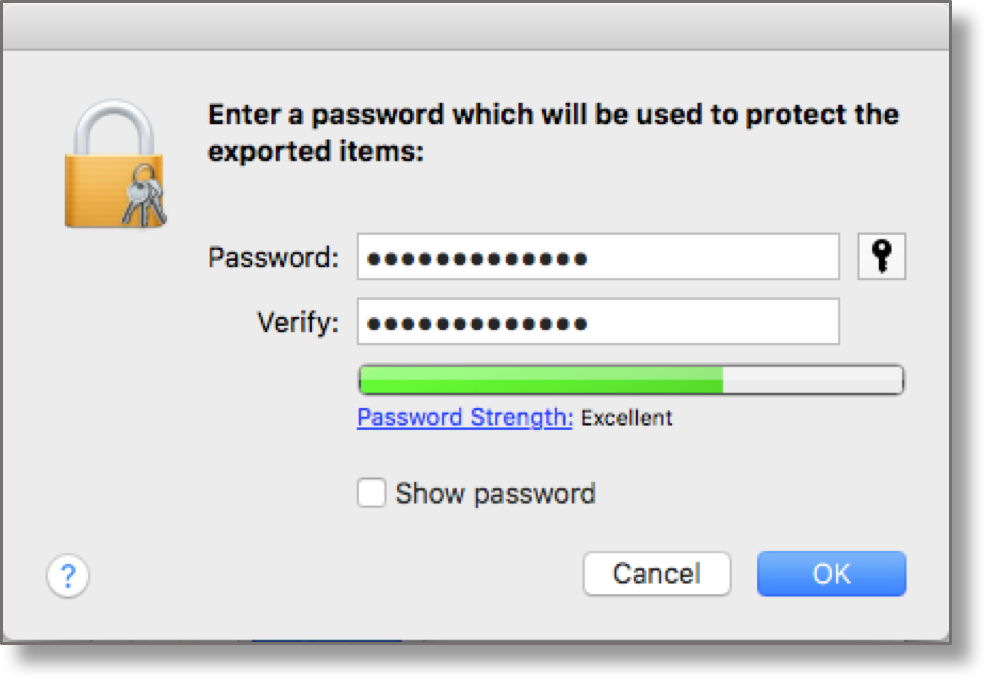
- After saving, you will be prompted to enter a password to protect the P12 certificate file.
- Click OK after entering and verifying your password.
IMPORTANT: Do not lose this password; it is required for future iOS signing.
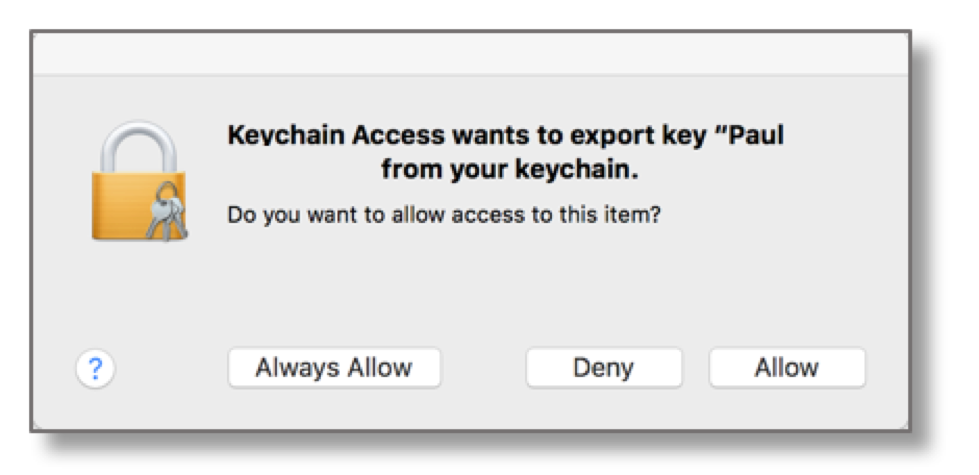
- If prompted, Allow Keychain Access to export the key from your keychain.
Congratulations! You now have a proper P12 certificate file. Next, we will create a provisioning profile to complete the signing credentials.
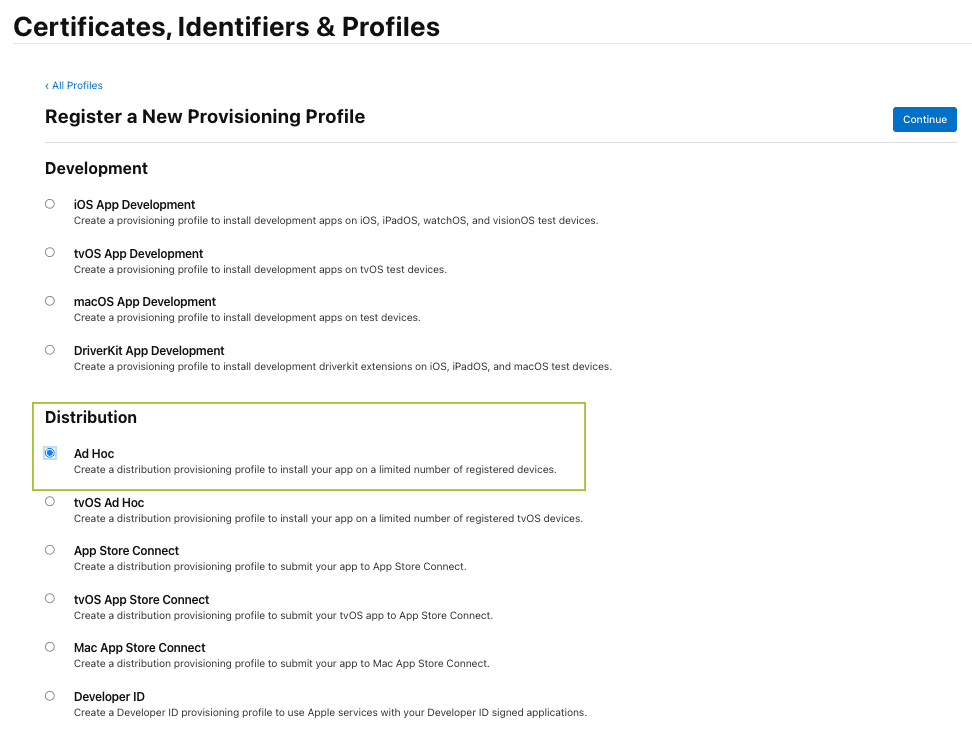
5. Create a Provisioning Profile
- Log into your Developer Portal account,
- Click on the Profiles tab.
- Click on the blue + sign button.
- Scroll down to the Distribution section.
- For an individual account, select Ad Hoc, and for an enterprise account, select In-House.
- Click Continue.
IMPORTANT: If you plan to fuse your app with a third-party EMM SDK on the Appdome platform, you will need an Enterprise Account to have unlimited devices. Individual Developer accounts can create an Ad Hoc Distribution certificate for proof of concept for small organizations.
Register Devices for Ad Hoc Distribution
If you choose Ad Hoc Distribution from either account type, the distribution of the app is limited to a list of registered 100 iPhones, 100 iPads, and 100 iPod Touches. Registering each device will require adding its Devices Unique Device Identifier (UDID) to the device list included in the provisioning profile. You can obtain the UDID for a device using Xcode or by web browsing from your device with Safari to https://get.udid.io, which allows you to email the result.
- Open Xcode
- Select Window > Devices from the top menu bar. If your device is connected to your Mac, you can select it to view its 40-digit identifier.
Registering devices can be done one at a time or by importing a list of devices.
- Open your developer.apple.com account.
- Click on the Devices tab.
- Click on the blue plus sign.
- Register Device
- Enter the Device Name and the Device ID (UDID)
- Click Continue.
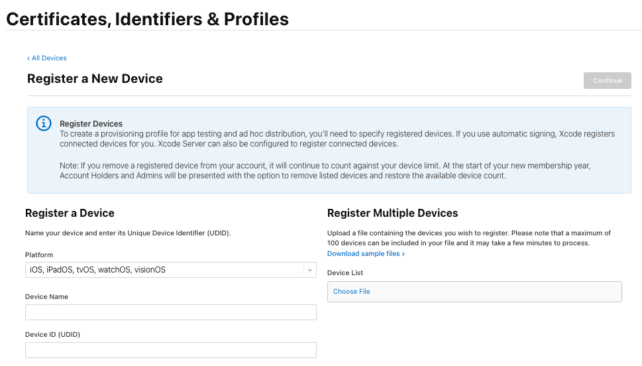
- Register Multiple Device – In order to register multiple devices, you can retrieve the format for a multiple register upload file by clicking on the Download sample files.

- Select the App ID that was created earlier.
- Click Continue.
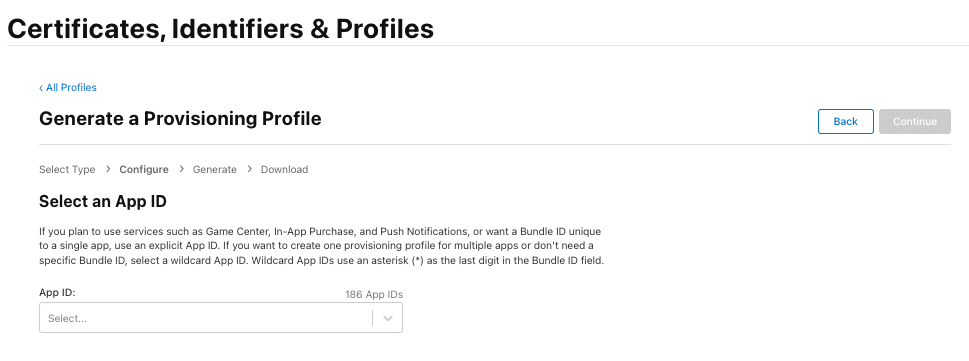
- Select the Production iOS Distribution Certificate that was created earlier.
IMPORTANT: If you have multiple distribution certificates, ensure you note the one you select here. You will need the P12 file containing the selected certificate as well as the private key to sign the app.
- If you are creating an Ad Hoc provisioning profile, you will need to select the Device list for permitted devices. The in-house provisioning profile will not prompt you to select a device list.
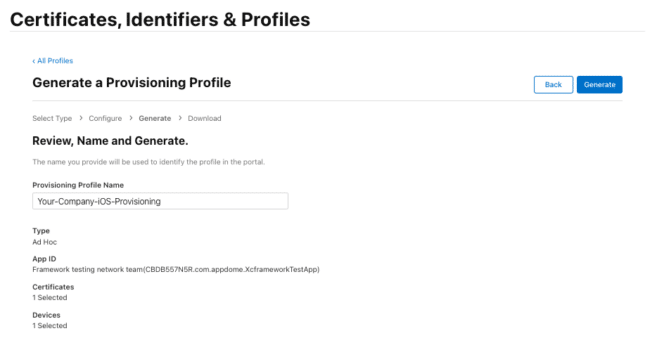
- Enter a name for the profile: Your-Company-iOS-Provisioning
- Click Generate
- Download the newly created provisioning profile.
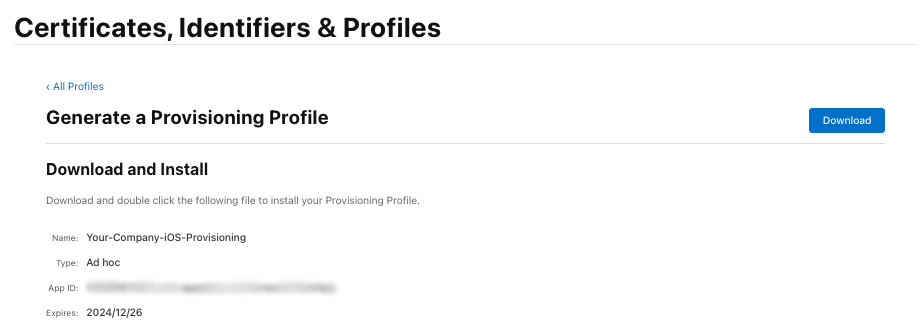
Congratulations! You now have a provisioning profile and are ready to sign your iOS apps.
After Creating Signing Credentials for signing iOS apps:
Now, you are all set to fuse, sign, and deploy apps on Appdome. For information, please read the knowledge base articles on:
- How do I fuse iOS apps on Appdome?
- How do I sign iOS apps on Appdome?
- How do I deploy iOS apps on Appdome?
How Do I Learn More?
If you have any questions, please send them our way at support.appdome.com or via the chat window on the Appdome platform.
Thank you!
Thanks for visiting Appdome! Our mission is to secure every app on the planet by making mobile app security easy. We hope we’re living up to the mission with your project.