
How to Use ConfigID in MobileBOT™ Defense Using AI
This Knowledge Base article describes how to use Appdome’s AI in your CI/CD pipeline to continuously deliver plugins that Use ConfigID in Mobile apps.
What is ConfigID?
ConfigID is a MobileBOT™ Defense capability that automatically includes a unique configuration identifier in the protected payload. The ConfigID allows backend services to identify the specific encryption and integrity keys used to generate each payload, enabling accurate payload validation across different application versions and security configurations.
How Appdome Protects Mobile Apps with ConfigID
Appdome automatically generates and includes a unique ConfigID in every protected MobileBOT™ Defense payload. Backend services and Web Application Firewalls (WAFs) can use this identifier to determine which encryption and integrity keys should be used to validate the received payload.
By associating each payload with its corresponding security configuration, ConfigID enables organizations to support multiple application versions and security configurations simultaneously without disrupting payload validation or backend processing.
Prerequisites for Using Appdome's ConfigID Plugins:
To use Appdome’s mobile app security build system to Use ConfigID , you’ll need:
- Appdome account (create a free Appdome account here)
- A license for ConfigID
- Mobile App (.ipa for iOS, or .apk or .aab for Android)
- Signing Credentials (see Signing Secure Android apps and Signing Secure iOS apps)
How to Implement Use ConfigID in Mobile Apps Using Appdome
On Appdome, follow these simple steps to create self-defending Mobile Apps that Use ConfigID without an SDK or gateway:
-
Designate the Mobile App to be protected.
-
Upload an app via the Appdome Mobile Defense platform GUI or via Appdome’s DEV-API or CI/CD Plugins.
-
Mobile App Formats: .ipa for iOS, or .apk or .aab for Android
-
ConfigID is compatible with: Obj-C, Java, JS, C#, C++, Swift, Kotlin, Flutter, React Native, Unity, Xamarin, and more.
-
-
Select the defense: ConfigID.
-
-
Follow the steps in Sections 2.2-2.2.2 of this article to add the ConfigID feature to your Fusion Set via the Appdome Console.
-
When you enable API Protection you'll notice that the Fusion Set you created in step 2.1 now bears the icon of the protection category that contains ConfigID.

Figure 2: Fusion Set that displays the newly added ConfigID protection
Note: Annotating the Fusion Set to identify the protection(s) selected is optional only (not mandatory). -
Open the Fusion Set Detail Summary by clicking the “...” symbol on the far-right corner of the Fusion Set. Copy the Fusion Set ID from the Fusion Set Detail Summary (as shown below):
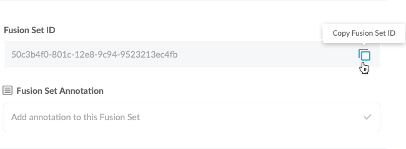
Figure 3: Fusion Set Detail Summary
-
Follow the instructions below to use the Fusion Set ID inside any standard mobile DevOps or CI/CD toolkit like Bitrise, Jenkins, Travis, Team City, Circle CI or other system:
-
Refer to the Appdome API Reference Guide for API building instructions.
-
Look for sample APIs in Appdome’s GitHub Repository.
-
Create and name the Fusion Set (security template) that will contain the ConfigID feature as shown below:
Figure 1: Fusion Set that will contain the ConfigID feature
-
-
Add the ConfigID feature to your security template.
-
Navigate to Build > API & Bot Protection tab > MobileBOT™ Defense section in the Appdome Console.
-
Toggle On API Protection > ConfigID.
Note: The checkmark feature ConfigID is enabled by default, as shown below.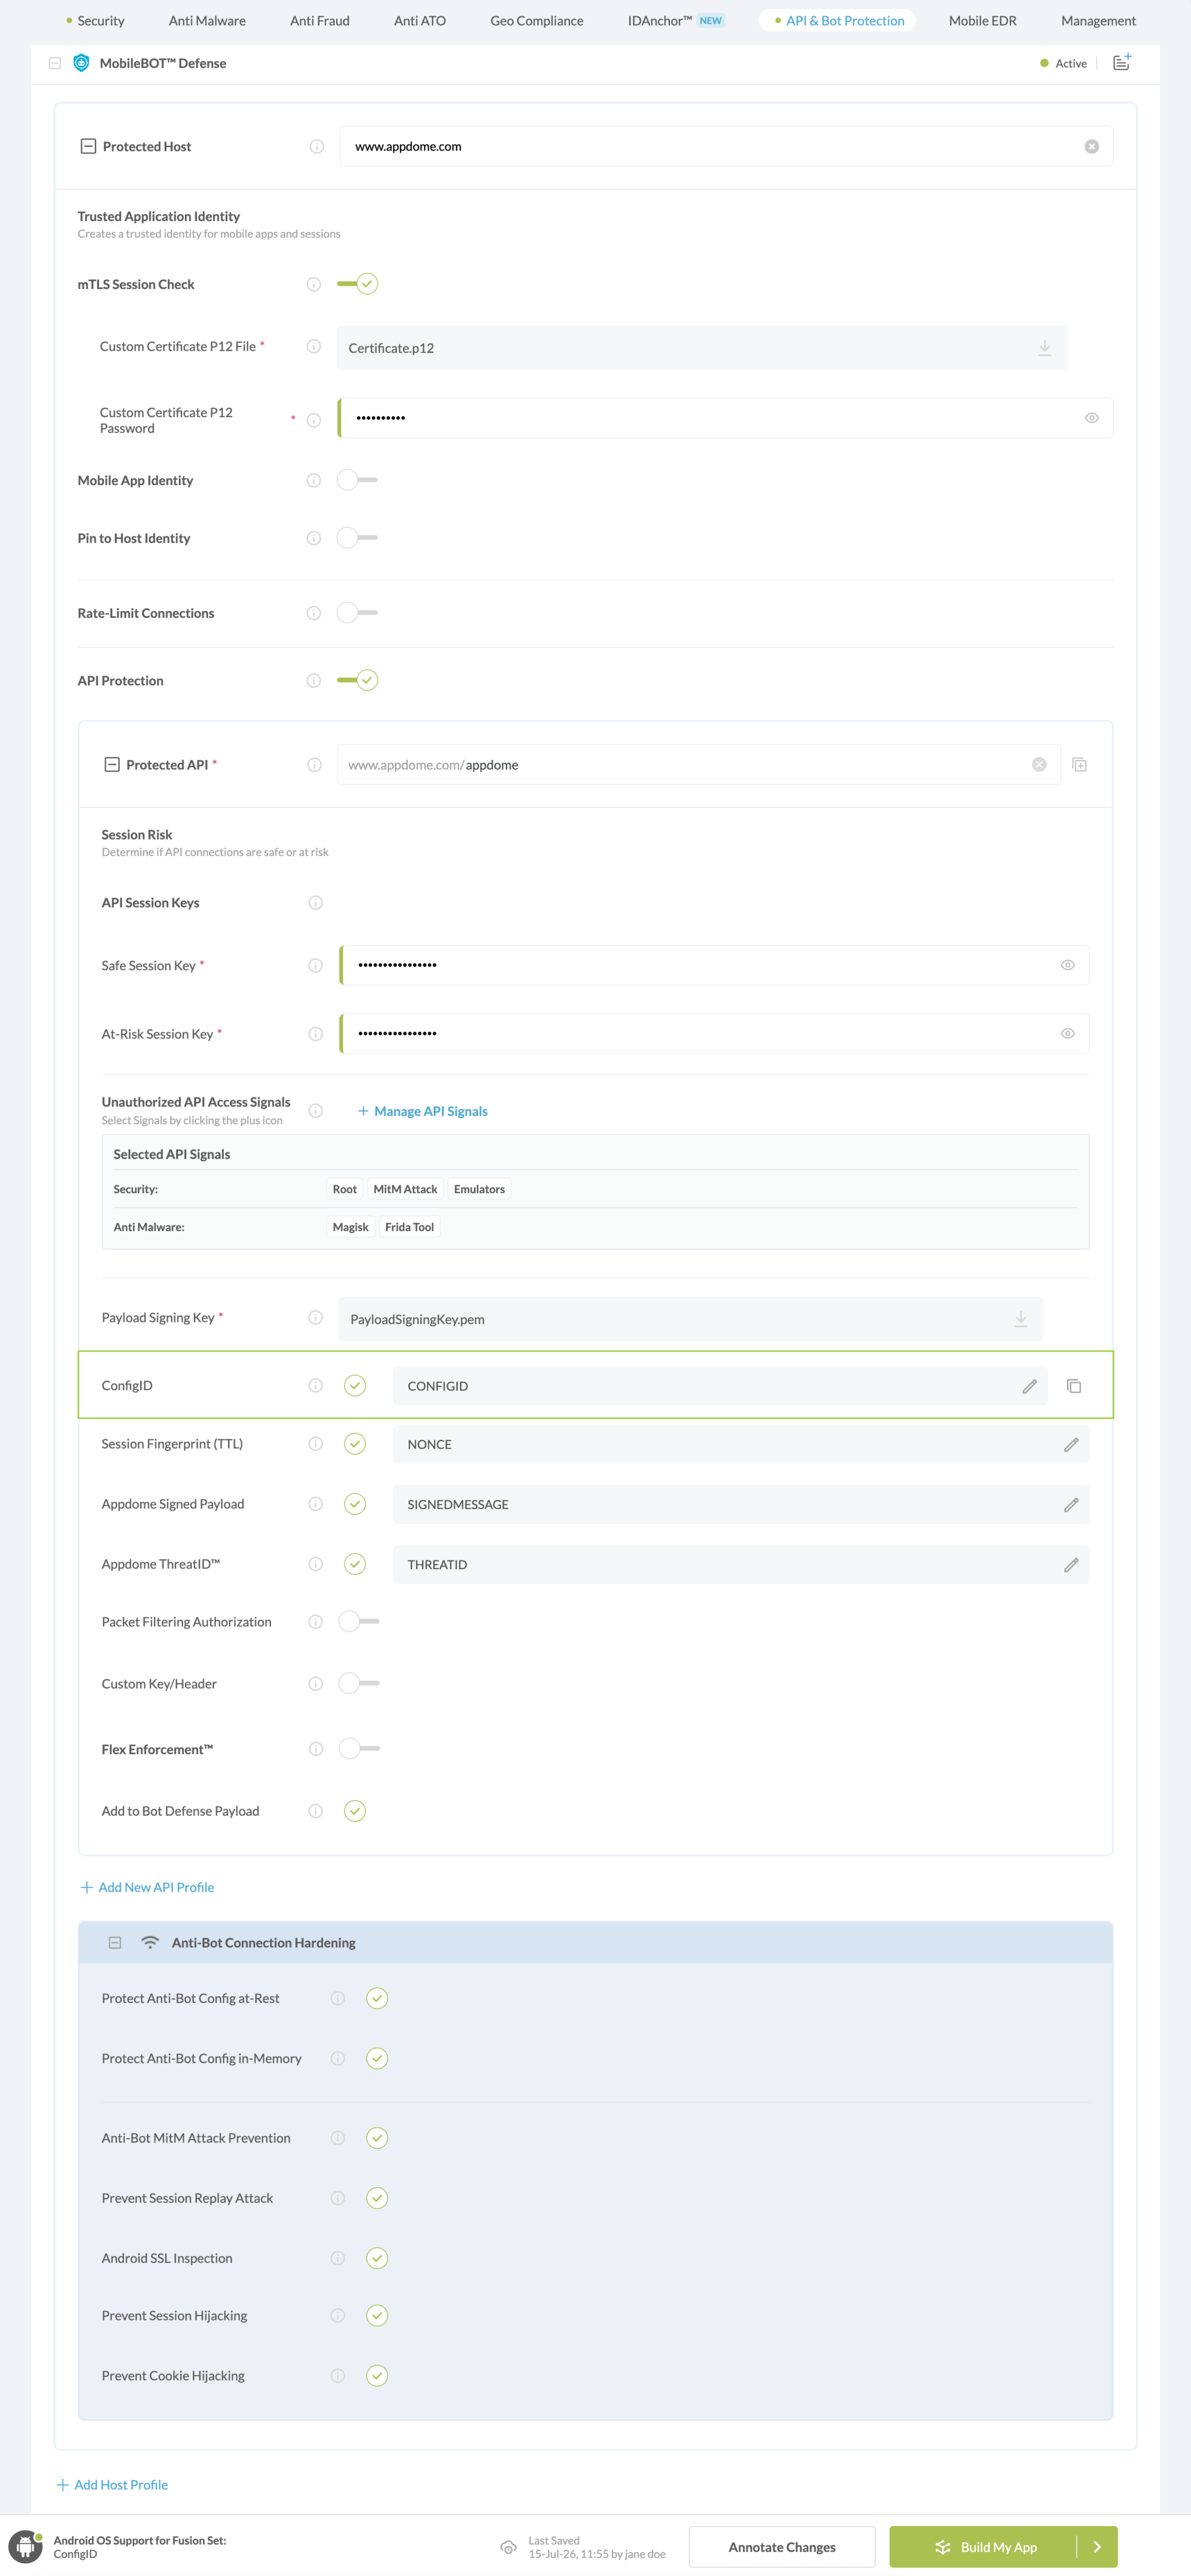
Figure 4: Selecting Use ConfigID
-
Congratulations! The ConfigID protection is now added to the mobile app -
-
Certify the ConfigID feature in Mobile Apps
After building ConfigID, Appdome generates a Certified Secure™ certificate to guarantee that the ConfigID protection has been added and is protecting the app. To verify that the ConfigID protection has been added to the mobile app, locate the protection in the Certified Secure™ certificate as shown below:
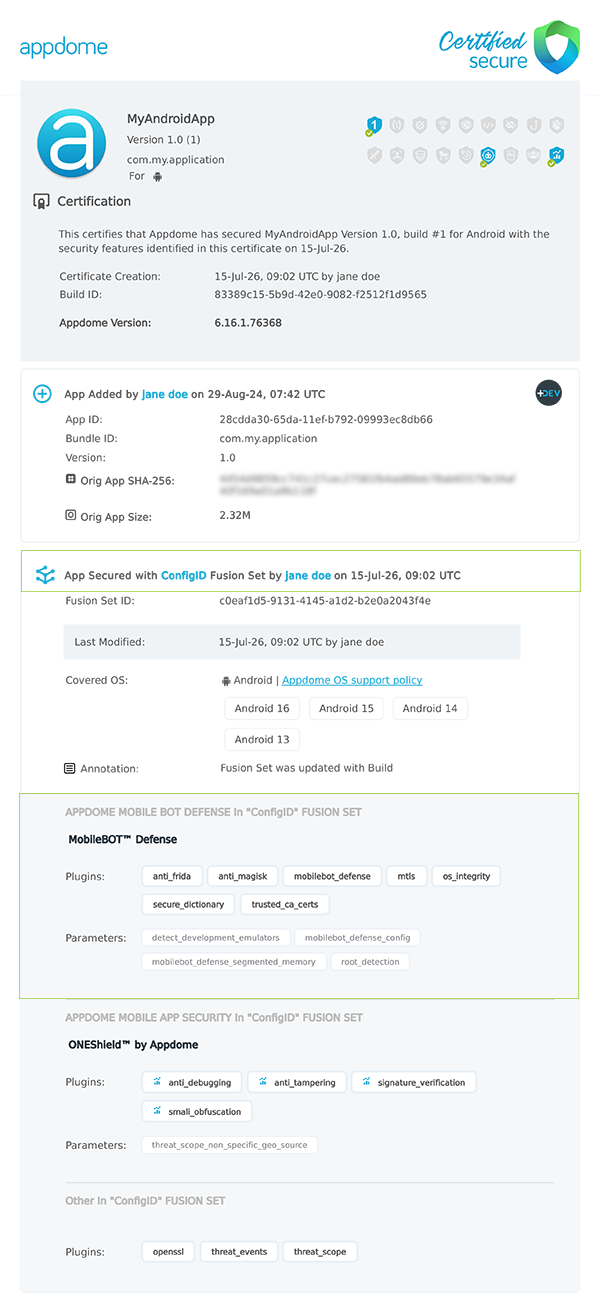
Figure 5: Certified Secure™ certificate
Each Certified Secure™ certificate provides DevOps and DevSecOps organizations the entire workflow summary, audit trail of each build, and proof of protection that ConfigID has been added to each Mobile app. Certified Secure provides instant and in-line DevSecOps compliance certification that ConfigID and other mobile app security features are in each build of the mobile app.
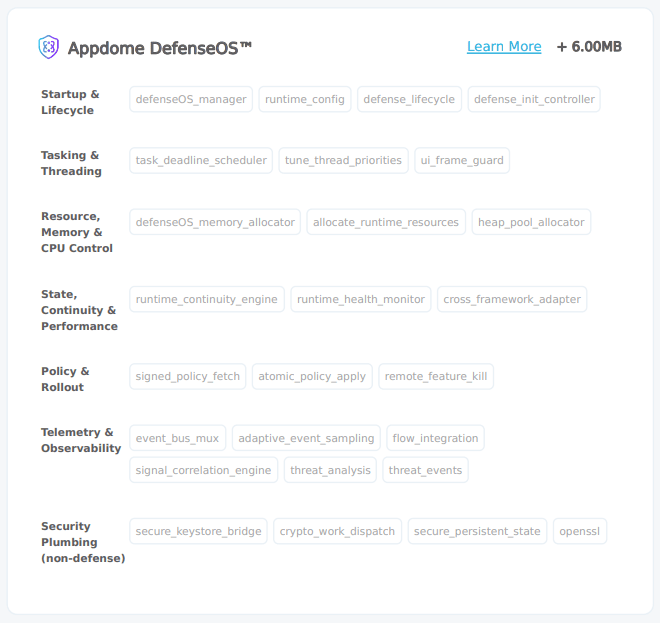
Figure 6: DefenseOS™
DefenseOS™ manages and coordinates Appdome defense capabilities in protected mobile apps. To learn more about DefenseOS and its runtime modules, see Understanding DefenseOS™.
Using Threat-Events™ for ConfigID Intelligence and Control in Mobile Apps
Appdome Threat-Events™ provides consumable in-app mobile app attack intelligence and defense control when ConfigID is detected. To consume and use Threat-Events™ for ConfigID in Mobile Apps, use AddObserverForName in Notification Center, and the code samples for Threat-Events™ for ConfigID shown below.
The specifications and options for Threat-Events™ for ConfigID are:
| Threat-Event™ Elements | Use ConfigID Method Detail |
|---|---|
| Appdome Feature Name | ConfigID |
| Threat-Event Mode | |
| OFF, IN-APP DEFENSE | Appdome detects, defends and notifies user (standard OS dialog) using customizable messaging. |
| ON, IN-APP DETECTION | Appdome detects the attack or threat and passes the event in a standard format to the app for processing (app chooses how and when to enforce). |
| ON, IN-APP DEFENSE | Uses Appdome Enforce mode for any attack or threat and passes the event in a standard format to the app for processing (gather intel on attacks and threats without losing any protection). |
| Certified Secure™ Threat Event Check | x |
| Visible in ThreatScope™ | x |
| Developer Parameters for Using ConfigID Threat-Event™ | |
| Threat-Event NAME | |
| Threat-Event DATA | reasonData |
| Threat-Event CODE | reasonCode |
| Threat-Event SCORE | |
| currentThreatEventScore | Current Threat-Event score |
| threatEventsScore | Total Threat-events score |
| Threat-Event Context Keys | |
|---|---|
| Timestamp | The exact time the threat event was triggered, recorded in milliseconds since epoch |
| message | Message displayed for the user on event |
| externalID | The external ID of the event which can be listened via Threat Events |
| osVersion | OS version of the current device |
| deviceModel | Current device model |
| deviceManufacturer | The manufacturer of the current device |
| fusedAppToken | The task ID of the Appdome fusion of the currently running app |
| kernelInfo | Info about the kernel: system name, node name, release, version and machine. |
| carrierPlmn | PLMN of the device. Only available for Android devices. |
| deviceID | Current device ID |
| reasonCode | Reason code of the occurred event |
| deviceBrand | Brand of the device |
| deviceBoard | Board of the device |
| buildUser | Build user |
| buildHost | Build host |
| sdkVersion | Sdk version |
| threatCode | The last six characters of the threat code specify the OS, allowing the Threat Resolution Center to address the attack on the affected device. |
With Threat-Events™ enabled (turned ON), Mobile developers can get detailed attack intelligence and granular defense control in Mobile applications and create amazing user experiences for all mobile end users when ConfigID is detected.
The following is a code sample for native Mobile apps, which uses all values in the specification above for ConfigID:
Important! Replace all placeholder instances of <Context Key> with the specific name of your threat event context key across all language examples. This is crucial to ensure your code functions correctly with the intended event data. For example, The <Context Key> could be the message, externalID, OS Version, reason code, etc.
xxxxxxxxxxIntentFilter intentFilter = new IntentFilter();intentFilter.addAction("");BroadcastReceiver threatEventReceiver = new BroadcastReceiver() { public void onReceive(Context context, Intent intent) { String message = intent.getStringExtra("message"); // Message shown to the user String reasonData = intent.getStringExtra("reasonData"); // Threat detection cause String reasonCode = intent.getStringExtra("reasonCode"); // Event reason code // Current threat event score String currentThreatEventScore = intent.getStringExtra("currentThreatEventScore"); // Total threat events score String threatEventsScore = intent.getStringExtra("threatEventsScore"); // Replace '<Context Key>' with your specific event context key // String variable = intent.getStringExtra("<Context Key>"); // Your logic goes here (Send data to Splunk/Dynatrace/Show Popup...) }};if (Build.VERSION.SDK_INT >= Build.VERSION_CODES.TIRAMISU) { registerReceiver(threatEventReceiver, intentFilter, Context.RECEIVER_NOT_EXPORTED);} else { registerReceiver(threatEventReceiver, intentFilter);}xxxxxxxxxxval intentFilter = IntentFilter()intentFilter.addAction("")val threatEventReceiver = object : BroadcastReceiver() { override fun onReceive(context: Context?, intent: Intent?) { var message = intent?.getStringExtra("message") // Message shown to the user var reasonData = intent?.getStringExtra("reasonData") // Threat detection cause var reasonCode = intent?.getStringExtra("reasonCode") // Event reason code // Current threat event score var currentThreatEventScore = intent?.getStringExtra("currentThreatEventScore") // Total threat events score var threatEventsScore = intent?.getStringExtra("threatEventsScore") // Replace '<Context Key>' with your specific event context key // var variable = intent?.getStringExtra("<Context Key>") // Your logic goes here (Send data to Splunk/Dynatrace/Show Popup...) }}if (Build.VERSION.SDK_INT >= Build.VERSION_CODES.TIRAMISU) { registerReceiver(threatEventReceiver, intentFilter, Context.RECEIVER_NOT_EXPORTED)} else { registerReceiver(threatEventReceiver, intentFilter)}x
let center = NotificationCenter.defaultcenter.addObserver(forName: Notification.Name(""), object: nil, queue: nil) { (note) in guard let usrInf = note.userInfo else { return } let message = usrInf["message"]; // Message shown to the user let reasonData = usrInf["reasonData"]; // Threat detection cause let reasonCode = usrInf["reasonCode"]; // Event reason code // Current threat event score let currentThreatEventScore = usrInf["currentThreatEventScore"]; // Total threat events score let threatEventsScore = usrInf["threatEventsScore"]; // Replace '<Context Key>' with your specific event context key // let variable = usrInf["<Context Key>"]; // Your logic goes here (Send data to Splunk/Dynatrace/Show Popup...)}xxxxxxxxxx[[NSNotificationCenter defaultCenter] addObserverForName: @"" object:nil queue:nil usingBlock:^(NSNotification *org_note) { __block NSNotification *note = org_note; dispatch_async(dispatch_get_main_queue(), ^(void) { // Message shown to the user NSString *message = [[note userInfo] objectForKey:@"message"]; // Threat detection cause NSString *reasonData = [[note userInfo] objectForKey:@"reasonData"]; // Event reason code NSString *reasonCode = [[note userInfo] objectForKey:@"reasonCode"]; // Current threat event score NSString *currentThreatEventScore = [[note userInfo] objectForKey:@"currentThreatEventScore"]; // Total threat events score NSString *threatEventsScore = [[note userInfo] objectForKey:@"threatEventsScore"]; // Replace '<Context Key>' with your specific event context key // NSString *variable = [[note userInfo] objectForKey:@"<Context Key>"]; // Your logic goes here (Send data to Splunk/Dynatrace/Show Popup...) });}];xxxxxxxxxxconst { ADDevEvents } = NativeModules;const aDDevEvents = new NativeEventEmitter(ADDevEvents);function registerToDevEvent(action, callback) { NativeModules.ADDevEvents.registerForDevEvent(action); aDDevEvents.addListener(action, callback);}export function registerToAllEvents() { registerToDevEvent( "", (userinfo) => Alert.alert(JSON.stringify(userinfo)) var message = userinfo["message"] // Message shown to the user var reasonData = userinfo["reasonData"] // Threat detection cause var reasonCode = userinfo["reasonCode"] // Event reason code // Current threat event score var currentThreatEventScore = userinfo["currentThreatEventScore"] // Total threat events score var threatEventsScore = userinfo["threatEventsScore"] // Replace '<Context Key>' with your specific event context key // var variable = userinfo["<Context Key>"] // Your logic goes here (Send data to Splunk/Dynatrace/Show Popup...) );}x
RegisterReceiver(new ThreatEventReceiver(), new IntentFilter("")); class ThreatEventReceiver : BroadcastReceiver{ public override void OnReceive(Context context, Intent intent) { // Message shown to the user String message = intent.GetStringExtra("message"); // Threat detection cause String reasonData = intent.GetStringExtra("reasonData"); // Event reason code String reasonCode = intent.GetStringExtra("reasonCode"); // Current threat event score String currentThreatEventScore = intent.GetStringExtra("currentThreatEventScore"); // Total threat events score String threatEventsScore = intent.GetStringExtra("threatEventsScore"); // Replace '<Context Key>' with your specific event context key // String variable = intent.GetStringExtra("<Context Key>"); // Your logic goes here (Send data to Splunk/Dynatrace/Show Popup...) }}x
NSNotificationCenter.DefaultCenter.AddObserver( (NSString)"", // Threat-Event Identifier delegate (NSNotification notification) { // Message shown to the user var message = notification.UserInfo.ObjectForKey("message"); // Threat detection cause var reasonData = notification.UserInfo.ObjectForKey("reasonData"); // Event reason code var reasonCode = notification.UserInfo.ObjectForKey("reasonCode"); // Current threat event score var currentThreatEventScore = notification.UserInfo.ObjectForKey("currentThreatEventScore"); // Total threat events score var threatEventsScore = notification.UserInfo.ObjectForKey("threatEventsScore"); // Replace '<Context Key>' with your specific event context key // var variable = notification.UserInfo.ObjectForKey("<Context Keys>"); // Your logic goes here (Send data to Splunk/Dynatrace/Show Popup...) });xxxxxxxxxxwindow.broadcaster.addEventListener("", function(userInfo) { var message = userInfo.message // Message shown to the user var reasonData = userInfo.reasonData // Threat detection cause var reasonCode = userInfo.reasonCode // Event reason code // Current threat event score var currentThreatEventScore = userInfo.currentThreatEventScore // Total threat events score var threatEventsScore = userInfo.threatEventsScore // Replace '<Context Key>' with your specific event context key // var variable = userInfo.<Context Keys> // Your logic goes here (Send data to Splunk/Dynatrace/Show Popup...)});x
import 'dart:async';import 'package:flutter/material.dart';import 'package:flutter/services.dart';class PlatformChannel extends StatefulWidget { const PlatformChannel({super.key}); State<PlatformChannel> createState() => _PlatformChannelState();}class _PlatformChannelState extends State<PlatformChannel> { // Replace with your EventChannel name static const String _eventChannelName = ""; static const EventChannel _eventChannel = EventChannel(_eventChannelName); void initState() { super.initState(); _eventChannel.receiveBroadcastStream().listen(_onEvent, onError: _onError); } void _onEvent(Object? event) { setState(() { // Adapt this section based on your specific event data structure var eventData = event as Map; // Example: Accessing 'externalID' field from the event var externalID = eventData['externalID']; // Customize the rest of the fields based on your event structure String message = eventData['message']; // Message shown to the user String reasonData = eventData['reasonData']; // Threat detection cause String reasonCode = eventData['reasonCode']; // Event reason code // Current threat event score String currentThreatEventScore = eventData['currentThreatEventScore']; // Total threat events score String threatEventsScore = eventData['threatEventsScore']; // Replace '<Context Key>' with your specific event context key // String variable = eventData['<Context Keys>']; }); } // Your logic goes here (Send data to Splunk/Dynatrace/Show Popup...)}Using Appdome, there are no development or coding prerequisites to build secured Mobile Apps by using ConfigID. There is no SDK and no library to code or implement in the app and no gateway to deploy in your network. All protections are built into each app and the resulting app is self-defending and self-protecting.
Releasing and Publishing Mobile Apps with ConfigID
After successfully securing your app by using Appdome, there are several available options to complete your project, depending on your app lifecycle or workflow. These include:
- Customizing, Configuring & Branding Secure Mobile Apps.
- Deploying/Publishing Secure mobile apps to Public or Private app stores.
- Releasing Secured Android & iOS Apps built on Appdome.
Related Articles:
- How to Use API Protection in MobileBOT™ Defense Using AI
- How to Use AppID In MobileBOT™ Defense
- How to Use Payload Timestamp with MobileBOT™ Defense Using AI
- How to Validate Session Fingerprint (TTL) with Appdome’s MobileBOT™ Defense Using AI
- How to Use Appdome Signed Payload with MobileBOT™ Defense Using AI
How Do I Learn More?
If you have any questions, please send them our way at support.appdome.com or via the chat window on the Appdome platform.
Thank you!
Thanks for visiting Appdome! Our mission is to secure every app on the planet by making mobile app security easy. We hope we’re living up to the mission with your project.